

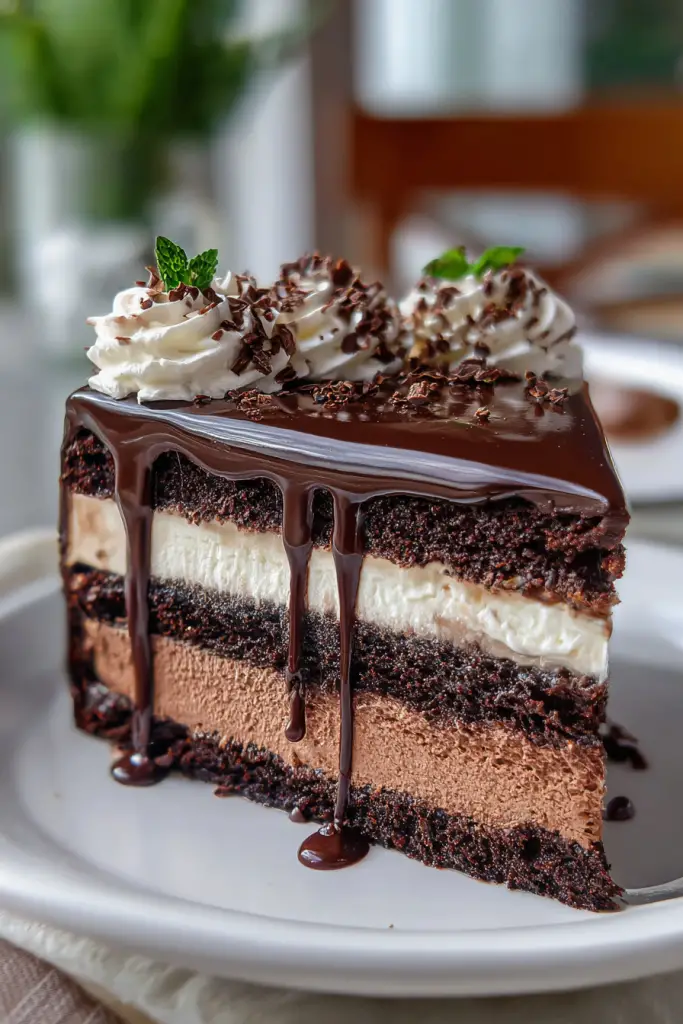
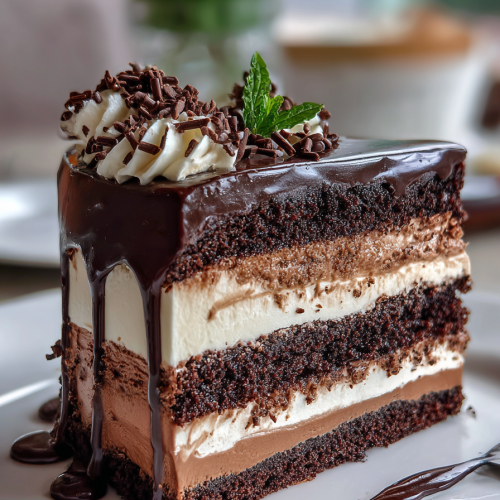
I’ve been perfecting this stunning Chocolate Tuxedo Cake for over a decade, and it never fails to steal the show at every gathering. This isn’t just any ordinary chocolate cake – it’s a sophisticated three-layer masterpiece that combines rich dark chocolate cake with silky white chocolate mousse, decadent dark chocolate mousse, and a glossy ganache finish that looks like it came straight from a high-end bakery. The contrast of dark and white chocolate creates that classic “tuxedo” appearance that’s absolutely breathtaking.
This Cake Will Transform Your Special Occasions
What makes this Chocolate Tuxedo Cake so special isn’t just its stunning appearance – it’s the incredible harmony of flavors and textures. Each bite delivers moist, rich chocolate cake paired with cloud-like mousses that literally melt on your tongue. I love how this recipe allows me to prepare components ahead of time, making it perfect for dinner parties and celebrations. The combination of dark cocoa powder and instant espresso creates an intensely chocolatey base, while the dual mousses add elegance that never fails to impress my guests.
What You’ll Need to Create This Masterpiece
Prep Time: 45 minutes | Cook Time: 30-35 minutes | Total Time: 5 hours (including chilling) | Servings: 12-14 | Difficulty: Intermediate
For the Chocolate Cake Layers:
| Ingredient | Quantity | Notes |
|---|---|---|
| All-purpose flour | 2¼ cups | Sifted for best texture |
| Granulated sugar | 2½ cups | |
| Dark cocoa powder | ¾ cup | Dutch-processed preferred |
| Baking powder | 2½ tsp | Fresh for proper rise |
| Salt | 1 tsp | For flavor balance |
| Unsalted butter | 1 cup + 2 tbsp | Room temperature |
| Egg whites | 1 cup (about 7 large eggs) | Room temperature |
| Buttermilk | 1½ cups | Room temperature |
| Vegetable oil | 2 tbsp | For moisture |
| Vanilla extract | 2 tsp | Pure vanilla recommended |
| Instant espresso powder | 1 tsp | Optional but recommended |
For the White Chocolate Mousse:
| Ingredient | Quantity | Notes |
|---|---|---|
| White chocolate chips | ¾ cup | High-quality white chocolate |
| Warm water | ⅓ cup | For melting chocolate |
| Heavy cream | 1⅓ cups | Cold, for whipping |
| Powdered sugar | 2 tbsp | For sweetness |
| Vanilla extract | ½ tsp | |
| Salt | ¼ tsp |
For the Dark Chocolate Mousse:
| Ingredient | Quantity | Notes |
|---|---|---|
| Dark chocolate chips | ½ cup | Use quality chocolate |
| Warm water | ⅓ cup | For melting chocolate |
| Heavy cream | 1 cup | Cold, for whipping |
| Powdered sugar | 2 tbsp | For sweetness |
| Salt | ¼ tsp |
For the Chocolate Ganache:
| Ingredient | Quantity | Notes |
|---|---|---|
| Dark chocolate chips | 1 cup + 1 tbsp | High-quality chocolate |
| Heavy cream | ¾ cup | For ganache |
| Unsalted butter | 2 tbsp | Room temperature |
| Corn syrup | 1 tbsp | For glossy shine |
| Salt | Pinch |
Let’s Create This Chocolate Masterpiece Together
Starting With The Perfect Chocolate Cake Base
I always begin by preheating my oven to 350°F and preparing three 9-inch round cake pans with butter and parchment paper circles on the bottom. This is crucial – you need three cake layers for the proper tuxedo effect shown in the photos.

In a large mixing bowl, I whisk together the all-purpose flour, sugar, dark cocoa powder, baking powder, and salt until well combined. In a separate bowl, I mix the room temperature butter, egg whites, buttermilk, vegetable oil, vanilla extract, and instant espresso powder (if using) until smooth. The key here is ensuring everything is at room temperature – this creates the smoothest batter and most even texture.
I gradually add the wet ingredients to the dry ingredients, mixing on low speed until just combined. Don’t overmix – a few small lumps are fine. The batter will be relatively thick and rich. I divide the batter evenly among the three prepared pans, using a kitchen scale for accuracy if possible. Each pan should have roughly the same amount of batter.
I bake the layers for 30-35 minutes, rotating the pans halfway through for even baking. The cakes are done when a toothpick inserted in the center comes out with just a few moist crumbs. I let them cool in the pans for 10 minutes, then turn them out onto wire racks to cool completely. This is essential – warm cake will melt the mousse during assembly.
Creating The Luxurious White Chocolate Mousse
While my cake layers cool completely, I prepare the white chocolate mousse. I place the white chocolate chips in a heatproof bowl and add the warm water. I melt this mixture over a double boiler or in the microwave in 20-second intervals, stirring until completely smooth and silky. I set this aside to cool to room temperature – if it’s too warm, it will deflate the whipped cream.
In a chilled bowl (I always pop mine in the freezer for 20 minutes along with the beaters), I whip the cold heavy cream with the powdered sugar, vanilla extract, and salt until soft to medium peaks form. The cream should hold its shape but still look glossy and smooth, not grainy.
Once the white chocolate mixture has cooled to room temperature, I gently fold it into the whipped cream using a rubber spatula. I use a folding motion rather than stirring to maintain the airiness. The mousse should be light, fluffy, and uniform in color. I cover this and refrigerate for at least 2 hours to firm up properly.
Making The Rich Dark Chocolate Mousse
The dark chocolate mousse follows the same technique. I melt the dark chocolate chips with the warm water, stirring until completely smooth. I let this cool to room temperature while I whip the cold heavy cream with the powdered sugar and salt until soft to medium peaks form.
I carefully fold the cooled dark chocolate mixture into the whipped cream, maintaining as much volume as possible. The result should be a light, airy mousse with intense chocolate flavor. I cover and refrigerate this for at least 2 hours alongside the white chocolate mousse.
Crafting The Glossy Ganache Finish
My ganache is what truly makes this cake restaurant-quality. I place the dark chocolate chips in a heatproof bowl. In a small saucepan, I heat the heavy cream over medium heat until it just begins to simmer around the edges – don’t let it boil. I pour the hot cream over the chocolate chips and let it sit undisturbed for 2 minutes. This allows the chocolate to melt gently.
After 2 minutes, I add the room temperature butter, corn syrup, and a pinch of salt. Starting from the center, I stir in slow circles, gradually working outward. This technique creates a smooth, glossy emulsion. The ganache should coat the back of a spoon when it’s ready. If it seems too thick, I add a tablespoon of warm cream. If it’s too thin, I let it cool for a few minutes. I let the ganache cool until it’s pourable but thick enough to create those beautiful drips – about 15-20 minutes at room temperature.
Assembly: Where The Magic Happens
This is the moment where your patience pays off. I make sure all components are properly chilled and ready. Using a long serrated knife, I level the tops of all three cake layers if they domed during baking. A flat surface is essential for stability.
I place the first cake layer on my serving plate or cake stand. If I’m worried about moving it later, I place strips of parchment paper under the edges to keep the plate clean during assembly – I can slide these out later.

I spread the entire portion of white chocolate mousse evenly over the first cake layer, creating a smooth, level surface about ¾ to 1 inch thick. I use an offset spatula for the smoothest application. The mousse should reach almost to the edges but not spill over.
I carefully place the second cake layer on top of the white mousse, pressing down very gently to adhere. Now I spread the entire portion of dark chocolate mousse over the second cake layer, again creating an even, smooth surface about ¾ to 1 inch thick.
I top the dark mousse with the third and final cake layer, pressing down gently. At this point, I have a three-layer cake with two mousse fillings. I place the entire assembled cake in the refrigerator for 30 minutes to firm up before adding the ganache. This step is crucial – it prevents the ganache from melting into the mousse.
After chilling, I pour the slightly cooled ganache over the top center of the cake. Using an offset spatula, I gently spread it toward the edges, letting it naturally drip down the sides. I don’t force the drips – they should flow naturally. The ganache should cover the top cake layer completely, creating that glossy, sophisticated finish.
For the final touch, I pipe decorative swirls of any leftover mousse on top, or I add chocolate shavings and a sprig of fresh mint as shown in the photos. I refrigerate the completed cake for at least 2 hours before serving to allow everything to set properly.
My Hard-Earned Tips for Chocolate Tuxedo Cake Success
After years of making this showstopper dessert, I’ve discovered some game-changing techniques. Always chill your mixing bowls and beaters in the freezer for 20 minutes before whipping cream – this creates the most stable, voluminous mousse. I weigh my dry ingredients rather than measuring by volume for consistent results every time. The instant espresso is completely optional, but it intensifies the chocolate flavor without adding coffee taste, which I absolutely love.
Temperature control is everything with this recipe. I let my cake layers cool completely before assembly, and I even pop them in the freezer for 15 minutes to make handling easier. The ganache needs to be the perfect consistency – it should coat a spoon but still pour smoothly. If it becomes too thick, I gently reheat it with a splash of cream.
When folding chocolate into whipped cream for the mousses, make sure the melted chocolate has cooled to room temperature. If it’s too warm, it will deflate the cream and create a grainy texture. Room temperature is the sweet spot where it incorporates smoothly without losing volume.
Getting Ahead: Your Time-Saving Strategy
This elegant cake is perfect for make-ahead entertaining, which is honestly one of my favorite aspects. I often bake the three cake layers on Friday evening and complete the assembly Saturday morning. The chocolate cake layers freeze beautifully for up to one month when wrapped tightly in plastic wrap and aluminum foil. Both mousses can be prepared up to three days in advance and stored covered in the refrigerator.
Once assembled, the entire cake stays fresh in the refrigerator for up to four days. For longer storage, I wrap the completed cake carefully and freeze it for up to six weeks. Just remember to thaw it overnight in the refrigerator before serving – this maintains the perfect texture of all the components.
Making This Recipe Your Own
Sometimes I substitute Greek yogurt for buttermilk when I’m out, and it works wonderfully – just thin it slightly with milk to match buttermilk’s consistency. The quality of chocolate really matters here, so I always use the best I can find. My gluten-free variation uses a cup-for-cup flour substitute with excellent results. For special occasions, I sometimes add a tablespoon of liqueur to the ganache – Grand Marnier or Kahlua both complement the chocolate beautifully.
Frequently Asked Questions
Can I make this cake completely ahead of time? Absolutely! The cake components can be made separately days in advance. Cake layers freeze for a month, mousses keep for 3 days refrigerated, and ganache stores for up to 2 weeks. Assemble the day before serving for best results.
How should I properly store this tuxedo cake? Store the completed cake covered in the refrigerator for up to 4 days. Use a cake dome or loosely tent with plastic wrap to prevent the ganache from absorbing refrigerator odors.
Why do I need three cake pans instead of two? The authentic tuxedo cake design requires three cake layers alternating with two mousse layers, topped with ganache. This creates the dramatic striped appearance shown in the photos. Two layers won’t achieve the same visual impact.
Can I substitute regular cocoa powder for dark cocoa powder? Yes, but dark cocoa powder provides a richer, more intense chocolate flavor and deeper color. Regular cocoa will work but creates a lighter, less dramatic result.
Why is it important to chill the mixing bowls for the mousse? Cold bowls help the cream whip faster and more stable peaks form. The cold temperature keeps the fat molecules firm, creating better texture and preventing the mousse from becoming grainy.
What’s the best way to achieve clean cake layers when cutting? Use a long, sharp serrated knife in a gentle sawing motion. Clean the blade between cuts, and slightly freezing the assembled cake for 30 minutes makes slicing much easier and neater.
Can I make this in different sized pans? Yes, but you’ll need to adjust baking times. For 8-inch pans, the layers will be taller and may need a few extra minutes. For a sheet cake version, you can bake in three 9×13 pans and cut rectangles for a simpler presentation.
Chocolate Tuxedo Cake
Ingredients
- Chocolate Cake Layers:
- 2¼ cups all-purpose flour sifted
- 2½ cups granulated sugar
- ¾ cup dark cocoa powder Dutch-processed preferred
- 2½ tsp baking powder fresh
- 1 tsp salt
- 1 cup + 2 tbsp unsalted butter room temperature
- 1 cup egg whites about 7 large eggs, room temperature
- 1½ cups buttermilk room temperature
- 2 tbsp vegetable oil
- 2 tsp vanilla extract pure
- 1 tsp instant espresso powder optional
- White Chocolate Mousse:
- ¾ cup white chocolate chips high-quality
- ⅓ cup warm water
- 1⅓ cups heavy cream cold
- 2 tbsp powdered sugar
- ½ tsp vanilla extract
- ¼ tsp salt
- Dark Chocolate Mousse:
- ½ cup dark chocolate chips quality chocolate
- ⅓ cup warm water
- 1 cup heavy cream cold
- 2 tbsp powdered sugar
- ¼ tsp salt
- Chocolate Ganache:
- 1 cup + 1 tbsp dark chocolate chips high-quality
- ¾ cup heavy cream
- 2 tbsp unsalted butter room temperature
- 1 tbsp corn syrup
- Pinch of salt
Instructions
- Prepare the Chocolate Cake Layers:
- Preheat oven to 350°F (175°C). Grease and line three 9-inch round cake pans with butter and parchment paper circles.
- In a large bowl, whisk together flour, sugar, cocoa powder, baking powder, and salt until well combined.
- In a separate bowl, mix butter, egg whites, buttermilk, vegetable oil, vanilla extract, and espresso powder (if using) until smooth.
- Gradually add wet ingredients to dry ingredients, mixing on low speed until just combined. Don’t overmix.
- Divide batter evenly among the three prepared pans (use a kitchen scale for accuracy).
- Bake for 30-35 minutes, rotating pans halfway through, until a toothpick inserted in center comes out with a few moist crumbs.
- Cool in pans for 10 minutes, then turn out onto wire racks to cool completely.
- Make the White Chocolate Mousse:
- Place white chocolate chips in a heatproof bowl and add warm water. Melt over double boiler or microwave in 20-second intervals, stirring until smooth. Cool to room temperature.
- Chill a mixing bowl and beaters in freezer for 20 minutes.
- In the chilled bowl, whip cold heavy cream with powdered sugar, vanilla extract, and salt until soft to medium peaks form.
- Gently fold cooled white chocolate mixture into whipped cream using a rubber spatula. Cover and refrigerate for at least 2 hours.
- Make the Dark Chocolate Mousse:
- Melt dark chocolate chips with warm water, stirring until completely smooth. Cool to room temperature.
- In a chilled bowl, whip cold heavy cream with powdered sugar and salt until soft to medium peaks form.
- Carefully fold cooled dark chocolate mixture into whipped cream. Cover and refrigerate for at least 2 hours.
- Prepare the Chocolate Ganache:
- Place dark chocolate chips in a heatproof bowl.
- Heat heavy cream in a saucepan over medium heat until it just begins to simmer around edges. Pour over chocolate chips.
- Let sit undisturbed for 2 minutes, then add butter, corn syrup, and salt.
- Stir from center outward in slow circles until smooth and glossy. Cool for 15-20 minutes until pourable but thick enough to create drips.
- Assemble the Cake:
- Level tops of all three cake layers with a serrated knife if they domed during baking.
- Place first cake layer on serving plate. Spread entire portion of white chocolate mousse evenly over top, about ¾ to 1 inch thick.
- Add second cake layer on top of white mousse, pressing gently. Spread entire portion of dark chocolate mousse evenly over this layer.
- Top with third cake layer, pressing gently. Refrigerate assembled cake for 30 minutes to firm up.
- Pour slightly cooled ganache over center of top cake layer. Use offset spatula to spread toward edges, letting it drip naturally down the sides.
- Decorate top with chocolate shavings, piped mousse swirls, or fresh mint if desired.
- Refrigerate for at least 2 hours before serving to allow everything to set properly.
Notes
Chilling is Essential: Don’t skip chilling the mixing bowls and beaters before whipping cream – this creates the most stable mousse. Also refrigerate the assembled cake before adding ganache to prevent melting.
Make-Ahead Tips: Cake layers can be baked up to 1 month ahead and frozen (wrapped tightly). Mousses can be made 3 days ahead and refrigerated. Ganache keeps for 2 weeks refrigerated.
Storage: Store completed cake covered in refrigerator for up to 4 days. Can be frozen for up to 6 weeks – thaw overnight in refrigerator.
Substitutions: Can substitute Greek yogurt thinned with milk for buttermilk. Use cup-for-cup gluten-free flour for gluten-free version. Add 1 tbsp liqueur (Grand Marnier or Kahlua) to ganache for adult version.
Serving Tip: For cleanest slices, freeze assembled cake for 30 minutes before cutting. Use a long serrated knife and clean blade between cuts.
Three Layers Required: This recipe makes THREE 9-inch cake layers – do not reduce to two as shown in some versions. The proper tuxedo effect requires three cake layers with two mousse layers between them.


Hi there. It looks like you make 2 cake layers and alternating cake-mousse-cake-mousse. This would mean the ganache is poured on the mouse? The pictures show 3 cake layers. I want to make this for a friend next week and am confused about the assembly.
Hi Tachelle! You’re absolutely right to be confused – I made an error in the assembly instructions. You actually need THREE cake layers, not two. The recipe should read: first cake layer, white chocolate mousse, second cake layer, dark chocolate mousse, third cake layer, then ganache on top.