

Okay, I need to be honest with you. I’m completely obsessed with this Jiffy Cornbread Casserole. It’s so ridiculously simple that I almost feel guilty calling it a “recipe.” But here’s the thing it takes maybe 10 minutes to throw together, and the results? Absolutely magical. We’re talking creamy, sweet corn heaven baked into the most tender cornbread you’ve ever tasted. This has become my secret weapon for family dinners. And trust me, everyone always asks for seconds.
The Day Everything Changed
Picture this: It’s 5 PM on a Tuesday.
I’m staring into my pantry with absolutely no dinner plan. My family’s going to be home in an hour. I’m scrambling.
All I had were a few random pantry staples. That’s when I spotted a dusty box of Jiffy mix shoved in the back. I figured, why not? Let’s experiment.
The result?
Pure. Comfort. Food. Magic.
What Makes This Casserole So Special?
Here’s the deal.
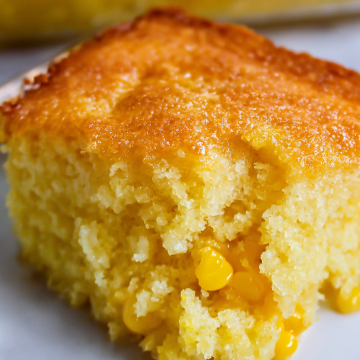
This isn’t your typical cornbread recipe. It’s like cornbread and corn pudding had a baby—and that baby is perfect.
The texture? Custardy and moist. You get these little bursts of sweet corn throughout. Every single bite hits that perfect balance between savory and sweet.
But the real beauty of this dish is how stupid-simple it is.
You literally dump everything into one pan. Stir. Bake.
That’s it.
- No fancy techniques required
- No complicated steps to memorize
- No culinary degree needed
Just straightforward cooking that somehow delivers restaurant-quality results.
I’ve served this at countless gatherings over the years. And you know what happens every single time? It disappears faster than anything else on the table.
Kids go crazy for the sweet, creamy texture. Adults love how it complements their main dish. And everyone—and I mean everyone—asks for the recipe.
Why I’m Not Apologizing for Using Jiffy Mix
Some people get all weird about using boxed mixes.
Not me.
Jiffy cornbread mix is a kitchen staple for good reason. It’s consistent. It’s affordable. And it delivers great flavor every single time.
Think about it this way: The mix already contains the perfect ratio of cornmeal, flour, and leavening agents. This means less measuring for you. Fewer ingredients cluttering your counter. And when I’m juggling three other dishes for a holiday meal? That convenience is priceless.
My Testing Journey (Or: How I Made This Casserole A Dozen Times)
Full transparency?
I’ve made this casserole at least 12 times now. Maybe more. I’ve tweaked it. Adjusted it. Obsessed over it.
I tested versions with eggs. Without eggs. Different sugar amounts. Various baking temperatures. The whole nine yards.
Here’s what I discovered:
The egg-free version creates the most luscious, custard-like texture. It’s incredible. Now, adding eggs makes it fluffier and more cake-like. Some people prefer that. Both versions taste fantastic.
But me? I’m team no-eggs all the way.
The sugar amount took some work too. I started with just a tablespoon. Too bland. Then I tried half a cup. Way too sweet. Three tablespoons? Perfect. It hits the sweet spot literally without overpowering the corn flavor.
You can adjust this based on your taste. But I highly recommend starting here.
When Should You Make This?
Listen, this casserole absolutely shines at holiday tables.
But don’t save it just for Thanksgiving or Christmas.
I make it on regular Tuesday nights because it comes together so quickly. It pairs beautifully with:
- A big pot of chili
- Roasted chicken
- Grilled meats
- Basically anything
The casserole also travels like a champ for potlucks. Just cover it with foil. Transport it in the baking dish. You can even reheat it right before serving if you need to.
Recipe Details
Prep Time: 10 minutes
Cook Time: 35-40 minutes
Total Time: 45-50 minutes
Servings: 8-10
Difficulty: Easy (seriously, if you can stir, you can make this)
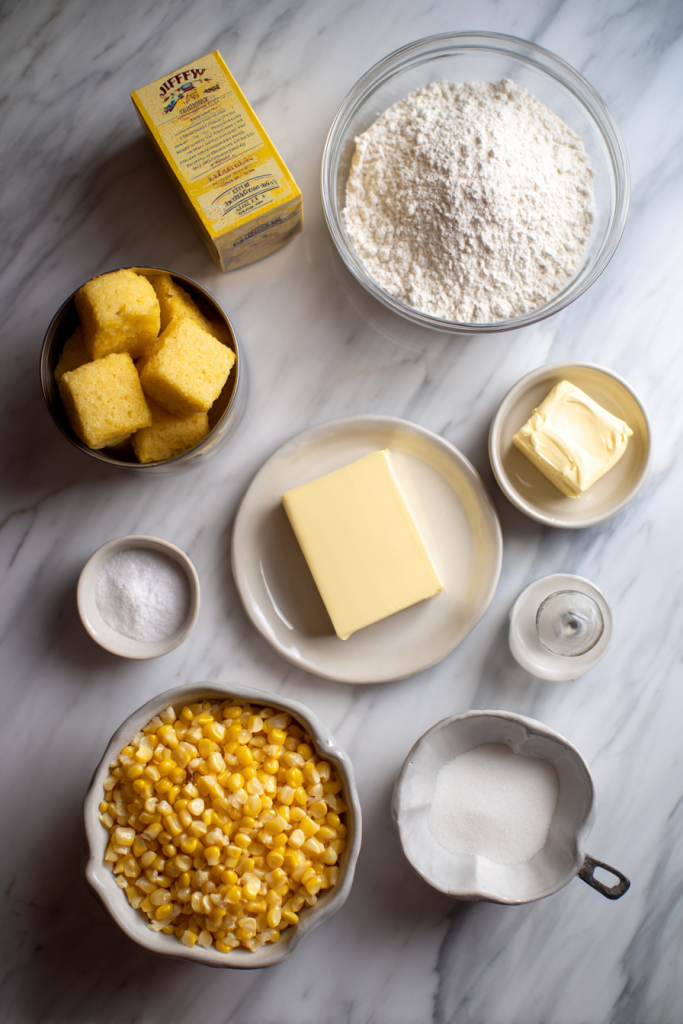
What You’ll Need
| Ingredient | Quantity | Notes |
|---|---|---|
| Butter | 1/2 cup (1 stick) | Melted in the baking dish |
| Whole kernel corn | 1 (15-oz) can | Drained completely |
| Creamed corn | 1 (15-oz) can | Use the entire can with liquid |
| Sour cream | 1 cup | Full-fat works best |
| Granulated sugar | 3 tablespoons | Adjust to taste |
| Kosher salt | 1/2 teaspoon | Enhances all flavors |
| Jiffy corn muffin mix | 1 (8-oz) box | The star ingredient |
How to Make This Magic Happen
The method is wonderfully straightforward.
You’ll do most of your work right in the baking dish. Which means minimal cleanup. (You’re welcome.)
Let me walk you through it step by step.
Step 1: Prepare Your Pan
First things first—preheat your oven to 350°F.
Grab an 8×8-inch or 9×9-inch baking dish. I personally prefer glass because it conducts heat evenly. But metal works fine too.
Now here’s a trick: Place your stick of butter directly in the baking dish. Pop it in the microwave for about 30-45 seconds until it’s completely melted.
Use a pastry brush or the back of a spoon to spread that butter up the sides. This does two things:
- Prevents sticking
- Creates those gorgeous golden edges everyone fights over
Step 2: Add the Corn
Open your can of whole kernel corn.
Drain it thoroughly. I usually press the lid down and hold the can upside down over the sink. Let it drain for a good 30 seconds. You want to get rid of as much liquid as possible.
Add the drained corn to your buttered pan.
Next, grab your creamed corn.
Important: Don’t drain this one!
The liquid adds moisture. It creates that signature creamy texture we’re going for. Pour the entire can into the dish.
Step 3: Mix in the Dairy and Seasonings
Scoop your sour cream into the pan.
The full-fat version gives you the richest results. But honestly? Reduced-fat will work if that’s what you have on hand.
Measure out your sugar and salt. Sprinkle both over the mixture.
Now, these seasonings might seem minimal. But they’re crucial. The sugar enhances the natural sweetness of the corn. The salt balances everything out and prevents the casserole from tasting flat.
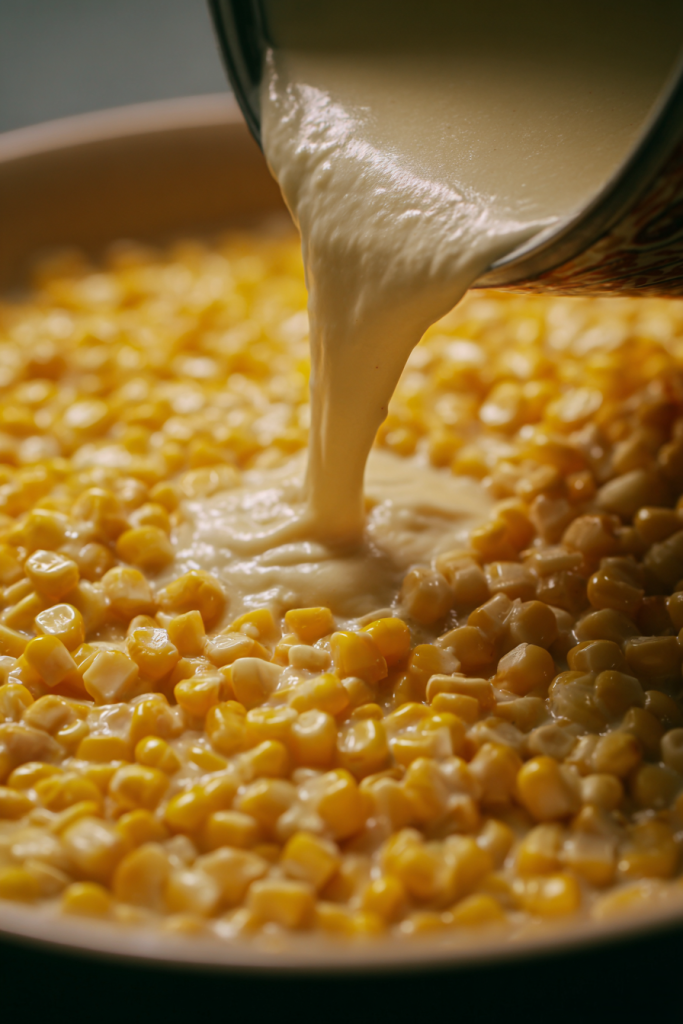
Step 4: Add the Jiffy Mix
Open your box of Jiffy corn muffin mix.
Pour it over everything in the pan.
Don’t worry about being precise. Don’t try to create fancy layers. We’re about to stir it all together anyway.
Step 5: Combine Everything
Using a sturdy spatula, stir everything together right in the pan.
Make sure you scrape the bottom. Get into those corners where butter likes to hide. Mix until you see no dry pockets of cornbread mix.
The batter will look lumpy and thick.
That’s exactly what you want.
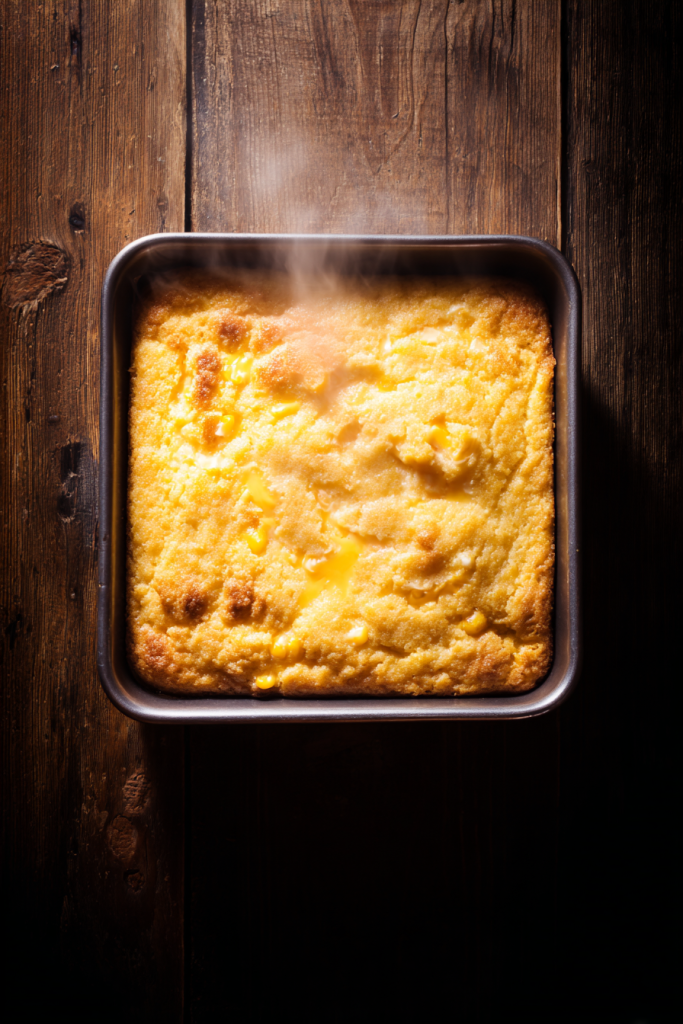
Step 6: Bake to Perfection
Slide your pan into the preheated oven.
Set a timer for 35 minutes. But stay flexible. Every oven runs a little differently.
You’ll know it’s done when:
- The edges turn golden brown
- The sides start pulling away slightly
- The center is set, not jiggly
Here’s a test I use: Gently shake the pan. The whole casserole should move as one piece. Not like a liquid.
For extra insurance? Use the toothpick test. Insert a toothpick into the center. It should come out with moist crumbs, not wet batter.
Pro Tips I’ve Learned the Hard Way
Tip 1: Is your casserole browning too quickly on top but still seems undercooked in the center?
Tent it loosely with aluminum foil for the last 10-15 minutes. Problem solved.
Tip 2: Let the casserole rest for 5-10 minutes after you pull it from the oven.
This allows it to set up. Makes serving so much easier. I learned this the hard way when I tried cutting into it immediately and everything just fell apart.
Tip 3: Use room temperature sour cream if you can.
Cold sour cream creates lumps that are harder to work out. Not a dealbreaker. Just annoying.
Tip 4: Want even deeper corn flavor?
Add an extra half can of creamed corn. Just reduce the baking time by about 5 minutes to compensate for the extra moisture.
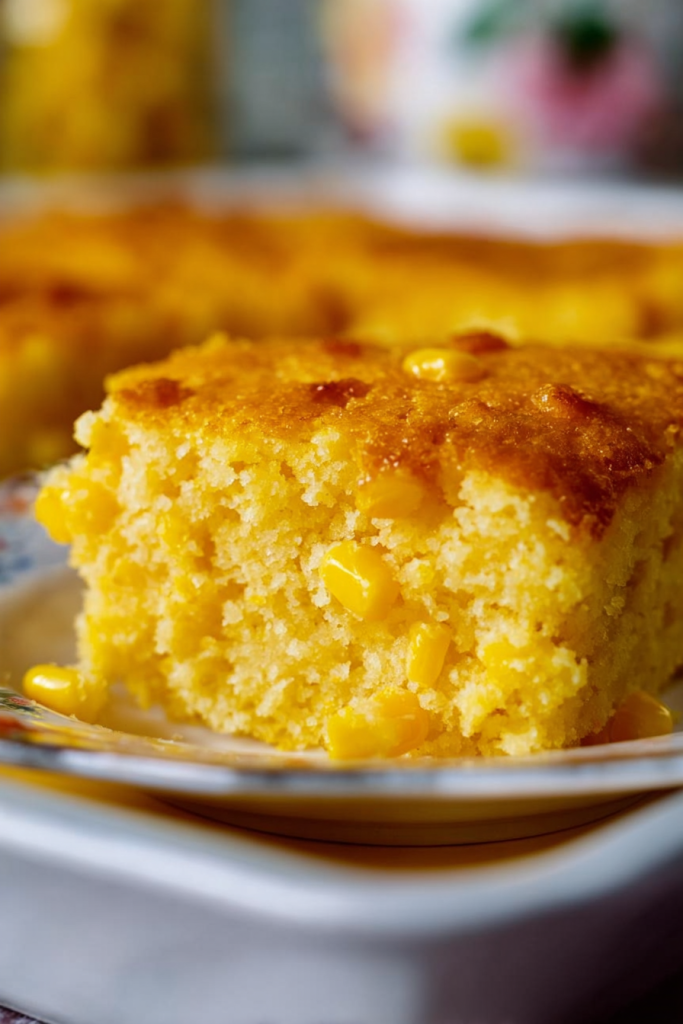
How I Like to Serve It
I serve this casserole warm, cut into generous squares.
A simple spatula works perfectly for portioning. The edges will be slightly crispy. The center stays wonderfully creamy. It’s this beautiful contrast of textures.
Feeling fancy? Consider garnishing with fresh herbs. A sprinkle of chopped chives or parsley adds a pop of color and freshness.

Make-Ahead Magic
This casserole is perfect for advance preparation.
You can assemble everything up to two days before you plan to serve it. Just cover the unbaked casserole tightly with plastic wrap. Stick it in the fridge.
When you’re ready to bake?
Remove it from the fridge. Let it sit at room temperature for about 15-20 minutes. Then bake as directed. Add an extra 5 minutes to account for the cold start.
Already baked it?
No problem. You can make the entire casserole a day ahead and reheat it before serving. Cover with foil. Warm in a 300°F oven for about 20 minutes.
Storage Guidelines (The Boring But Important Stuff)
Store leftover casserole in an airtight container in the refrigerator.
It will keep for 3-4 days. This dish doesn’t do well at room temperature. So refrigerate it within two hours of baking.
For reheating, I prefer the oven method. Cover portions with foil and warm at 300°F for 15-20 minutes.
The microwave works in a pinch. Heat individual portions for 45-90 seconds. Just know it won’t be quite as good.
Delicious Variations to Try
The basic recipe is fantastic.
But once you’ve made it a few times? Try these variations:
Cheesy Version: Stir in 1½ cups shredded cheddar cheese. Sprinkle another ½ cup on top before baking. Skip the extra sugar when adding cheese. The savory-sweet combo is incredible.
Spicy Kick: Add diced jalapeños or a can of diced green chiles. This pairs amazingly with chili or barbecue.
Extra Sweet: Increase sugar to ½ cup for a dessert-like casserole. Some people in the South swear by this version.
Cake-Style Texture: Add 2 beaten eggs for a fluffier, taller result. It’ll rise more in the oven and have a lighter crumb.
Perfect Pairings
This casserole complements so many dishes.
My favorite? Serve it alongside a big pot of chili. It’s the ultimate comfort meal. Especially on a cold night.
It also pairs beautifully with:
- Roasted chicken
- Pulled pork
- Grilled ribs
- Brisket
For holiday meals, it holds its own next to turkey, ham, and all the traditional sides. The sweet-savory profile balances richer, heavier dishes perfectly.
Your Questions Answered
Can I use a different cornbread mix instead of Jiffy?
Absolutely!
Look for any 8-ounce cornbread mix. The weight matters more than the brand.
Can’t find another brand? You can make a homemade substitute. Combine:
- ⅔ cup flour
- ½ cup cornmeal
- ⅓ cup sugar
- ½ tablespoon baking powder
- ½ teaspoon salt
- 2 tablespoons vegetable oil
Mix it together and use it just like you would Jiffy.
Why did my casserole turn out runny?
The most common reason?
Underbaking.
Different pans conduct heat differently. Oven temperatures vary. If your casserole seems too wet after the recommended time, keep baking in 5-minute increments until the center sets.
Cover with foil if the top is browning too quickly.
Can I make this in a slow cooker?
Yes!
Spray your slow cooker with cooking spray. Add all ingredients. Stir well. Cook on high for 2 hours or low for 3-4 hours.
This is amazing during the holidays when you need your oven for the turkey.
What’s the difference between this and corn pudding?
Great question.
Corn pudding contains many more eggs. Like, a lot more. This creates an ultra-light, soufflé-like texture.
This casserole is denser. More custardy. Less air, more substance. Both are delicious. They just serve different purposes.
Can I freeze leftovers?
I don’t recommend it.
The dairy and moisture content don’t thaw well. You’ll end up with a watery, separated texture. It’s just not good.
This casserole is best enjoyed fresh or refrigerated for a few days.
My Final Thoughts
This Jiffy Cornbread Casserole has earned its permanent spot in my recipe rotation.
It’s proof that simple ingredients can create something truly special. You don’t need fancy equipment. You don’t need expensive ingredients. You just need seven basic items and 45 minutes.
Whether you’re feeding your family on a random Tuesday night or contributing to a holiday feast, this casserole delivers every single time.
Give it a try.
I promise you won’t be disappointed.
Jiffy Cornbread Casserole
Ingredients
- 1/2 cup butter 1 stick, melted
- 1 whole kernel corn 15-oz can, drained completely
- 1 creamed corn 15-oz can, with liquid
- 1 cup sour cream full-fat works best
- 3 tablespoons granulated sugar adjust to taste
- 1/2 teaspoon kosher salt
- 1 Jiffy corn muffin mix 8-oz box
Instructions
- Preheat your oven to 350°F. Place the stick of butter in an 8×8-inch or 9×9-inch baking dish and microwave for 30-45 seconds until completely melted. Brush the butter up the sides of the dish to prevent sticking.
- Drain the whole kernel corn thoroughly and add it to the buttered pan. Pour in the entire can of creamed corn with its liquid.
- Add the sour cream to the pan. Sprinkle the sugar and salt over the mixture.
- Pour the Jiffy corn muffin mix over everything in the pan.
- Using a sturdy spatula, stir everything together right in the pan. Make sure to scrape the bottom and corners. Mix until there are no dry pockets of cornbread mix. The batter will be lumpy and thick.
- Bake for 35-40 minutes, until the edges turn golden brown and the center is set. The casserole should move as one piece when gently shaken, not like a liquid. If browning too quickly, tent loosely with aluminum foil for the last 10-15 minutes.
- Remove from oven and let rest for 5-10 minutes before serving. This allows the casserole to set up properly.


