

Three summers ago, I found myself in a familiar predicament—craving something sweet and satisfying during those sweltering July afternoons, but wanting to avoid the sugar crash that comes with traditional frozen treats. As someone who’s spent over a decade developing healthier alternatives to classic desserts, I knew there had to be a way to create something that satisfied both my sweet tooth and my nutritional goals. That’s when I stumbled upon what would become my most requested recipe: these frozen peanut butter Greek yogurt bites.
The inspiration struck during a particularly busy week when I was meal prepping for clients and needed quick, protein-packed snacks that wouldn’t derail anyone’s wellness goals. I remembered my grandmother’s old peanut butter fudge recipe—the one that required no cooking but delivered maximum flavor—and wondered if I could transform that concept using Greek yogurt as the base. After dozens of tests and tweaks (my family was more than happy to be taste testers), I perfected this formula that delivers 8 grams of protein per bite while tasting like a decadent dessert.
What makes my approach unique is the combination of both powdered and creamy peanut butter. Most recipes use one or the other, but I discovered that powdered peanut butter provides the intense nutty flavor without excess oils, while just a tablespoon of creamy peanut butter adds the rich mouthfeel that makes these bites irresistible. The secret lies in achieving the perfect protein-to-satisfaction ratio—something I learned from years of creating desserts that actually fuel your body rather than drain it.
Why These Bites Are a Nutritional Powerhouse
Each bite contains approximately 8 grams of complete protein, thanks to the Greek yogurt’s impressive amino acid profile, plus healthy fats from the peanut butter and dark chocolate. With only 4 grams of natural sugars per serving (compared to 20+ grams in typical frozen treats), these satisfy sweet cravings without the blood sugar rollercoaster. The full-fat Greek yogurt provides probiotics for gut health, while the dark chocolate delivers antioxidants and that essential chocolate fix we all crave.
Perfect for fitness enthusiasts, busy parents, or anyone following keto, low-carb, or high-protein lifestyles, these bites require zero baking skills and just 15 minutes of active preparation time. They’re ideal for meal prep Sunday, post-workout recovery, or those moments when you need something sweet but nutritious. Whether it’s summer heat that has you avoiding the oven or winter cravings for a cool, creamy treat, these bites deliver year-round satisfaction that aligns with your health goals.
| Ingredient | Quantity | Notes | Substitutions | Where to Buy |
|---|---|---|---|---|
| Greek yogurt (full fat) | 1/2 cup | Must be full-fat for proper texture and richness | Coconut yogurt for dairy-free | Any grocery store, refrigerated section |
| Powdered peanut butter | 1/4 cup | Brands like PB Fit or PB2 work best | Almond flour + 1 tsp vanilla extract | Health food aisle or online |
| Creamy peanut butter | 1 tablespoon | Natural, no-sugar-added preferred | Almond butter, sunflower seed butter | Nut butter aisle |
| Maple syrup | 1/2 tablespoon | Pure maple syrup, not pancake syrup | Honey, stevia (use half the amount) | Baking aisle |
| Dark chocolate chips | 1/2 cup | 70% cacao or higher (Lily’s brand is excellent) | Sugar-free chocolate chips, cacao chips | Baking aisle |
| Coconut oil | 1 teaspoon | Refined coconut oil prevents coconut flavor | Avocado oil, butter | Health food aisle |
| Flaky sea salt | Pinch | Maldon or similar high-quality salt | Regular sea salt (use less) | Specialty food section |
Recipe Timing
Prep Time: 10 minutes | Freeze Time: 30 minutes | Total Time: 40 minutes
Active Time: 15 minutes | Hands-off Time: 25 minutes
Servings: 6 large bites | Difficulty: Easy
Step-by-Step Instructions with Professional Tips
Step 1: Create the Perfect Base Mixture
Combine Greek yogurt, powdered peanut butter, creamy peanut butter, and maple syrup in a medium mixing bowl. Pro Tip: Let the Greek yogurt sit at room temperature for 5 minutes before mixing—this prevents lumps and creates a silkier texture. Stir with a rubber spatula in a folding motion rather than aggressive stirring, which can break down the yogurt’s structure and create a watery consistency.
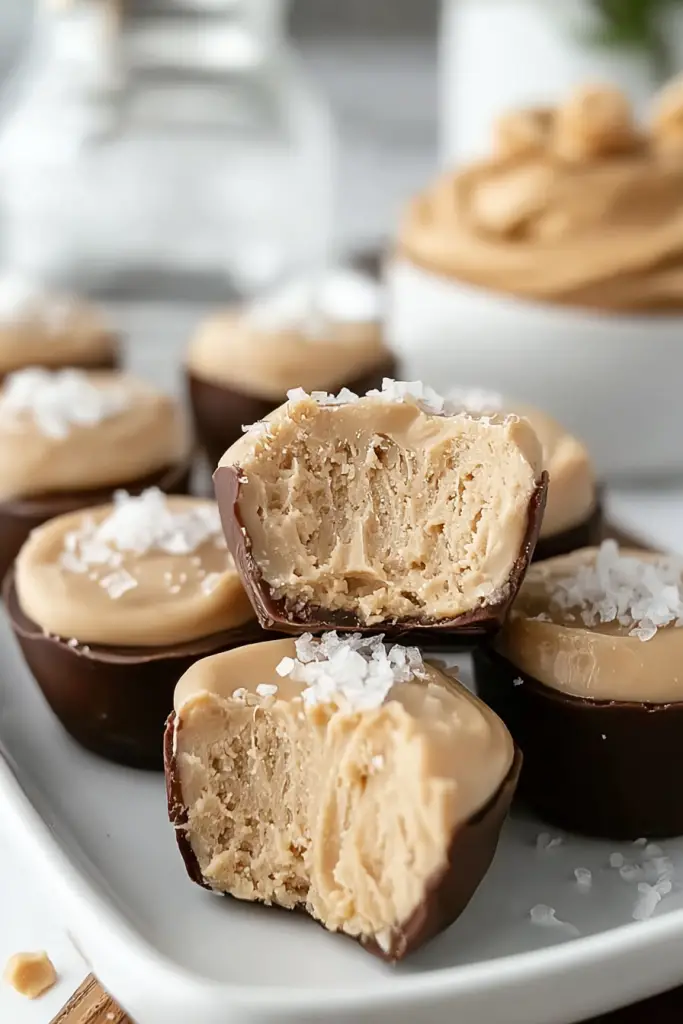
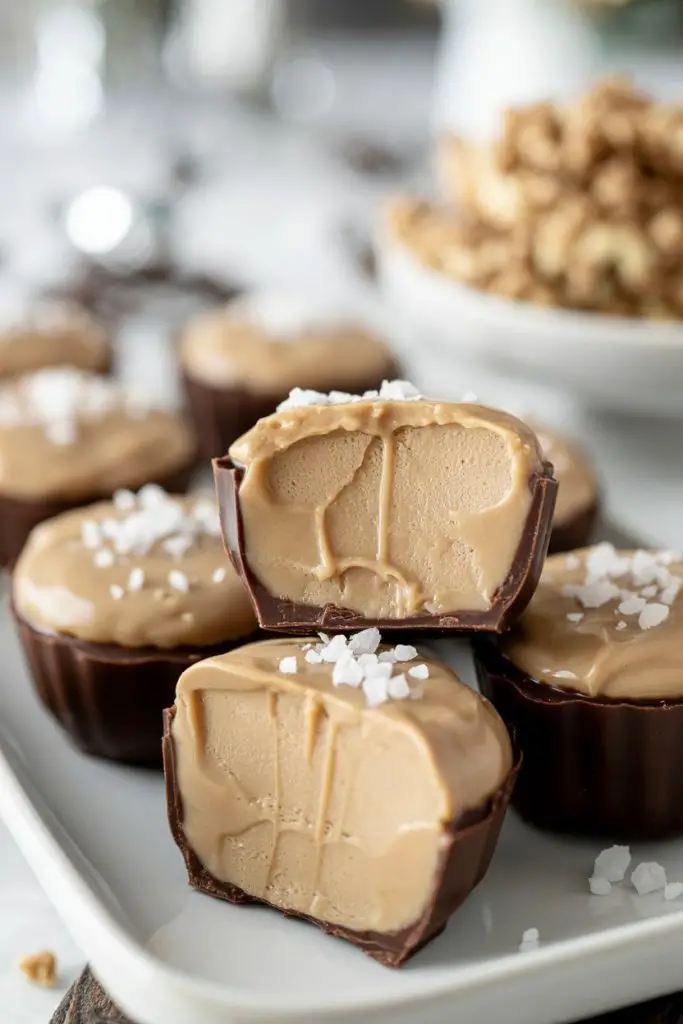
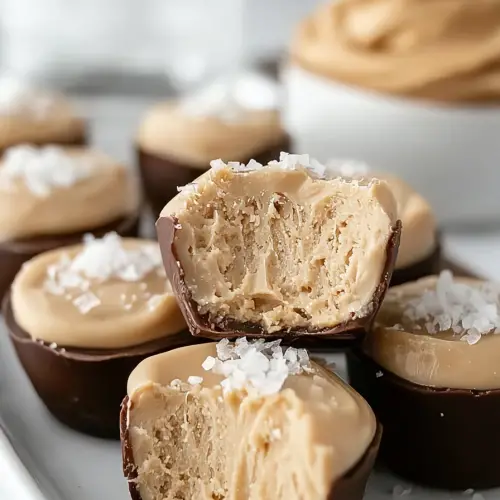
Visual Cue: The mixture should be pale tan and completely smooth, with no visible streaks of peanut butter. If you see any lumps, press them against the bowl’s side with your spatula.
Step 2: Portion with Precision
Line a small baking sheet with parchment paper. Using a medium cookie scoop (about 2 tablespoons), portion the mixture into 6 evenly-sized mounds. Pro Tip: Wet your scoop with cold water between portions to prevent sticking—this professional technique ensures clean, uniform shapes.
Why This Works: Consistent sizing ensures even freezing and coating. Irregular sizes lead to some bites being too soft while others are rock-hard.
Step 3: The Critical First Freeze
Place the tray in the freezer for exactly 15-20 minutes. Pro Tip: Set a timer—over-freezing at this stage makes the bites too hard to dip cleanly, while under-freezing results in messy, melting bites during coating.
Temperature Check: The bites should feel firm to touch but yield slightly when pressed gently with your finger.
Step 4: Master the Chocolate Coating
Combine dark chocolate chips and coconut oil in a microwave-safe bowl. Microwave in 30-second intervals, stirring between each, until smooth. Pro Tip: The coconut oil creates a thinner coating that hardens beautifully, but don’t add more than specified or the chocolate won’t set properly.
Visual Cue: Properly melted chocolate should coat the back of a spoon and drip in a steady ribbon when lifted.
Step 5: The Professional Dipping Technique
Working quickly, use a fork to dip each frozen bite into the chocolate, allowing excess to drip off. Pro Tip: Tap the fork gently against the bowl’s edge three times—this removes excess chocolate while maintaining complete coverage.
Place coated bites back on parchment paper and immediately sprinkle with flaky sea salt if using. Critical Timing: You have about 60 seconds before the chocolate begins to set, so work efficiently.
Step 6: The Final Set
Refrigerate for 10 minutes until chocolate hardens completely. Pro Tip: Resist the temptation to freeze at this stage—the contrast between the firm chocolate shell and creamy interior is what makes these bites special.
Equipment Recommendations: A small offset spatula makes transferring the coated bites easier, and a fine-mesh strainer is perfect for dusting the finished bites with powdered sugar if desired.
Common Mistakes to Avoid:
- Using non-fat yogurt (creates icy texture)
- Over-mixing the base (breaks down yogurt structure)
- Freezing too long before coating (chocolate won’t adhere properly)
- Adding too much coconut oil (prevents chocolate from setting)
Creative Variations to Master
Chocolate Lover’s Version
Replace the powdered peanut butter with 2 tablespoons unsweetened cocoa powder and add 1 extra tablespoon of maple syrup. The result is a rich, double-chocolate experience that rivals premium ice cream bars. I developed this variation for my daughter’s birthday party, and it was gone within minutes.
Tropical Twist
Substitute almond butter for peanut butter and add 1 tablespoon of unsweetened shredded coconut to the base mixture. Roll the finished bites in toasted coconut flakes instead of chocolate coating. This version transports me back to Hawaiian vacations and pairs beautifully with iced green tea.
Seasonal Fall Adaptation
During autumn months, I incorporate 1/2 teaspoon pumpkin pie spice into the yogurt mixture and use maple syrup generously. The warm spices complement the nuttiness perfectly, creating a cozy treat that satisfies pumpkin spice cravings without the sugar overload.
Make-Ahead Mastery & Meal Prep Strategy
These bites are meal prep gold. I prepare double batches every Sunday, storing them in individual portion containers for grab-and-go snacks throughout the week. The key is proper packaging: place parchment paper between layers to prevent sticking, and store in airtight containers for up to one week refrigerated or one month frozen.
Pro Scaling Guide: When doubling the recipe, increase freezing time to 25-30 minutes for the first freeze, as larger batches take longer to set evenly. Triple batches work best when prepared in stages—make the base mixture all at once, but portion and freeze in smaller batches for consistent results.
Perfect Pairings & Serving Strategies
These bites pair exceptionally well with unsweetened iced tea, cold brew coffee, or sparkling water with a splash of lemon. For dinner parties, I serve them alongside fresh berries and a drizzle of balsamic reduction—the contrast creates an elegant, restaurant-quality dessert presentation.
Wine Pairing: A light Pinot Noir or Prosecco complements the nutty sweetness without overwhelming the delicate flavors.
Storage Science & Leftover Magic
Refrigerator Storage: Keep in airtight containers for 5-7 days. The texture actually improves after 24 hours as flavors meld together.
Freezer Storage: Wrap individually in plastic wrap, then store in freezer bags for up to 3 months. Allow 2-3 minutes at room temperature before eating for optimal texture.
Leftover Transformation: Crumble any broken bites over Greek yogurt for breakfast, blend into smoothies for extra creaminess, or chop and fold into homemade ice cream.
Complete Nutritional Analysis
Per bite (based on 6 servings):
- Calories: 127
- Protein: 8g (25% of calories)
- Carbohydrates: 9g (28% of calories)
- Fat: 7g (47% of calories)
- Fiber: 2g
- Sugar: 4g (all natural sources)
- Sodium: 45mg
The macronutrient profile makes these ideal for post-workout recovery, satisfying the 3:1 carb-to-protein ratio recommended by sports nutritionists while providing sustained energy from healthy fats.
Comprehensive FAQ from Years of Recipe Testing
Q1: Can I use 0% fat Greek yogurt instead of full-fat? After testing this extensively, I strongly recommend sticking with full-fat. The 0% version creates an icy, crystalline texture when frozen due to higher water content. Full-fat yogurt contains natural emulsifiers that keep the bites creamy. If you must use non-fat, add 1 teaspoon of melted coconut oil to the mixture to compensate for missing fats.
Q2: My chocolate coating cracked when I bit into the frozen treats. What went wrong? This happens when there’s too much temperature difference between the coating and the base. The solution is proper tempering: let chocolate-coated bites sit at room temperature for 90 seconds before serving from the refrigerator, or 3-4 minutes if coming from the freezer. The chocolate should yield slightly rather than shatter.
Q3: Can I substitute the powdered peanut butter with regular peanut butter? Yes, but use only 2 additional tablespoons of creamy peanut butter instead of the 1/4 cup powdered. This maintains flavor balance while preventing the mixture from becoming too oily. The texture will be slightly denser, but still delicious. I discovered this ratio through trial and error when I ran out of powdered peanut butter mid-recipe.
Q4: The yogurt mixture seems too loose to hold its shape. How do I fix this? This usually indicates your Greek yogurt wasn’t thick enough to begin with. Some brands are thinner than others. Strain regular yogurt through cheesecloth for 30 minutes, or add 1-2 tablespoons of unflavored protein powder to thicken. I keep vanilla protein powder on hand specifically for this purpose.
Q5: Are these safe for children with nut allergies? Absolutely not in their current form, but I’ve created a seed butter version for my friend’s daughter with severe allergies. Substitute sunflower seed butter cup-for-cup for both the powdered and creamy peanut butter. The flavor is nuttier and slightly more mineral-forward, but equally satisfying.
Q6: How can I make these bites larger for a more substantial dessert? Use a large cookie scoop (about 3 tablespoons) and increase the first freeze time to 25-30 minutes. You’ll get 4 larger bites instead of 6. For chocolate coating, you may need an additional 1/4 cup chocolate chips and 1/2 teaspoon coconut oil to ensure complete coverage.
Professional Tips for Consistent Success
Equipment Alternatives: No cookie scoop? Use a large spoon dipped in water, or portion the mixture into silicone muffin cups for uniform shapes. Ice cube trays work surprisingly well for bite-sized portions.
Food Safety Considerations: Always use pasteurized dairy products and consume within recommended timeframes. If serving at parties, keep refrigerated until 30 minutes before serving, then display on a chilled platter.
Troubleshooting Common Issues:
- Bites too soft: Increase freezing time or use thicker yogurt
- Chocolate won’t stick: Bites weren’t cold enough during dipping
- Grainy texture: Powdered peanut butter wasn’t mixed thoroughly
- Too sweet: Reduce maple syrup by half next time
The Science Behind the Recipe
The magic happens through controlled crystallization. Greek yogurt’s protein structure creates a creamy base, while the small amount of fat from peanut butter prevents ice crystals from forming. The chocolate coating provides textural contrast and acts as a barrier, preserving the creamy interior. This understanding comes from years of experimenting with frozen dessert formulations.
Final Thoughts & Community Connection
These frozen peanut butter Greek yogurt bites represent everything I love about modern healthy cooking: maximum flavor with minimal effort, ingredients you can pronounce, and results that satisfy both nutrition goals and taste preferences. They’ve become my go-to recipe for converting skeptics who think healthy desserts can’t taste amazing.
I’d love to hear about your variations and experiences with this recipe. Tag me on social media with your creations, and don’t hesitate to ask questions in the comments below. Cooking is a journey we’re all on together, and every question helps me create better content for our community.
Recipe Rating & Reviews: Please rate this recipe and share your modifications—your feedback helps other home cooks succeed and inspires my next recipe development adventures.
Save this recipe for your next meal prep session, and prepare to have your afternoon snack game completely transformed.
Frozen Peanut Butter Greek Yogurt Bites
Ingredients
- 1/2 cup full-fat Greek yogurt
- 1/4 cup powdered peanut butter e.g., PB Fit or PB2
- 1 tablespoon creamy natural peanut butter no sugar added
- 1/2 tablespoon pure maple syrup
- 1/2 cup dark chocolate chips 70% cacao or higher
- 1 teaspoon refined coconut oil
- Pinch flaky sea salt e.g., Maldon
- Substitutions:
- Coconut yogurt for dairy-free
- Almond flour + vanilla extract for powdered peanut butter
- Almond or sunflower seed butter for creamy peanut butter
- Honey or stevia for maple syrup
- Sugar-free chocolate chips or cacao nibs for dark chocolate
- Avocado oil or butter for coconut oil
Instructions
- Create the Base:
- Let Greek yogurt sit at room temperature for 5 minutes. In a bowl, combine Greek yogurt, powdered peanut butter, creamy peanut butter, and maple syrup. Fold gently with a rubber spatula until smooth and uniform.
- Portion Mixture:
- Line a baking sheet with parchment paper. Using a medium cookie scoop (~2 tablespoons), portion mixture into 6 even mounds. Wet scoop between portions to prevent sticking.
- First Freeze:
- Freeze for 15-20 minutes until firm but slightly yielding to touch.
- Prepare Chocolate Coating:
- Melt dark chocolate chips and coconut oil in 30-second microwave intervals, stirring until smooth.
- Dip Bites:
- Using a fork, dip frozen bites into melted chocolate, letting excess drip off. Place on parchment-lined tray and sprinkle with flaky sea salt immediately.
- Final Set:
- Refrigerate for 10 minutes to harden chocolate coating. Serve chilled or store appropriately.


