

A Crave-Worthy Twist on a Classic Favorite
Picture this: you’re walking through Philadelphia, and the intoxicating aroma of sizzling beef, caramelized onions, and melted cheese fills the air. Your mouth waters, but then reality hits—you’re committed to your keto lifestyle. Does this mean saying goodbye to one of America’s most beloved sandwiches?
Not on my watch!
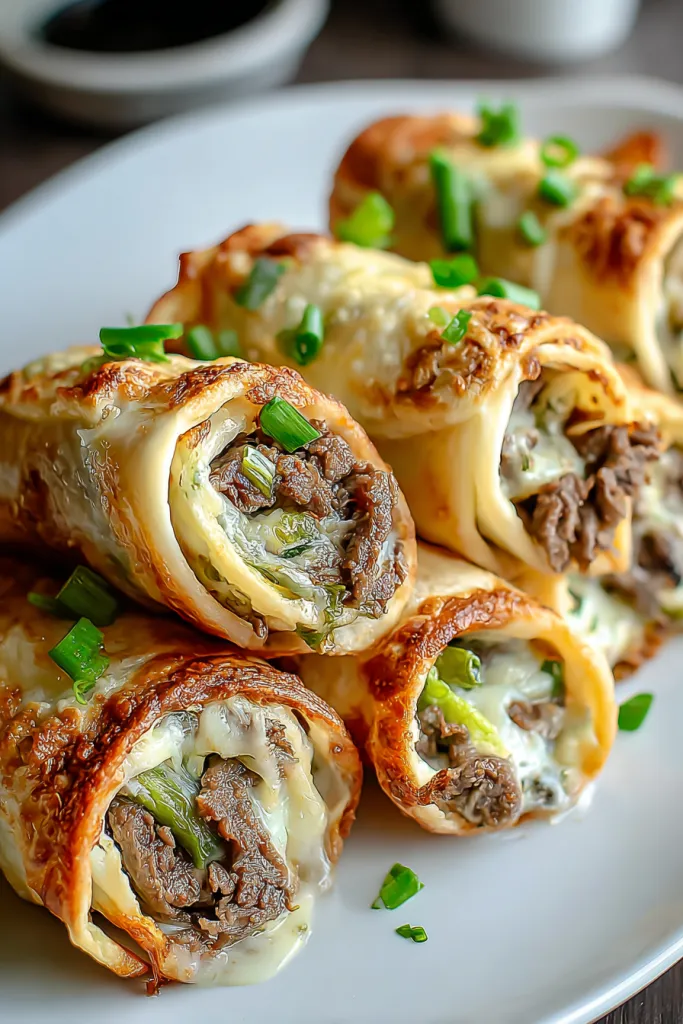
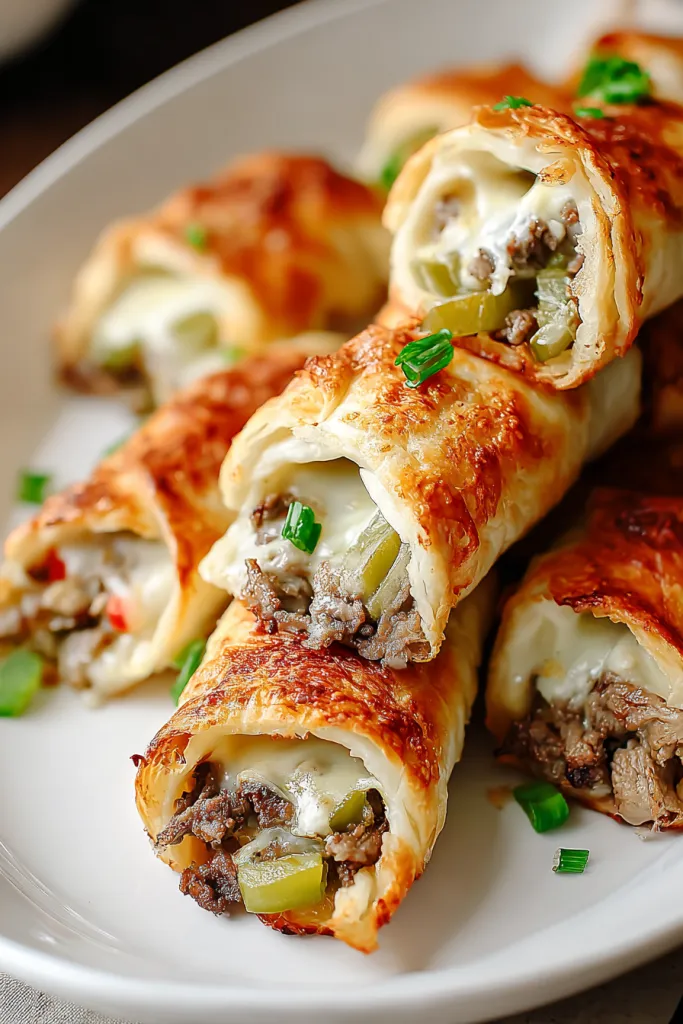
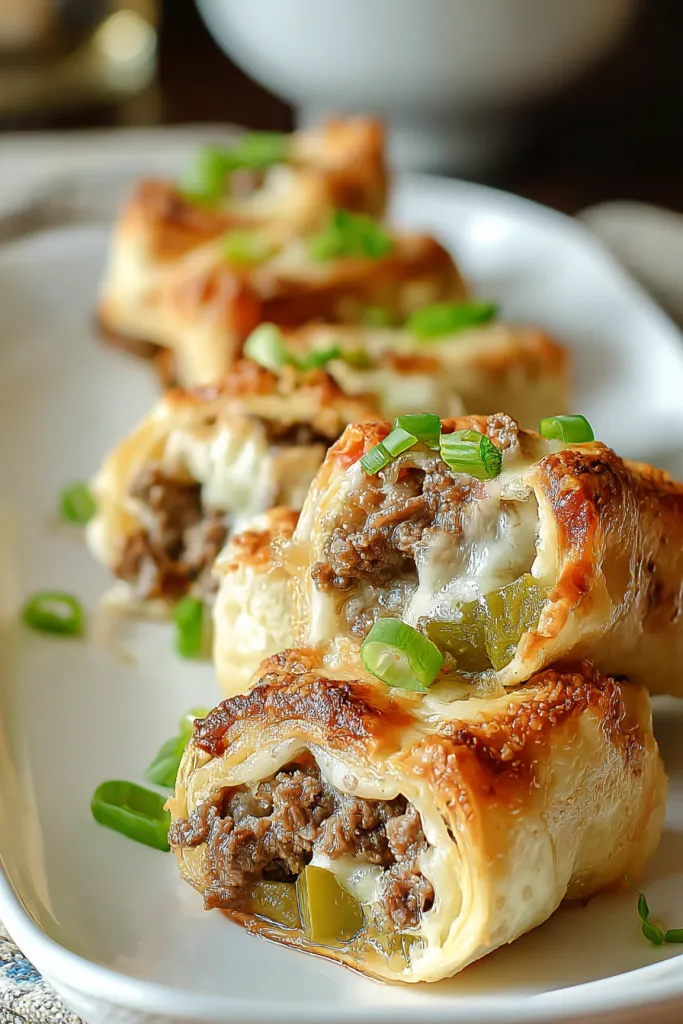
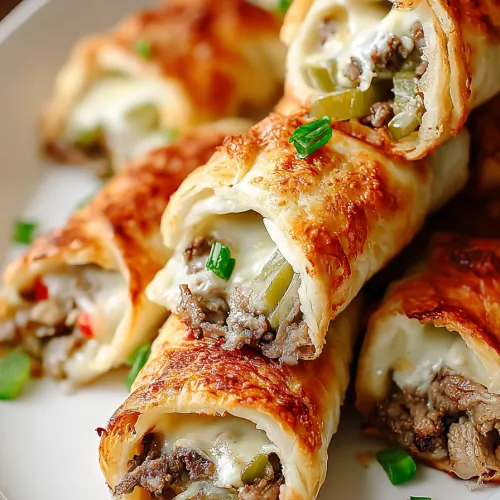
I’ve cracked the code on creating the perfect Keto Philly Cheesesteak Roll Ups that deliver every ounce of that classic cheesesteak satisfaction without derailing your low-carb goals. We’re talking tender ground beef, perfectly sautéed peppers and onions, creamy cheese, all wrapped in crispy Monterey Jack cheese shells that’ll make you forget bread ever existed.
Why You’ll Love This Recipe
Low-Carb Heaven Without Compromise At just 3g net carbs per roll-up, this dish slides perfectly into your keto macros while delivering maximum flavor impact. I’ve tested this recipe dozens of times, and each bite proves you don’t need bread to experience cheesesteak bliss.
Cheese Wraps That Actually Work Forget those flimsy tortilla substitutes! These Monterey Jack cheese wraps bake into golden, lacey perfection that’s sturdy enough to hold all that delicious filling. It’s not just a replacement—it’s an upgrade that adds an extra layer of cheesy goodness.
One-Pan Wonder for Busy Lives The entire filling comes together in a single skillet, and the cheese wraps bake on one sheet. As someone who values efficiency in the kitchen, I appreciate recipes that minimize cleanup while maximizing flavor.
Meal Prep Champion These roll-ups store beautifully and reheat like a dream. I often make a double batch on Sunday and enjoy them throughout the week—they actually get better as the flavors meld together.
The Story Behind My Keto Cheesesteak Revolution
Last year, I found myself standing in front of a famous Philly cheesesteak joint, feeling completely defeated. Six months into my keto journey, I’d conquered pizza cravings and pasta withdrawals, but the sight of that perfectly messy cheesesteak broke my resolve.
That’s when inspiration struck. Why couldn’t I recreate those exact flavors in a keto-friendly package? After weeks of experimentation (and plenty of delicious failures), I landed on the genius idea of using baked cheese as the wrap. The result? These incredible roll-ups that satisfy every cheesesteak craving while keeping you firmly in ketosis.
Recipe Timing & Difficulty
Prep Time: 10 minutes | Cook Time: 15 minutes | Total Time: 25 minutes
Servings: 4 | Difficulty: Easy
Ingredients & Step-by-Step Instructions
Ingredients
Here’s everything you’ll need to create 8 incredible roll-ups that’ll transport you straight to Philadelphia:
| Ingredient | Quantity | Notes |
|---|---|---|
| Monterey Jack cheese (shredded) | 2 cups | Creates the crispy wraps – don’t substitute |
| Ground beef | 16 ounces | 80/20 blend works best for flavor |
| Medium onion | 1/2 onion (sliced) | Slice thin for faster cooking |
| Bell pepper | 1 pepper (sliced) | Any color works; green is traditional |
| Worcestershire sauce | 1 teaspoon | Adds that authentic Philly flavor |
| Cream cheese | 4 ounces | Softened for easier melting |
| Salt & black pepper | To taste | Season generously |
Step-by-Step: How to Make Keto Philly Cheesesteak Roll Ups
Step 1: Prep Like a Pro Before touching that stove, get organized. I’ve learned that proper prep is the secret to seamless cooking. Slice your onion and bell pepper into thin strips—they’ll cook faster and distribute more evenly. Divide your shredded Monterey Jack into 8 equal portions (about 1/4 cup each) and cube your cream cheese for quicker melting.
Step 2: Create the Perfect Filling Heat your skillet over medium-high heat. Add the ground beef and break it apart with a spatula, letting it brown for about 3-4 minutes. Here’s my pro tip: don’t move it too much initially—let it develop that beautiful crust.
Once the beef starts browning nicely, add your sliced onions and bell peppers. Cook everything together for 7-10 minutes, stirring occasionally, until the vegetables are tender and the beef is fully cooked. The onions should be translucent and slightly caramelized.
Drain any excess grease (though with 80/20 beef, there shouldn’t be much). Add the Worcestershire sauce, cubed cream cheese, salt, and pepper. Stir gently until the cream cheese melts completely, creating a luscious, cohesive filling. Remove from heat and set aside.
Step 3: Master the Cheese Wraps Preheat your oven to 350°F (175°C). This temperature is crucial—too hot and the cheese burns before it crisps; too cool and it won’t develop that perfect golden edge.
Line a large baking sheet with parchment paper. Trust me on this—foil will cause sticking nightmares, and a bare pan is asking for trouble. Place your 8 portions of shredded cheese on the parchment, spacing them about 2 inches apart. Gently flatten each mound into a 4-inch circle.
Bake for 8-10 minutes, watching carefully. You’ll know they’re ready when the edges turn golden brown and the center looks set but not burnt. The key is timing—too long and they’ll be brittle; too short and they won’t hold together.
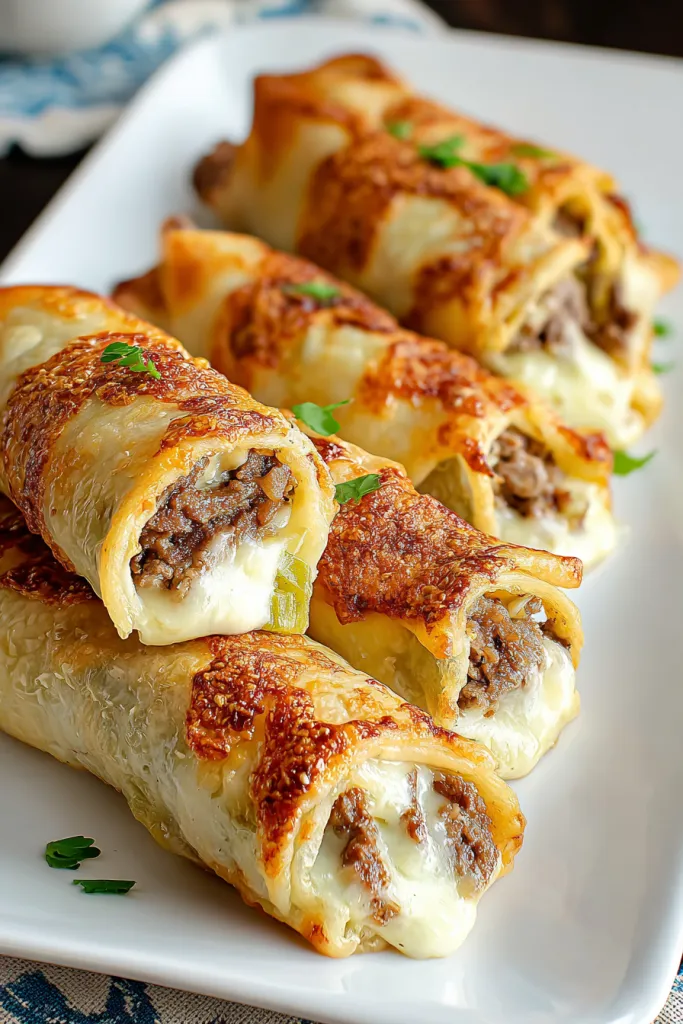
Step 4: The Perfect Roll Here’s where the magic happens. Let the cheese circles cool for exactly 1-2 minutes—they need to be cool enough to handle but still warm enough to be pliable. Working quickly, place about 2 tablespoons of filling along one edge of each cheese circle.
Gently roll each circle into a log, starting from the filled edge. The cheese should wrap around the filling beautifully. Place each roll-up seam-side down and let them cool completely—this helps them hold their shape.
Serving, Storage & FAQs
How to Serve Your Keto Philly Cheesesteak Roll Ups
These versatile roll-ups work for virtually any occasion. I’ve served them at everything from casual family dinners to elegant dinner parties, and they never fail to impress.
As an Appetizer Spread Cut each roll-up diagonally in half and arrange on a wooden serving board. Create a dipping station with keto-friendly garlic aioli, spicy mustard, or sugar-free ketchup. The presentation is restaurant-worthy, but the effort is minimal.
Weeknight Dinner Perfection Serve 2-3 roll-ups per person alongside cauliflower mash and roasted vegetables. I particularly love them with sautéed zucchini noodles or a crisp Caesar salad. The combination feels indulgent while staying completely keto-compliant.
Meal Prep Success Pack 2 roll-ups in individual containers with cherry tomatoes, cucumber slices, and a few olives. They make fantastic grab-and-go lunches that actually taste better after the flavors have had time to meld.
Storage & Reheating Tips
Proper Storage Store cooled roll-ups in an airtight container in the refrigerator for up to 4 days. For longer storage, wrap each roll-up individually in plastic wrap and freeze for up to 2 months. I always label them with the date—frozen keto meals can look surprisingly similar!
Reheating for Best Results From the fridge: Microwave for 30-45 seconds, or better yet, reheat in the oven at 350°F for 5-7 minutes to restore that crispy exterior.
From frozen: Thaw overnight in the refrigerator, then reheat as above. For extra crispy edges, try reheating in an air fryer at 350°F for 3-4 minutes.
Frequently Asked Questions
Can I use different cheese for the wraps?
Absolutely! I’ve experimented with cheddar, mozzarella, and provolone. Each creates a slightly different texture and flavor profile. Monterey Jack gives the best balance of meltability and crispiness, but feel free to explore.
What if I want to use actual steak instead of ground beef?
Thinly sliced ribeye or flank steak works beautifully! Sear it quickly in the same skillet and proceed with the recipe. Just remember to slice against the grain for tenderness.
Are these suitable for meal prep?
They’re meal prep gold! I often make a double batch on Sundays. They actually improve in flavor after a day in the fridge as all the ingredients meld together.
Can I make these vegetarian?
Definitely! Use your favorite meatless ground alternative, or try sautéed mushrooms with spinach for a completely different but equally delicious filling.
How do I prevent the cheese wraps from breaking?
The key is timing. Let them cool just enough to handle but roll them while still slightly warm and pliable. Also, don’t overfill them—about 2 tablespoons of filling per wrap is perfect.
Final Thoughts: Your New Keto MVP
After months of perfecting this recipe, I can confidently say these Keto Philly Cheesesteak Roll Ups have become one of my most-requested dishes. They prove that following a keto lifestyle doesn’t mean sacrificing flavor or satisfaction.
Whether you’re new to keto or a seasoned low-carb veteran, this recipe delivers on every level. The combination of tender beef, perfectly cooked vegetables, and that genius cheese wrap creates something truly special—a dish that satisfies your cheesesteak cravings while keeping you firmly in ketosis.
Next time you’re missing those classic comfort foods, remember this recipe. Fire up that skillet, preheat your oven, and get ready to roll up some serious deliciousness. Your taste buds (and your macros) will thank you!
Keto Philly Cheesesteak Roll Ups
Ingredients
- For the Roll-Ups:
- 2 cups Monterey Jack cheese shredded
- 16 ounces Ground beef 80/20 blend for flavor
- 1/2 Medium onion sliced thin
- 1 Bell pepper sliced, any color
- 1 teaspoon Worcestershire sauce
- 4 ounces Cream cheese softened
- Salt & black pepper to taste
Instructions
- Prep Ingredients: Slice the onion and bell pepper into thin strips for even cooking. Divide the shredded Monterey Jack into 8 equal portions and cube the cream cheese for easy melting.
- Cook the Filling: Heat a skillet over medium-high heat. Add ground beef, breaking it apart with a spatula. Cook for 3-4 minutes, allowing it to develop a crust. Add onions and bell peppers, cooking for 7-10 minutes until tender. Drain excess grease, then add Worcestershire sauce, cubed cream cheese, salt, and pepper. Stir until cream cheese melts into the beef mixture. Remove from heat.
- Make the Cheese Wraps: Preheat the oven to 350°F (175°C). Line a baking sheet with parchment paper. Place 8 portions of shredded cheese onto the paper, flattening them into 4-inch circles. Bake for 8-10 minutes, until edges turn golden brown.
- Roll the Cheesesteaks: Let the cheese circles cool for 1-2 minutes. Once warm enough to handle but still pliable, place about 2 tablespoons of the filling along one edge of each cheese circle and gently roll them into logs. Place each roll-up seam-side down and allow them to cool completely to help them hold their shape.


What are the carbs for this? Would greatly appreciate an answer to my email address. Thanks
Hi Christie! The carb count is about 4-5g net carbs per roll-up, making them perfect for keto! So glad you’re interested in trying them. Hope you love them as much as I do! 😊