There’s something about autumn that just hits different in the kitchen.
The air gets crisp. The leaves turn. And suddenly, all I want is something warm, spiced, and fresh out of the oven. That’s exactly when I start reaching for canned pumpkin puree and a bag of chocolate chips.
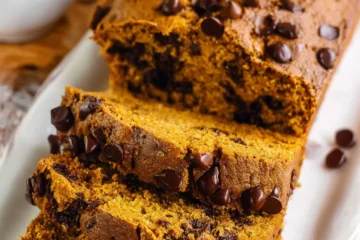
Today, I’m sharing my absolute favorite fall bake. We’re making pumpkin chocolate chip bread. This loaf is soft, incredibly moist, and packed with cozy spice flavor in every bite. And those pockets of melty chocolate? Pure perfection.
Why Pumpkin and Chocolate Just Work
I know some people raise an eyebrow at this combo. Chocolate and pumpkin?
Trust me on this one.
The earthy sweetness of pumpkin puree acts like a canvas. It softens the richness of the chocolate and lets those warm fall spices shine. Together, they create something that tastes way more complex than the ingredient list suggests. One bite and you’ll completely understand.
Why This Beats Store-Bought Every Time
Store-bought pumpkin bread always disappoints me. It’s either too dry, weirdly dense, or tastes like it was made weeks ago. There’s nothing fresh about it.
This homemade version is a completely different experience.
The secret is in the wet ingredient combo. We use both vegetable oil and pumpkin puree together. Oil keeps the crumb tender and moist for days. Pumpkin adds body, flavor, and natural sweetness without making things heavy.
We also use two types of sugar. Granulated sugar gives structure and light sweetness. Brown sugar brings in a rich, deep molasses note that makes the whole loaf taste more interesting. That little detail makes a big difference.

Know Your Ingredients Before You Start
Before we do anything, let’s talk about a few key ingredients. Because small choices here actually matter a lot.
Pumpkin puree vs. pumpkin pie filling. They are not the same thing. Pie filling already has added sugars and pre-mixed spices. It will throw off the whole recipe. Always grab pure pumpkin puree.
Baking soda. This is our leavening agent, and it works beautifully with the natural acidity in pumpkin. It’s what gives the loaf that tall, proud rise in the oven. Just make sure yours isn’t expired.
The spice duo. Ground cinnamon brings familiar warmth. Pumpkin pie spice layers in nutmeg, ginger, and cloves underneath it. Together, they smell like a fall candle, but way better because you can actually eat it.
Chocolate chips. We’re using semi-sweet. That slight bitterness balances the sweet batter perfectly. I always keep an extra handful for the top of the loaf too.
Ingredients
Here’s everything you need laid out in one place:
| Ingredient | Quantity | Notes |
|---|---|---|
| All-purpose flour | 1 ¾ cups | Divided (save ¼ cup for coating the chocolate chips) |
| Baking soda | 1 teaspoon | Check the expiration date |
| Ground cinnamon | 2 teaspoons | Adds sweet, warm depth |
| Pumpkin pie spice | ¾–1 teaspoon | Adjust to your spice preference |
| Salt | ½ teaspoon | Balances all the sweetness |
| Eggs | 2 large | Room temperature works best |
| Granulated sugar | ¾ cup | Structure and sweetness |
| Light brown sugar | ½ cup | Moisture and molasses richness |
| Pumpkin puree | 1 ½ cups | Pure puree only, no pie filling |
| Vegetable oil | ½ cup | Keeps the crumb soft for days |
| Vanilla extract | ½ teaspoon | Ties everything together |
| Milk | ¼ cup | Smooths out the batter |
| Semi-sweet chocolate chips | 1 cup | Plus extra for topping |
Quick Timing Overview:
| Prep Time | Cook Time | Total Time | Servings | Difficulty |
|---|---|---|---|---|
| 15 minutes | 65 minutes | 1 hour 20 minutes | 10 | Easy |
Let’s Bake: Step-by-Step Instructions
Alright. Ingredients are gathered. Let’s get into it. I’ll walk you through every single step so nothing gets missed.
Step 1: Prep Your Pan and Preheat the Oven
Start by preheating your oven to 350°F. Position your oven rack right in the middle. This lets the heat circulate evenly so your bread bakes uniformly from all sides.
Grab a standard 9×5-inch loaf pan. Spray it well with nonstick cooking spray. For extra insurance, line it with a strip of parchment paper. That little parchment sling makes removing the finished loaf completely stress-free. Set the pan aside.
Step 2: Whisk Together the Dry Ingredients
In a large mixing bowl, add 1 ½ cups of flour. Set aside that remaining ¼ cup for later. We’ll need it.
Add the baking soda, ground cinnamon, pumpkin pie spice, and salt. Whisk everything together until the spices are evenly distributed throughout the flour. You want every bite to be equally spiced, not just one corner of the loaf. Set the bowl aside.

Step 3: Mix the Wet Ingredients
Grab a separate medium bowl. Crack in your two eggs. Add both the granulated sugar and the light brown sugar. Whisk them together until the mixture looks smooth and just slightly pale.
Now add the big players. Spoon in the pumpkin puree. Pour in the vegetable oil, vanilla extract, and milk. Whisk everything vigorously until you have a smooth, beautiful orange batter. Stop for a second and smell it. It’s honestly incredible at this stage.
Step 4: Fold Wet Into Dry
This is the step where most people accidentally ruin their quick bread. Pay attention here.
Pour your pumpkin mixture into the bowl of dry ingredients. Set your whisk down and switch to a rubber spatula. Gently fold the two together.
The golden rule? Do not overmix. Overmixing develops the gluten too aggressively and gives you a tough, rubbery loaf. Stir only until the dry flour streaks disappear. If you see a few lumps, that’s completely fine. Lumps are actually a good sign here.

Step 5: The Flour-Coated Chocolate Chip Trick
Remember that reserved ¼ cup of flour? Now it earns its place.
Pour your 1 cup of chocolate chips into a small bowl. Sprinkle the reserved flour over them. Toss until every chip has a light flour coating.
Why bother?
Chocolate chips are heavy. Without this step, they drop straight to the bottom of the loaf and pool there. The flour coating creates just enough friction to help them stay suspended throughout the batter. It takes 30 extra seconds and completely changes the final result.
Gently fold the coated chips into your batter.
Step 6: Fill the Pan and Add the Topping
Scrape the batter into your prepared loaf pan. Smooth the top gently with your spatula. Then grab that extra handful of chocolate chips and scatter them generously over the surface.
This small move makes a huge visual difference. The finished loaf looks like something from a bakery window, not a home kitchen.
Place the pan into the oven and bake for 65 to 75 minutes.

Step 7: Test for Doneness and Cool Completely
At the 60-minute mark, start checking. Insert a long toothpick straight down into the thickest part of the center. If it comes out clean or with just a couple of moist crumbs, you’re done.
Wet, gooey batter on the toothpick? Give it 5 more minutes and test again.
If the top is getting dark but the center isn’t finished, lightly tent a piece of aluminum foil over the pan. That slows the browning without stopping the center from cooking through.
Once baked, pull it from the oven. Let it sit in the pan for 15 minutes. Then transfer to a wire rack to cool fully before slicing.
Frequently Asked Questions
How do I know for sure when the bread is done?
Start your toothpick test at 60 minutes. You want it to come out clean or with just a few moist crumbs clinging to it. Wet batter means more time needed. Also keep in mind that the loaf keeps cooking slightly as it rests in the hot pan after you pull it from the oven.
Why did my bread crack down the middle?
Good news. That crack is completely normal. It’s actually a sign that your bread baked correctly.
Here’s what happens. The outer crust sets first as the heat hits it. The moist, dense center keeps rising after that. Eventually it pushes right up through the crust. That split down the middle is a classic marker of a well-risen quick bread. It’s not a flaw. It’s a feature.
My chocolate chips still sank. What went wrong?
A couple of things could cause this. Your batter might have been too warm. Warm batter becomes thinner and offers less resistance to heavy chips. Make sure your eggs and milk are at room temperature, not straight from a warm spot.
If it keeps happening, switch to mini chocolate chips. They’re significantly lighter and distribute throughout the loaf much more evenly without sinking.
Can I turn this batter into muffins?
Absolutely. This batter works beautifully as muffins.
Line a standard muffin tin with paper liners. Fill each cup about three-quarters full. Bake at 350°F for roughly 20 to 25 minutes. Check with a toothpick. They’re great for quick breakfasts or packing into a lunchbox during the week.

How to Store Your Pumpkin Chocolate Chip Bread
Getting the storage right means your bread stays just as good on day three as it was on day one.
First, let it cool completely. This step is non-negotiable. Wrapping warm bread traps steam inside. That moisture turns the crust soggy and the texture gummy. Be patient and let it reach full room temperature first.
Counter storage. Wrap the cooled loaf tightly in plastic wrap or place it in an airtight container. It stays moist and delicious at room temperature for 3 to 4 days. Honestly, a lot of people think it tastes even better on day two. The spices have more time to settle in and develop, and the flavors get deeper and more complex overnight.
Refrigerator storage. If you want it to last longer, pop it in the fridge. It keeps well for up to one week.
How to Freeze This Bread
This loaf freezes beautifully. I often bake two at once just so I have one ready to go in the freezer.
Here’s the method:
- Let the loaf cool completely on the wire rack
- Wrap it tightly in a layer of plastic wrap
- Wrap it again in a layer of aluminum foil
- Place the double-wrapped loaf into a heavy-duty freezer bag
- Squeeze out as much air as possible before sealing
It keeps well in the freezer for up to three months.
When you’re ready to eat it, don’t rush the thaw. Move the wrapped loaf to the refrigerator and let it thaw slowly overnight. The next morning, bring it out to the counter and let it come to room temperature before slicing. Rushing this with heat makes the texture uneven.
I genuinely hope this pumpkin chocolate chip bread becomes a staple in your kitchen every fall. It’s the kind of recipe you’ll make once and then find yourself baking on repeat all season long. Warm spices, melty chocolate, and a tender crumb that stays moist for days.
Happy baking. Enjoy every bite.

Moist Pumpkin Chocolate Chip Bread
Ingredients
- 1 1/2 cups all-purpose flour plus 1/4 cup reserved for coating chips
- 1 tsp baking soda check expiration date
- 2 tsp ground cinnamon
- 3/4 tsp pumpkin pie spice up to 1 tsp based on preference
- 1/2 tsp salt
- 2 large eggs room temperature
- 3/4 cup granulated sugar
- 1/2 cup light brown sugar packed
- 1 1/2 cups pumpkin puree pure puree, not pie filling
- 1/2 cup vegetable oil
- 1/2 tsp vanilla extract
- 1/4 cup milk
- 1 cup semi-sweet chocolate chips plus extra for topping
Instructions
- Preheat oven to 350°F and grease a 9×5-inch loaf pan. Line with parchment paper for easy removal.
- In a large bowl, whisk together 1 1/2 cups flour, baking soda, cinnamon, pumpkin pie spice, and salt.
- In a separate bowl, whisk eggs and both sugars until smooth. Add pumpkin puree, oil, vanilla, and milk; whisk until well combined.
- Gently fold the wet ingredients into the dry ingredients using a rubber spatula. Mix only until flour streaks disappear; do not overmix.
- Toss chocolate chips with the reserved 1/4 cup of flour in a small bowl. Gently fold the coated chips into the batter.
- Pour batter into the prepared pan. Top with extra chocolate chips. Bake for 65–75 minutes, or until a toothpick comes out clean.
- Cool in the pan for 15 minutes, then transfer to a wire rack to cool completely before slicing.