

This Red Velvet Cheesecake combines two beloved desserts into one show-stopping creation. I’ve made this recipe countless times for special occasions. The rich cheesecake layer pairs perfectly with moist red velvet cake. It’s always the star of my holiday gatherings.
The first time I made this dessert, I was nervous about combining two classic treats. Would the flavors work together? Would the textures complement each other? I’m thrilled to say this recipe exceeded all my expectations. The tangy cream cheese filling balances the sweet red velvet cake beautifully.
Why You’ll Love This Recipe
I appreciate how this recipe simplifies a complex dessert without sacrificing quality. Using a boxed red velvet cake mix saves precious time. The homemade cheesecake layer adds that special touch everyone expects. This combination gives you bakery-quality results at home.
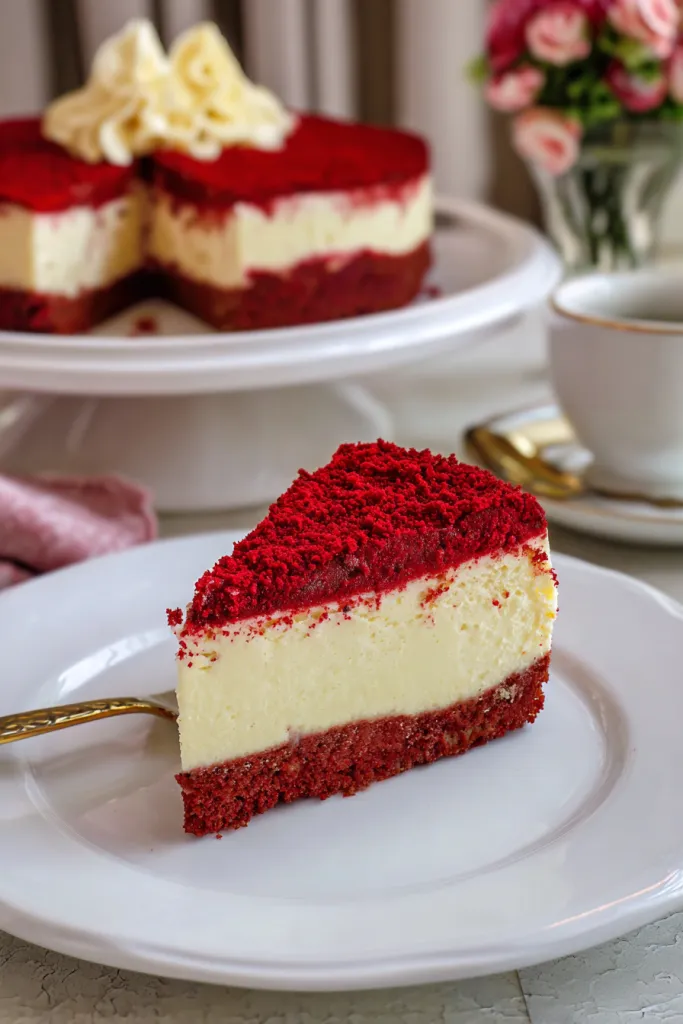
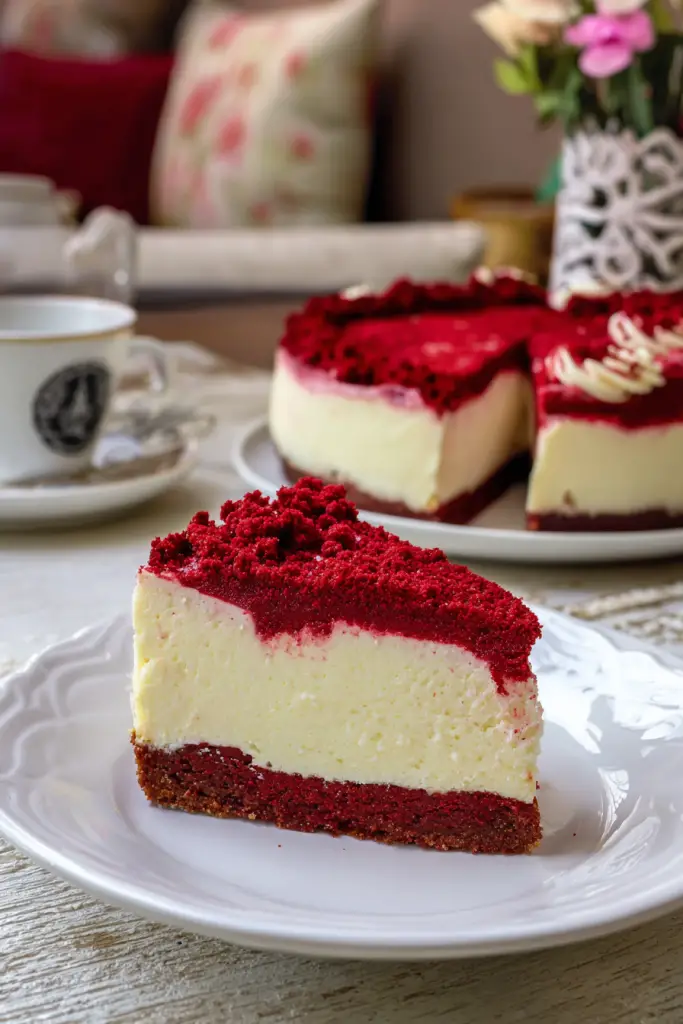
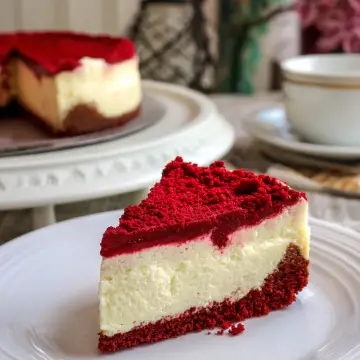
The three-layer structure creates visual drama when you slice into it. Your guests will see the deep red cake base first. Then comes the creamy white cheesecake layer. Finally, the fluffy whipped cream topping completes the presentation. It’s dessert perfection on a plate.
What Makes This Red Velvet Cheesecake Special
Red velvet cheesecake brings together two dessert world favorites in harmony. The concept originated at The Cheesecake Factory. Home bakers have since created countless variations. My version focuses on simplicity and consistent results.
Red velvet cake has a unique flavor profile that sets it apart. It features subtle cocoa notes without overpowering chocolate taste. The distinctive red color comes from food coloring. Traditional recipes use buttermilk and vinegar for that signature tang.
The cheesecake layer in this recipe is wonderfully smooth and creamy. I use full-fat cream cheese for the best texture. Sour cream adds extra richness and a slight tang. These flavors complement the red velvet cake perfectly.
Recipe Timing & Details
Prep Time: 20 minutes
Cook Time: 90 minutes
Cooling Time: 2 hours
Total Time: 3 hours 30 minutes
Servings: 12 slices
Difficulty: Moderate
Essential Ingredients You’ll Need
This recipe uses straightforward ingredients you can find at any grocery store. The cake layer relies on a quality box mix. The cheesecake requires standard baking staples. The whipped cream topping needs just three simple ingredients.
For the Red Velvet Layer: I start with a boxed red velvet cake mix for convenience. You’ll also need whatever ingredients your specific box calls for. This usually includes eggs, oil, and water. Different brands have slightly different requirements.

For the Cheesecake Layer: Cream cheese forms the base of this luscious filling. Make sure it’s fully softened before you begin. I use granulated sugar to sweeten the mixture. Four large eggs help bind everything together.
Sour cream adds incredible richness and tang to the cheesecake. A small amount of flour stabilizes the filling. Pure vanilla extract enhances all the other flavors. A pinch of salt balances the sweetness perfectly.
For the Whipped Cream Topping: Heavy cream whips up into fluffy clouds of deliciousness. Powdered sugar sweetens without adding graininess. Vanilla extract ties all the flavors together beautifully.
Ingredients Table
| Ingredient | Quantity | Notes |
|---|---|---|
| Red Velvet Cake Mix | 1 box | Plus box ingredients (eggs, oil, water) |
| Cream Cheese | 16 ounces | Softened to room temperature |
| Granulated Sugar | 1⅓ cups | For cheesecake layer |
| Large Eggs | 4 | Room temperature preferred |
| Sour Cream | ⅔ cup | Full-fat recommended |
| All-Purpose Flour | 2 tablespoons | Helps stabilize filling |
| Vanilla Extract | 2 teaspoons | Pure extract works best |
| Salt | ½ teaspoon | Balances sweetness |
| Heavy Cream | 2 cups | Must be cold for whipping |
| Powdered Sugar | 4 tablespoons | For whipped topping |
| Vanilla Extract | 2 teaspoons | For whipped topping |
| Butter | 2 tablespoons | For greasing pan |
| Flour | 2 tablespoons | For dusting pan |
Kitchen Tools You’ll Need
A 9-inch springform pan is essential for this recipe. The removable sides make serving much easier. You’ll need mixing bowls in various sizes. An electric mixer speeds up the process significantly.
I recommend having a rubber spatula for scraping down bowl sides. A wire cooling rack helps the cake cool evenly. Aluminum foil or plastic wrap keeps leftovers fresh. A sharp knife ensures clean slices when serving.
Detailed Cooking Instructions
Preparing Your Workspace
I always start by organizing my ingredients and tools before baking. This makes the process smoother and more enjoyable. Room temperature ingredients blend together more easily. Pull your cream cheese and eggs from the refrigerator early.
Preheat your oven to 350 degrees Fahrenheit before you begin mixing. This ensures it reaches the proper temperature when you’re ready. Prepare your springform pan by generously buttering the bottom and sides. Dust with flour and tap out any excess.
Making the Red Velvet Cake Layer
The cake layer serves as the foundation for this spectacular dessert. I follow the box instructions exactly as written. Different brands may have slightly different ingredient requirements. Mix the batter until it’s smooth and well combined.
Pour the prepared batter into your buttered and floured springform pan. Spread it evenly across the bottom with a spatula. This ensures even baking throughout the layer. Tap the pan gently on the counter to release air bubbles.
Place the pan in your preheated oven on the center rack. Bake for 30 to 32 minutes total. The cake is done when a toothpick inserted in the center comes out clean. A few moist crumbs are fine.
Remove the pan from the oven and place it on a wire rack. Let the cake cool completely before adding the cheesecake layer. This prevents the layers from mixing together. I usually wait about 30 minutes.
Creating the Cheesecake Layer
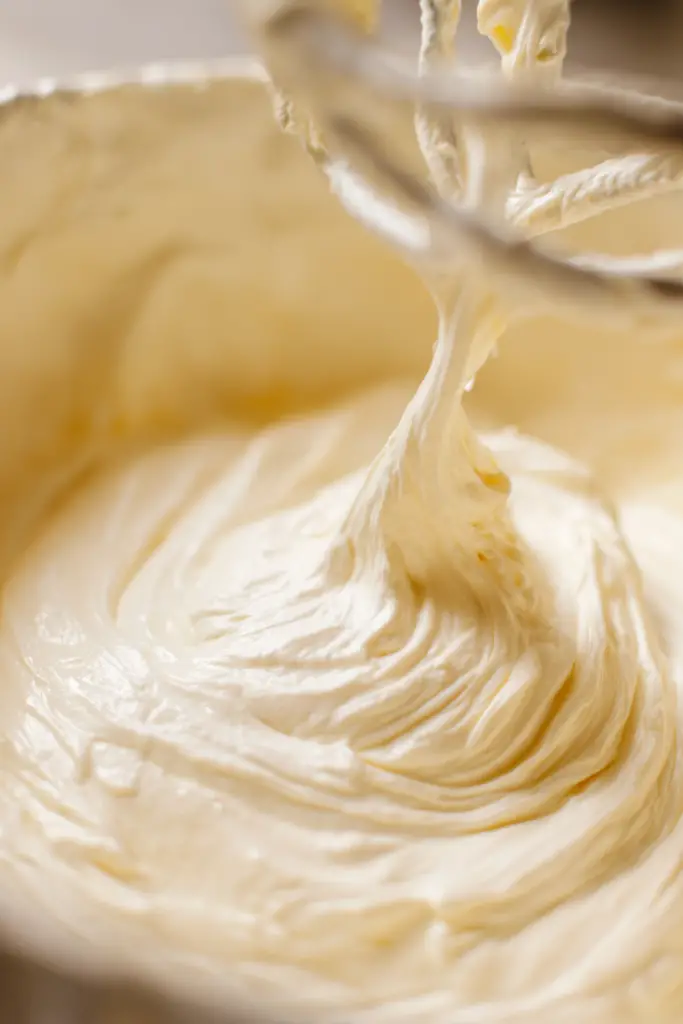
The cheesecake layer is where this dessert truly shines. I start by beating the softened cream cheese in a large bowl. Use an electric mixer on medium-high speed. Beat until the cream cheese is smooth and creamy.
Add the granulated sugar to the cream cheese gradually. Continue beating until the mixture is light and fluffy. This takes about 2 to 3 minutes. Scrape down the bowl sides occasionally.
Now I add the eggs one at a time to the cream cheese mixture. Beat each egg until it’s fully incorporated before adding the next. This prevents lumps and ensures a smooth texture. Don’t rush this step.
Add the sour cream, flour, vanilla extract, and salt to the bowl. Mix on low speed until everything is just combined. Avoid overmixing at this stage. Overmixing can create air bubbles that crack during baking.
Pour the cheesecake mixture over your cooled red velvet cake layer. Spread it evenly with a spatula to the edges. The layer should be smooth and level. Tap the pan gently to remove any air bubbles.
Baking the Combined Layers
Return the pan to your 350-degree oven for the second baking phase. This bake takes significantly longer than the cake layer. Set your timer for 60 minutes initially.
The cheesecake is done when the edges are set but the center still jiggles slightly. This jiggle should be about a 2-inch diameter circle. The residual heat will finish cooking the center. Overbaking creates a dry, cracked cheesecake.
Turn off the oven but leave the cheesecake inside with the door closed. Let it sit for 10 minutes in the residual heat. This gradual temperature change prevents cracking. After 10 minutes, crack the oven door open slightly.
Leave the cheesecake in the oven with the door ajar for another 10 minutes. Then remove it to a wire rack to cool completely. This careful cooling process is crucial for texture.
The Cooling Process
Patience is essential during the cooling phase of this recipe. Let the cheesecake cool at room temperature for about 30 minutes. Then transfer the entire pan to your refrigerator. Chill for at least 4 hours or overnight.
I prefer to chill mine overnight for the best texture. The cheesecake firms up completely during this time. The flavors also meld together beautifully. This waiting period is worth it.
Preparing the Whipped Cream Topping
Make the whipped cream topping just before serving for the best texture. Add cold heavy cream to a medium mixing bowl. The cream must be very cold to whip properly.
Add the powdered sugar and vanilla extract to the cream. Start beating on medium speed with an electric mixer. Gradually increase to high speed as the cream thickens.
Beat until soft peaks form when you lift the beaters. This takes about 3 to 5 minutes total. Don’t overbeat or you’ll end up with butter. Stop when the peaks gently fold over.
Assembling and Serving
Remove your chilled cheesecake from the refrigerator before adding the whipped cream. Run a knife around the edge of the pan. This helps release the cheesecake cleanly. Carefully remove the springform pan sides.
Spread the whipped cream evenly over the top of the cheesecake. Use an offset spatula for the smoothest finish. You can pipe it decoratively if you prefer. I sometimes reserve some for garnishing individual slices.
For the cleanest slices, use a sharp knife dipped in hot water. Wipe the knife clean between each cut. This creates beautiful, professional-looking slices. Each slice will showcase the stunning layers.
Storage Instructions
Refrigerator Storage: Cover your red velvet cheesecake with aluminum foil or plastic wrap carefully. Avoid pressing the wrap directly onto the whipped cream topping. Store in the refrigerator for up to 5 days. The cheesecake actually tastes better after a day or two.
Freezer Storage: You can freeze this cheesecake for longer storage periods. I recommend freezing it before adding the whipped cream topping. Wrap it tightly in aluminum foil and then in a freezer bag. It will keep for up to 3 months.
To thaw, transfer the wrapped cheesecake to your refrigerator. Let it defrost slowly for 24 hours before serving. Add fresh whipped cream topping just before serving. This ensures the best texture and presentation.
Tips, Variations & FAQs
Expert Tips for Success
Tip 1: Room Temperature Ingredients I cannot stress enough how important room temperature cream cheese is. Cold cream cheese creates lumps that won’t blend smoothly. Leave it out for at least one hour before starting. You can also cut it into cubes to speed softening.
Tip 2: Avoid Overmixing Mix the cheesecake batter just until ingredients are combined. Overmixing incorporates too much air into the batter. This air creates cracks during baking. Mix on low speed once you add the eggs.
Tip 3: Water Bath Alternative Some bakers use a water bath to prevent cracking. I find my gradual cooling method works just as well. If you prefer a water bath, wrap your springform pan in foil. Place it in a larger pan with one inch of water.
Tip 4: Testing for Doneness The jiggle test is the most reliable method for cheesecake. Gently shake the pan when checking. The outer ring should be set firm. Only the center 2-inch circle should jiggle slightly.
Tip 5: Clean Slicing Technique Hot water creates the cleanest cuts through cheesecake. Dip your knife in very hot water before each cut. Wipe it completely dry with a towel. Then make your slice in one smooth motion.
Creative Variations to Try
Chocolate Ganache Topping: Replace the whipped cream with a rich chocolate ganache. Heat one cup of heavy cream until it just begins to simmer. Pour it over 8 ounces of chopped chocolate. Stir until smooth and glossy. Let it cool slightly before pouring over the cheesecake.
Cream Cheese Frosting: Traditional cream cheese frosting works beautifully on this dessert. Beat 8 ounces of softened cream cheese with 4 tablespoons of butter. Add 3 cups of powdered sugar and 1 teaspoon of vanilla. Spread or pipe over the chilled cheesecake.
White Chocolate Red Velvet: Add 4 ounces of melted white chocolate to the cheesecake batter. Melt the chocolate and let it cool slightly first. Fold it in gently after adding all other ingredients. This creates an extra luxurious cheesecake layer.
Mini Cheesecakes: Transform this recipe into individual servings using a muffin tin. Line the tin with cupcake papers. Add a small amount of red velvet batter to each cup. Top with cheesecake mixture and bake for 20 to 25 minutes.
Red Velvet Crumb Garnish: Save the scraps when leveling your cake layer. Crumble them into fine crumbs and toast lightly. Sprinkle these red crumbs over the whipped cream topping. This adds color and extra red velvet flavor.
Troubleshooting Common Issues
Problem: Cracked Cheesecake Top Cracks usually result from overbaking or rapid temperature changes. Follow my gradual cooling method carefully. Don’t open the oven door during baking. The whipped cream topping will hide minor cracks anyway.
Problem: Soggy Cake Layer Make sure your cake layer is completely cool before adding cheesecake batter. A warm cake creates steam that makes the layers soggy. Wait at least 30 minutes after baking the cake.
Problem: Cheesecake Won’t Firm Underbaking is the most common cause of soft cheesecake. The center should still jiggle slightly when you remove it. It will firm up during chilling. Always refrigerate for at least 4 hours.
Problem: Difficulty Removing from Pan Run a thin knife around the edge before releasing the springform. Do this while the cheesecake is still slightly warm. Warming the outside of the pan with your hands helps too.
Frequently Asked Questions
Can I make this recipe ahead of time? Absolutely! This cheesecake is perfect for advance preparation. Make it up to 2 days before serving. Store it covered in the refrigerator without the whipped cream. Add the whipped cream topping just before serving for the best presentation.
Can I use a homemade red velvet cake instead of a box mix? Yes, you can definitely use a homemade red velvet cake recipe. Use your favorite recipe and bake it in the springform pan. Just ensure it’s completely cooled before adding the cheesecake layer. The baking time may vary slightly.
Why is my cheesecake cracking? Cracks develop from overbaking or sudden temperature changes. Remove the cheesecake when the center still jiggles slightly. Follow the gradual cooling process I outlined. These steps prevent most cracking issues.
Can I substitute the sour cream? Greek yogurt makes an excellent sour cream substitute. Use the same measurement of full-fat Greek yogurt. The flavor will be slightly different but still delicious. Some bakers also use heavy cream successfully.
How do I know when the cheesecake is fully set? The cheesecake needs at least 4 hours of refrigeration to set properly. Overnight chilling produces the best texture. The cheesecake should be firm to the touch. It shouldn’t jiggle when you gently shake the pan.
Can I freeze individual slices? Yes, individual slices freeze beautifully for convenient single servings. Wrap each slice tightly in plastic wrap. Then place wrapped slices in a freezer bag. They’ll keep for up to 3 months frozen.
Serving Suggestions
This red velvet cheesecake is stunning on its own. However, you can elevate the presentation with simple additions. Fresh raspberries add a tart contrast to the sweet dessert. Their red color complements the cake beautifully.
A drizzle of chocolate sauce creates an elegant finishing touch. Use store-bought or homemade chocolate sauce. Drizzle it over each slice just before serving. This adds visual appeal and extra flavor.
Consider serving this cheesecake for Valentine’s Day celebrations. The red color makes it perfect for romantic occasions. It’s also ideal for Christmas dinner dessert. Birthday parties and anniversaries are other great opportunities.
Final Thoughts
This Red Velvet Cheesecake has become my signature dessert for special occasions. I love how it combines two classic treats into something extraordinary. The recipe might seem complex, but it’s quite manageable.
Take your time with each step and follow the instructions carefully. The result is a bakery-quality dessert made in your own kitchen. Your guests will be incredibly impressed with this stunning creation.
The combination of moist red velvet cake with creamy cheesecake is irresistible. The whipped cream topping adds the perfect finishing touch. I hope you enjoy making and sharing this recipe as much as I do.
Red Velvet Cheesecake
Ingredients
- For the Red Velvet Layer:
- 1 box red velvet cake mix
- Eggs oil, and water (as per box instructions)
- 2 tablespoons butter for greasing pan
- 2 tablespoons all-purpose flour for dusting pan
- For the Cheesecake Layer:
- 16 ounces cream cheese softened to room temperature
- 1⅓ cups granulated sugar
- 4 large eggs room temperature preferred
- ⅔ cup sour cream full-fat recommended
- 2 tablespoons all-purpose flour
- 2 teaspoons vanilla extract pure extract works best
- ½ teaspoon salt
- For the Whipped Cream Topping:
- 2 cups heavy cream must be cold for whipping
- 4 tablespoons powdered sugar
- 2 teaspoons vanilla extract
Instructions
- Preparing Your Workspace:
- Preheat your oven to 350°F (175°C).
- Generously butter the bottom and sides of a 9-inch springform pan, then dust with flour and tap out any excess.
- Remove cream cheese and eggs from refrigerator to bring to room temperature.
- Making the Red Velvet Cake Layer:
- Prepare the red velvet cake batter according to box instructions until smooth and well combined.
- Pour the batter into the prepared springform pan and spread evenly with a spatula.
- Tap the pan gently on the counter to release air bubbles.
- Bake on the center rack for 30-32 minutes, until a toothpick inserted in the center comes out clean.
- Remove from oven and place on a wire rack. Let cool completely for about 30 minutes.
- Creating the Cheesecake Layer:
- In a large bowl, beat the softened cream cheese with an electric mixer on medium-high speed until smooth and creamy.
- Gradually add granulated sugar and continue beating for 2-3 minutes until light and fluffy, scraping down the bowl sides occasionally.
- Add eggs one at a time, beating each egg until fully incorporated before adding the next.
- Add sour cream, flour, vanilla extract, and salt. Mix on low speed until just combined. Do not overmix.
- Pour the cheesecake mixture over the cooled red velvet cake layer and spread evenly to the edges.
- Tap the pan gently to remove any air bubbles.
- Baking the Combined Layers:
- Return the pan to the 350°F oven and bake for 60 minutes, until edges are set but the center still jiggles slightly (about a 2-inch diameter circle).
- Turn off the oven but leave the cheesecake inside with the door closed for 10 minutes.
- Crack the oven door open slightly and leave for another 10 minutes.
- Remove to a wire rack and let cool at room temperature for 30 minutes.
- Transfer the entire pan to the refrigerator and chill for at least 4 hours or overnight (overnight is preferred).
- Preparing the Whipped Cream Topping:
- Just before serving, add cold heavy cream to a medium mixing bowl.
- Add powdered sugar and vanilla extract.
- Beat on medium speed with an electric mixer, gradually increasing to high speed as cream thickens.
- Beat for 3-5 minutes until soft peaks form. Do not overbeat.
- Assembling and Serving:
- Remove chilled cheesecake from refrigerator and run a knife around the edge of the pan.
- Carefully remove the springform pan sides.
- Spread the whipped cream evenly over the top of the cheesecake using an offset spatula.
- For clean slices, dip a sharp knife in hot water, wipe dry, and cut in one smooth motion. Wipe knife clean between each cut.
Notes
Freezer: Freeze before adding whipped cream topping. Wrap tightly in aluminum foil and place in a freezer bag. Keeps for up to 3 months. Thaw in refrigerator for 24 hours before serving and add fresh whipped cream. Expert Tips: Room temperature cream cheese is crucial for a smooth, lump-free cheesecake. Leave out for at least 1 hour.
Avoid overmixing once eggs are added to prevent air bubbles that cause cracks.
The gradual cooling method prevents cracking in the cheesecake.
For cleanest cuts, use a hot, dry knife for each slice. Variations: Chocolate Ganache Topping: Replace whipped cream with ganache made from 1 cup heavy cream and 8 oz chopped chocolate.
Cream Cheese Frosting: Use traditional cream cheese frosting instead of whipped cream.
Mini Cheesecakes: Make individual servings in a muffin tin lined with cupcake papers. Bake for 20-25 minutes.
Claude can make mistakes. Please double-check responses. Sonnet 4.5


