

Red velvet sandwich cookies are my absolute favorite holiday treat! These stunning crimson cookies combine soft, cocoa-kissed cookie layers with creamy vanilla filling. I’ve been making these for years, and they never fail to impress.
The moment you bite into one, you experience pure magic. The tender red velvet cookies melt on your tongue while the sweet vanilla cream adds richness. I love how the white chocolate chips provide little pockets of sweetness throughout each cookie.

These cookies remind me of classic red velvet cake but in portable form. The gorgeous red color makes them perfect for Christmas, Valentine’s Day, or any celebration. I often make big batches because they disappear quickly at parties.
Why You’ll Love This Recipe
I appreciate how simple these cookies are to prepare. You don’t need any fancy equipment or unusual ingredients. Everything comes together in about 35 minutes from start to finish.
The texture is what makes these cookies special. They stay soft for days when stored properly. The vanilla cream filling complements the subtle chocolate flavor perfectly without overpowering it.
I’ve experimented with different variations over the years. Adding crushed candy canes gives them a festive peppermint twist. The white chocolate chips melt slightly during baking, creating delicious pockets of sweetness.
Recipe Timing & Yield
Prep Time: 15 minutes
Cook Time: 10 minutes
Chill Time: 20 minutes
Total Time: 45 minutes
Servings: 12 sandwich cookies (24 individual cookies)
Difficulty: Easy
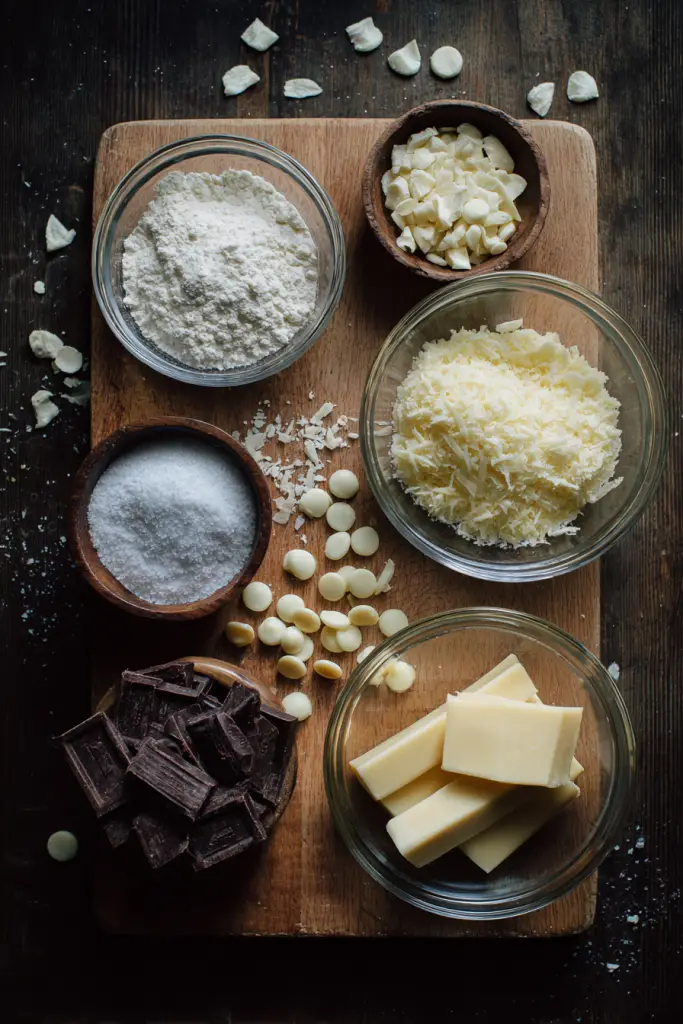
Ingredients You’ll Need
| Ingredient | Quantity | Notes |
|---|---|---|
| Butter, unsalted | 2 sticks (cubed) | Plus ½ cup for filling |
| Granulated sugar | 1½ cups | For cookie dough |
| Large eggs | 2 | Room temperature works best |
| Pure vanilla extract | 1 tsp | Plus 2 tsp for filling |
| Super red food coloring | 2 tsp | Gel type preferred |
| Cocoa powder | ¼ cup | Unsweetened only |
| Baking soda | 1 tsp | For rise and texture |
| Cornstarch | 1 tsp | Keeps cookies tender |
| Kosher salt | ½ tsp | Balances sweetness |
| Cake flour | 1 cup | Creates soft texture |
| All-purpose flour | 1¾ cups | Main structure |
| White chocolate chips | 1½ cups | Adds sweetness |
| Candy canes, crushed | 1 cup | Festive addition |
| Sanding sugar | ½ cup | For coating |
| Powdered sugar | 1½ cups | For vanilla filling |
Key Ingredients Breakdown
Sugar Selection: I use three types of sugar in this recipe. Granulated sugar creates the cookie base structure. Sanding sugar adds sparkle and crunch to the exterior. Powdered sugar makes the filling smooth and creamy.
Food Coloring Choice: Super red gel food coloring works much better than liquid versions. It blends smoothly without adding extra moisture to your dough. I recommend investing in quality gel coloring for the best results.
Cocoa Powder Matters: Unsweetened cocoa powder is essential here. These cookies already have plenty of sweetness from sugar and chocolate chips. The unsweetened cocoa provides that signature red velvet flavor without making them too sweet.
Flour Combination: Using both cake flour and all-purpose flour creates the perfect texture. Cake flour makes the cookies tender and soft. All-purpose flour provides just enough structure to hold everything together nicely.
Add-Ins: White chocolate chips melt slightly during baking, creating pockets of creamy sweetness. Crushed candy canes add a festive peppermint flavor and beautiful color contrast. You can omit them for a classic version.
Essential Equipment
I use a stand mixer with paddle attachment for this recipe. It makes creaming butter and sugar effortless. You can use a hand mixer if that’s what you have available.
Silicone baking mats or parchment paper prevent sticking beautifully. I prefer silicone mats because they’re reusable and eco-friendly. Either option works perfectly fine for these cookies.
A rolling pin helps achieve even cookie thickness. I aim for about half-inch thickness throughout. This ensures all cookies bake at the same rate and look uniform.
A small circular cookie cutter creates perfectly shaped cookies. I use a 2-inch cutter for ideal sandwich-sized cookies. Make sure you have a piping bag for the filling too.
Step-by-Step Instructions
Preparing The Cookie Dough
I start by lining two baking sheets with silicone liners or parchment paper. This prevents any sticking and makes cleanup so much easier. Set these aside while you prepare the dough.
Step 1: Add cubed butter and granulated sugar to your stand mixer bowl. Use the paddle attachment on medium speed for about 3 minutes. The mixture should look light and fluffy when ready.
Step 2: Add eggs one at a time to the butter mixture. Mix well after each addition before adding the next egg. This ensures proper incorporation and prevents the mixture from separating.
Step 3: Pour in vanilla extract and combine on low speed. Add the super red food coloring next and mix until the color distributes evenly. The batter should be vibrant red at this point.
Step 4: Combine all dry ingredients in a separate large bowl. Whisk together both flours, cocoa powder, baking soda, cornstarch, and salt. This ensures even distribution throughout the dough.
Step 5: Gradually add the dry mixture to the wet ingredients. Keep your mixer on low speed during this process. Mix just until a soft dough forms without overmixing.
Step 6: Keep the mixer running on low speed. Add white chocolate chips and crushed candy canes to the dough. Mix until these additions are evenly distributed throughout.
Chilling The Dough
Transfer your prepared dough to a covered container. Place it in the refrigerator for approximately 20 minutes. This chilling step is crucial for easier rolling and handling.
Cold dough holds its shape better during cutting and baking. I sometimes chill mine for up to 30 minutes if the kitchen is particularly warm. Don’t skip this step or your cookies might spread too much.
Rolling And Cutting
Preheat your oven to 410 degrees Fahrenheit while the dough chills. This high temperature creates cookies with slightly crispy edges and soft centers. Make sure your oven reaches full temperature before baking.
Lightly flour a clean, flat work surface. Remove the chilled dough from the refrigerator and place it on the floured surface. Use your rolling pin to roll the dough to half-inch thickness.
Step 7: Use a small circular cookie cutter to cut out 24 circles. I press straight down and lift up without twisting for clean edges. Arrange the cut cookies on your prepared baking sheets.
Adding The Coating
Combine sanding sugar and additional crushed candy canes in a small bowl. This creates a beautiful, sparkly coating for your cookies. Mix them together with a spoon.
Step 8: Roll each cookie circle in the sugar mixture. Make sure to coat both sides evenly. Gently press the coating into the cookie surface so it adheres properly.
Place the coated cookies back onto your baking sheet. Space them about 2 inches apart to allow for slight spreading. They won’t spread much because of the chilled dough.

Baking To Perfection
Step 9: Place the baking sheets in your preheated 410-degree oven. Bake for 10 minutes or until the tops appear lightly browned. Watch them carefully during the last few minutes.
The cookies will look slightly underdone when you remove them. They continue cooking on the hot baking sheet after removal. This technique ensures soft, tender cookies instead of overbaked ones.
Let cookies cool on the baking sheet for 5 minutes. This allows them to set up properly without breaking. Then transfer them to a wire cooling rack.
Allow cookies to cool completely on the wire rack. This takes about 15-20 minutes depending on room temperature. Completely cooled cookies are essential for adding filling without melting it.
Making The Vanilla Cream Filling
Step 10: Add softened butter to a large mixing bowl. Make sure your butter is truly softened to room temperature. Cold butter won’t mix properly and will create lumps.
Add powdered sugar and vanilla extract to the butter. Beat everything together on medium-high speed for 3-4 minutes. The filling should look light, fluffy, and almost white in color.
Taste the filling and adjust sweetness if needed. I sometimes add an extra tablespoon of powdered sugar for sweeter filling. You can also add more vanilla for stronger flavor.
Assembling The Sandwich Cookies
Transfer your vanilla cream filling to a piping bag. Fit it with a large round tip for easy piping. You can also use a plastic bag with the corner snipped off.
Step 11: Flip half of your cooled cookies upside down on your work surface. Pipe a generous amount of filling onto the flat side of each cookie. I use about 2 tablespoons per cookie.
Step 12: Place a second cookie on top of the filling, flat side down. Press the cookies together gently but firmly. The filling should spread to the edges without oozing out excessively.
Continue assembling until all sandwich cookies are complete. I wipe the edges clean with a damp paper towel if needed. This creates a professional, bakery-style appearance.

Tips, Variations & FAQs
Expert Tips For Success
Temperature Matters: Room temperature eggs and butter incorporate much better than cold ingredients. I take mine out of the refrigerator about 30 minutes before starting. This simple step makes a noticeable difference in texture.
Don’t Overmix: Stop mixing as soon as the dough comes together. Overmixing develops too much gluten, resulting in tough cookies. I always mix on low speed when adding dry ingredients.
Consistent Thickness: Use rolling pin guides or rubber bands on your rolling pin. This ensures all cookies are exactly the same thickness. Even thickness means even baking throughout the batch.
Proper Cooling: Never stack warm cookies or add filling to warm cookies. The heat melts the filling and creates a messy disaster. Patience during cooling pays off with perfect sandwich cookies.
Storage Method: Store finished sandwich cookies in an airtight container at room temperature. They stay fresh for up to 5 days this way. I place parchment paper between layers to prevent sticking.
Delicious Variations To Try
Classic Red Velvet: Omit the candy canes and white chocolate chips for traditional flavor. The cookies will still be absolutely delicious. This version highlights the classic red velvet taste perfectly.
Cream Cheese Filling: Replace vanilla filling with cream cheese frosting for authentic red velvet flavor. Beat 4 ounces of softened cream cheese with butter and powdered sugar. This creates a tangy, rich filling.
Chocolate Drizzle: Melt dark or white chocolate and drizzle over assembled sandwiches. Let the chocolate set completely before serving. This adds an elegant, professional touch to your cookies.
Peppermint Lovers: Add ½ teaspoon peppermint extract to both the cookie dough and filling. This intensifies the minty flavor throughout. Perfect for true peppermint enthusiasts during the holidays.
Mini Version: Use a smaller cookie cutter for bite-sized treats. Reduce baking time to 7-8 minutes for smaller cookies. These make adorable party favors or dessert table additions.
Troubleshooting Common Issues
Cookies Spreading Too Much: Your dough wasn’t chilled long enough or your butter was too warm. Always chill dough for the full 20 minutes. You can even chill cut cookies for 10 minutes before baking.
Dry, Crumbly Cookies: This happens from overbaking or using too much flour. Measure flour by spooning it into the cup and leveling. Remove cookies when they look slightly underdone for best results.
Filling Too Runny: Your butter was too soft or you didn’t beat it long enough. The filling should hold stiff peaks when properly beaten. Add more powdered sugar if needed to thicken it up.
Color Not Bright Enough: Liquid food coloring produces pale results compared to gel coloring. Invest in quality super red gel food coloring. You may need to add an extra teaspoon for deeper color.
Frequently Asked Questions
Can I make these cookies ahead of time?
Yes, absolutely! You can bake the cookies up to 3 days in advance. Store them unfilled in an airtight container at room temperature. Add the filling the day you plan to serve them for best results.
Can I freeze red velvet sandwich cookies?
You can freeze the unfilled cookies for up to 2 months. Wrap them tightly in plastic wrap, then aluminum foil. Thaw at room temperature and add fresh filling before serving.
What can I substitute for cake flour?
Make your own cake flour substitute by measuring 1 cup all-purpose flour. Remove 2 tablespoons and replace with 2 tablespoons cornstarch. Sift together several times before using.
Can I use regular red food coloring instead of gel?
Liquid food coloring works but requires more to achieve vibrant color. This adds extra moisture to your dough. I strongly recommend gel coloring for consistent results and better color.
How do I prevent the filling from melting out?
Make sure cookies are completely cool before adding filling. Use room temperature butter for the filling, not melted butter. Don’t press the cookies together too hard when assembling them.
Serving Suggestions
These red velvet sandwich cookies look stunning arranged on a white serving platter. I like to dust them lightly with powdered sugar for extra elegance. They make beautiful centerpieces at holiday gatherings.
Pair them with hot chocolate, coffee, or cold milk for the perfect treat. The rich flavors complement warm beverages beautifully. I love serving them at afternoon tea parties too.
Package them in clear cellophane bags tied with ribbon for lovely gifts. They make thoughtful presents for teachers, neighbors, or coworkers. Everyone appreciates homemade cookies during the holidays.
Create a dessert board featuring these cookies alongside other holiday treats. Add fudge, peppermint bark, and chocolate truffles for variety. This makes an impressive display for parties.
Final Thoughts
Red velvet sandwich cookies have become a holiday tradition in my home. The combination of soft cookies and creamy filling never gets old. I hope you enjoy making and sharing these as much as I do.
The recipe is flexible enough to customize based on your preferences. Try different fillings, add-ins, or decorations to make them your own. Each variation tastes absolutely wonderful in its own way.
Don’t be intimidated by the steps involved in this recipe. Everything comes together easily with basic baking skills. Even beginners can achieve beautiful, delicious results with these cookies.
I’d love to hear how your red velvet sandwich cookies turn out! They’re sure to become a favorite in your household too. Happy baking!
Nutritional Information (Per Sandwich Cookie):
Calories: 385 | Fat: 18g | Carbohydrates: 52g | Protein: 3g | Sugar: 38g | Sodium: 165mg
Note: Nutritional values are approximate and may vary based on specific ingredients used.

Red Velvet Sandwich Cookies
Ingredients
- For the Cookies:
- 2 sticks unsalted butter cubed
- 1½ cups granulated sugar
- 2 large eggs
- 1 tsp pure vanilla extract
- 2 tsp super red food coloring gel type
- ¼ cup unsweetened cocoa powder
- 1 tsp baking soda
- 1 tsp cornstarch
- ½ tsp kosher salt
- 1 cup cake flour
- 1¾ cups all-purpose flour
- 1½ cups white chocolate chips
- 1 cup crushed candy canes
- For the Coating:
- ½ cup sanding sugar
- Additional crushed candy canes
- For the Vanilla Cream Filling:
- ½ cup unsalted butter softened
- 1½ cups powdered sugar
- 2 tsp pure vanilla extract
Instructions
- Prepare the Cookie Dough:
- Line two baking sheets with silicone liners or parchment paper. Set aside.
- In a stand mixer with paddle attachment, cream cubed butter and granulated sugar on medium speed for 3 minutes until light and fluffy.
- Add eggs one at a time, mixing well after each addition.
- Add 1 tsp vanilla extract and super red food coloring. Mix on low speed until color is evenly distributed.
- In a separate bowl, whisk together cake flour, all-purpose flour, cocoa powder, baking soda, cornstarch, and salt.
- Gradually add dry ingredients to wet ingredients on low speed. Mix just until a soft dough forms.
- Add white chocolate chips and 1 cup crushed candy canes. Mix on low until evenly distributed.
- Chill and Shape:
- Transfer dough to a covered container and refrigerate for 20 minutes.
- Preheat oven to 410°F (210°C).
- On a lightly floured surface, roll chilled dough to ½-inch thickness.
- Use a 2-inch circular cookie cutter to cut out 24 circles.
- Coat and Bake:
- Combine sanding sugar and additional crushed candy canes in a small bowl.
- Roll each cookie circle in sugar mixture, coating both sides. Press gently to adhere.
- Place coated cookies on prepared baking sheets, spacing 2 inches apart.
- Bake for 10 minutes or until tops are lightly browned.
- Cool on baking sheet for 5 minutes, then transfer to wire rack. Cool completely (15-20 minutes).
- Make the Filling:
- In a large mixing bowl, beat softened butter, powdered sugar, and 2 tsp vanilla extract on medium-high speed for 3-4 minutes until light and fluffy.
- Assemble:
- Transfer filling to a piping bag fitted with a large round tip.
- Flip half the cookies upside down. Pipe about 2 tablespoons of filling onto the flat side of each cookie.
- Top with remaining cookies, flat side down. Press gently to spread filling to edges.
Notes
Make Ahead: Bake cookies up to 3 days in advance. Store unfilled and add filling before serving. Freeze unfilled cookies for up to 2 months.
Cake Flour Substitute: If you don’t have cake flour, measure 1 cup all-purpose flour, remove 2 tablespoons, and replace with 2 tablespoons cornstarch. Sift several times.
Food Coloring: Gel food coloring works best for vibrant color without adding excess moisture. Liquid coloring requires more and can affect dough consistency.
Variations: Omit candy canes for classic red velvet flavor. Use cream cheese frosting instead of vanilla filling for authentic red velvet taste. Add ½ tsp peppermint extract to dough and filling for extra mint flavor.
Troubleshooting: If cookies spread too much, chill dough longer. If filling is too runny, beat longer or add more powdered sugar. Make sure cookies are completely cool before filling.Claude can make mistakes. Please double-check responses.


