

I’ll be honest with you. Cauliflower was never my first choice.
It sat there in the produce section looking pale and a bit sad. I’d toss it in soups, sure. But exciting? Not really. Not until I started roasting it.
Here’s what happens when cauliflower meets a very hot oven:
- Those pale, dense florets turn golden and slightly crispy on the edges.
- The centers go tender and almost creamy.
- And the whole thing develops this deep, nutty, savory flavor you just can’t get any other way.
Now add a miso garlic glaze on top of all that?

That’s when it gets really good.
This Roasted Miso Garlic Cauliflower is something I make on busy weeknights, lazy weekends, and pretty much whenever I spot a good cauliflower at the store. It looks fancy enough to serve to guests. It tastes like you spent way more effort than you did. And it comes together in under 45 minutes with ingredients you probably already have.
So Why Does This Recipe Actually Work?
It comes down to one thing: timing the glaze correctly.
Miso paste is packed with natural sugars and fermented proteins. Both brown fast — and by fast, I mean they’ll go from perfectly caramelized to charred and bitter in just a few minutes if you’re not careful. It’s a bit like sugar on a creme brulee. Great when timed right. Disastrous when you walk away.
The trick is to roast the cauliflower plain first. Just oil and salt. Let it spend 20 uninterrupted minutes building a proper golden crust. Only then do we brush on the miso garlic sauce and send it back into the oven.
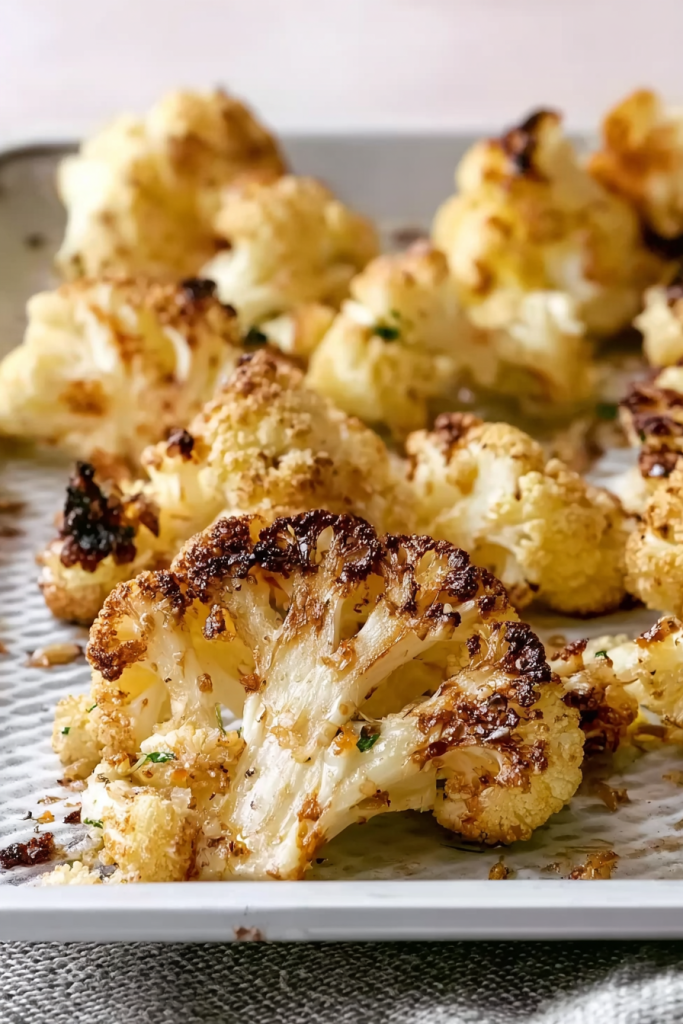
A quick 3-minute broil at the very end does the finishing work. Those edges go deep golden. The glaze turns glossy and slightly tacky. The kitchen smells incredible.
The result? Tender on the inside. Caramelized on the outside. Coated in a glaze that hits salty, sweet, nutty, and aromatic all at once.
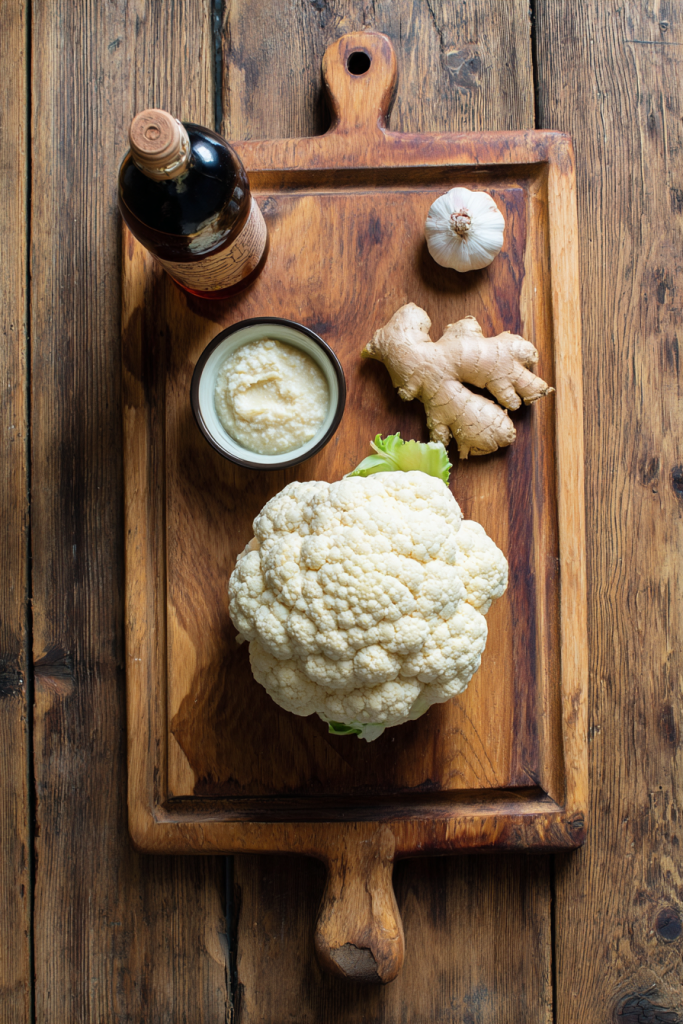
Everything You’ll Need
The good news? The ingredient list is short. Most of it lives in your pantry already.
| Prep Time | Cook Time | Total Time | Servings | Difficulty |
| 10 minutes | 33 minutes | 43 minutes | 4 | Easy |
Full Ingredients at a Glance
| Ingredient | Quantity | Notes |
| For the Miso Garlic Sauce | ||
| Ginger | 1/2 tsp grated (with juice) | From a 1-inch / 2.5 cm knob. Fresh only — no powder. |
| White miso paste | 2 Tbsp | Hikari Miso Organic White Miso works great. Saltier brands? Add more maple syrup. |
| Maple syrup | 1 Tbsp | Cuts through the saltiness. Honey or regular sugar both work fine. |
| Soy sauce | 1 tsp | Just enough to deepen the umami without overpowering. |
| Garlic | 1 clove | Minced fine or pressed. Either way works. |
| For the Cauliflower | ||
| Cauliflower | 1 head (medium-large, ~2.3 lb / 1 kg) | Fresh is best. Cut into evenly-sized florets so they cook at the same rate. |
| Neutral cooking oil | 4 Tbsp | Sunflower, avocado, or vegetable oil. Nothing with a strong flavor. |
| Kosher salt | 1/4 tsp (plus more to taste) | Diamond Crystal brand preferred. It seasons more gently than table salt. |
A Word on Choosing Your Miso
If you’ve never bought miso before, it can feel a little overwhelming. There are so many varieties. But for this recipe, you only need one thing: white miso.
White miso — sometimes called shiro miso — is the mildest of the bunch. It has a gentle, slightly sweet flavor that complements the cauliflower rather than fighting it. Think of it like the difference between a whisper and a shout. For roasted vegetables, you want the whisper.
Hikari Miso’s Organic White Miso is what I reach for. It’s reliable, widely available, and works in pretty much every miso recipe I’ve tried.
| Quick Tip: Every brand of miso has a different salt level. Before you pour that sauce on your cauliflower, taste a small spoonful. Too salty? Stir in another half tablespoon of maple syrup. You’re going for a balance between savory, sweet, and garlicky. |
— SEGMENT 2: Step-by-Step Method —
Let’s Cook: Step-by-Step
Step 1: Make the Miso Garlic Sauce First
Here’s a habit I picked up after a few rushed dinners: build your sauce before you touch the cauliflower. It takes 3 minutes. And it means you won’t be scrambling with a pastry brush while a hot pan sits waiting on the counter.
It also gives the garlic and ginger a few minutes to settle into the miso before it goes anywhere near the oven. The flavors meld. The sauce gets better just sitting there.
- Grate your ginger on a fine ceramic grater. You want the pulp and the juice together — not just one or the other. Measure out a level ½ teaspoon.
- In a small bowl, combine the white miso, maple syrup, and soy sauce. Stir until fully smooth. No lumps, no streaks.
- Press or mince the garlic clove and add it to the bowl along with the grated ginger. Stir everything together.
- Taste it. Savory, slightly sweet, garlicky — that’s what you’re after. If it’s too sharp, add a touch more maple syrup.
| Make-Ahead Tip: The miso garlic sauce keeps in the fridge for up to 3 days in a sealed jar. Make a double batch. You’ll find yourself drizzling it on roasted broccoli, grilled chicken, even plain rice. |
Step 2: Get the Cauliflower Ready
One rule here: consistent sizing. If your florets are all different sizes, the small ones will burn while the large ones are still raw in the middle. Think of it like cooking steaks of wildly different thicknesses at the same time. It just doesn’t work.
Aim for pieces roughly the size of a golf ball. When in doubt, cut them a little smaller rather than larger.
- Preheat the oven to 425°F (230°C). Using a convection setting? Drop it to 400°F (205°C). Middle rack position.
- Set the cauliflower head flat-side down. Cut it into halves, then quarters. Angle your knife to remove the dense inner core from each section.
- Pull the florets apart with your hands or separate with a knife. Golf ball size is your target. Halve any florets that are noticeably bigger.
- Dump all the florets into a large mixing bowl. Add the neutral oil and kosher salt. Toss thoroughly until every piece has a visible, even oil coating.

Step 3: The First Roast — Plain, No Sauce
This is where the real foundation gets built. No sauce yet. Just hot oven, oil-coated florets, and time.
Think of it like searing a steak before finishing it. You’re building a crust first. Everything else comes after.
- Line a large rimmed baking sheet with parchment paper.
- Spread the florets in a single, uncrowded layer. If they’re touching too much, grab a second pan. Crowded cauliflower steams — and steamed cauliflower is not the goal.
- Roast for exactly 20 minutes. Don’t open the oven. Let the heat stay consistent.
- After 20 minutes, pull the pan out. Flip each floret with tongs or a spatula. You should see golden-brown color on the undersides. That’s your sign things are going well.
| Important: Don’t skip the flip. The underside is usually the best-browned surface. Turning the florets exposes fresh sides to the heat and gives you more caramelization all around. |
Step 4: Add the Glaze and Finish Strong
This is the part where everything comes together. The hot, half-roasted cauliflower is ready to absorb the miso garlic sauce. It soaks right in.
- Using a pastry brush, coat each floret generously with the miso garlic sauce. Work quickly — you don’t want the pan cooling down too much.
- Return the pan to the oven and roast for another 10 minutes. The glaze will bubble slightly and deepen in color. That’s exactly right.
- Switch the oven to broil. Keep the rack in the middle — about 9 inches / 22 cm from the heat source. Broil for 3 minutes, watching closely.
- Done when the edges show deep golden-brown color and the glaze looks glossy and slightly tacky — like it’s been lacquered on.
| Watch the broiler: Oven broilers vary a lot. Some run hot. Some don’t. Check at the 2-minute mark. If the edges are already darkening fast, pull it. You want caramelized, not carbonized. |
Two Ways to Cut the Cauliflower
The floret method above is what I use most of the time. But there’s a second approach worth knowing.
| Method | What You Get | Best Used When… |
| Classic Florets | Uneven shapes, lots of surface area | Feeding a crowd. Easy to serve. |
| Cauliflower Steaks | Flat slabs, 1/2 inch thick | You want even browning and a nicer plate presentation. |
Option A: Classic Florets
Pull the head apart into individual florets after removing the core. Great for feeding a crowd since everything holds its shape on the plate. The multiple rounded surfaces make fully even browning tricky — but the miso glaze covers all that generously.
Option B: Cauliflower Steaks
Slice the whole head straight through into ½-inch (1.3 cm) slabs. The flat cut surfaces press right against the hot pan and caramelize far more efficiently than rounded florets. The downside? Each head only gives you 3 to 4 usable steaks. The outer sections crumble. Best when presentation matters and you’re cooking for fewer people.
— SEGMENT 3: Tips, Variations, Serving & FAQs —
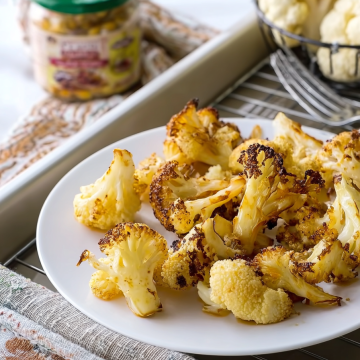
Tips, Variations & Serving Ideas
Things That Actually Make a Difference
A few details separate a good result from a great one.
- Use a heavy baking sheet. Thin, cheap pans warp at 425°F. A heavy-gauge, rimmed sheet pan holds its shape and spreads heat evenly.
- Single layer — always. Piling the cauliflower traps steam. Steam = soft and pale, not roasted and golden. Use two pans if you have a large head.
- Watch that broil step. Three minutes is a rough guide. Check at 2 minutes. Broilers vary more than regular oven temps do.
- Apply the glaze while the florets are still hot. A hot surface helps the sauce sink in slightly instead of just sitting on top.
- Adjust timing by floret size. Smaller pieces might be done a few minutes early. Larger ones may need an extra 5 minutes in the second roast.
| Image Prompt 5: A beautiful ceramic plate with a generous serving of roasted miso cauliflower, garnished with toasted sesame seeds and thinly sliced green onions, shot at a 45-degree angle with a dark linen napkin and chopsticks in the background, warm inviting light. |
Want to Switch Things Up?
Try a Different Miso
White miso is mild and sweet — great for this recipe, especially if you’re new to miso cooking. But swapping it out is a fun way to change the flavor without changing anything else.
| Miso Type | Flavor Profile | Best For | Adjustment Needed? |
| White (Shiro) | Mild, slightly sweet | This recipe — best for beginners | None |
| Yellow (Shinshu) | Earthy, medium-strong | Deeper flavor variation | Reduce soy slightly |
| Red (Aka) | Bold, very salty, funky | Intense umami lovers | Less soy + more maple syrup |
If you use red miso, go easy on the soy sauce and taste as you adjust. It can get salty fast.
Add a Finishing Garnish
The cauliflower is already complete as-is. But if you want to dress it up:
- Toasted sesame seeds: Nutty crunch. Easy to add.
- Thinly sliced scallions: Fresh, slightly sharp contrast to the rich miso glaze.
- A drizzle of sesame oil: Added right before serving. Aromatic depth without any extra cooking.
Turn It Into a Full Meal
This dish is a natural side. But it plays especially well with:
- Steamed jasmine rice and a fried egg — quick weeknight plate.
- Grilled chicken thighs or pan-seared salmon — for something more substantial.
- A bowl of miso soup — keeps the whole Japanese-inspired theme going.
Storage and Reheating
| Storage Method | How Long | Best Practice |
| Refrigerator | Up to 3 days | Cool completely first. Store in an airtight container. |
| Freezer | Up to 1 month | Freeze in a single layer first, then bag. Prevents clumping. |
| Reheating | 8-10 minutes | 400°F oven works best. Microwave is fine but softens the crust. |
One thing worth knowing: the microwave will get the job done if you’re in a hurry. But the oven brings back the crispy edges. That’s usually worth the extra 10 minutes.
Frequently Asked Questions
Can I use a different type of miso if white isn’t available?
Yes. Yellow miso is your closest substitute — earthier and a bit stronger, but still works well. Red miso is fine too, just dial back the soy sauce to about half a teaspoon and add extra maple syrup to balance the saltiness.
One thing to avoid: instant miso powder. It won’t give you the same silky, cohesive glaze. Stick to the paste.
Why does my miso sauce burn before the cauliflower is done?
Almost certainly because the sauce went on too early. Miso has natural sugars that scorch quickly in a hot oven. The fix is simple: always complete the full 20-minute first roast before the glaze goes anywhere near the pan. The florets should look visibly golden before you brush on a single drop of sauce.
Can I make this with frozen cauliflower?
You can. But there’s one step you can’t skip: thaw it completely, spread the florets on a clean kitchen towel, and pat them very dry.
Dry florets = crispy edges. Wet florets = mushy steamed texture.
Frozen cauliflower holds a surprising amount of water. Get rid of it before it hits the oven.
What can I substitute for maple syrup?
Honey works great and gives you an almost identical result. Regular granulated sugar also works — just use about ¾ tablespoon since sugar is sweeter by volume than maple syrup. Brown sugar adds a subtle molasses note that actually pairs nicely with the miso.
Avoid artificial sweeteners. They don’t caramelize, and caramelization is half the point here.
Can I prep this ahead of time?
Absolutely. In fact, I’d encourage it.
- The sauce: Make it up to 3 days ahead. Keeps perfectly in the fridge in a sealed jar.
- The cauliflower: Cut and stored raw in the fridge up to a day before roasting.
- Fully prepped: Roast through step 3, refrigerate, then finish with a quick broil right before serving to bring back the caramelized edges.
Made this recipe? Tag your creation and share your results!
Roasted Miso Garlic Cauliflower — your new favorite vegetable side dish.
Roasted Miso Garlic Cauliflower
Ingredients
Miso Garlic Sauce
- 1/2 tsp fresh ginger grated with juice, from a 1-inch knob
- 2 tbsp white miso paste shiro miso — Hikari Organic recommended
- 1 tbsp maple syrup or honey, or 3/4 tbsp sugar
- 1 tsp soy sauce
- 1 garlic clove minced or pressed
Cauliflower
- 1 medium-large cauliflower head approx. 2.3 lb / 1 kg, cut into golf ball-sized florets
- 4 tbsp neutral cooking oil sunflower, avocado, or vegetable oil
- 1/4 tsp kosher salt plus more to taste — Diamond Crystal preferred
Instructions
- In a small bowl, combine the white miso paste, maple syrup, and soy sauce. Stir until fully smooth with no lumps.
- Grate the ginger on a fine grater, capturing both the pulp and juice. Mince or press the garlic clove. Add both to the miso mixture and stir to combine. Taste and adjust — add more maple syrup if too salty. Set aside.
- Preheat your oven to 425°F (230°C). If using convection, set to 400°F (205°C). Position the rack in the middle.
- Cut the cauliflower into halves, then quarters, removing the dense inner core. Break or cut into golf ball-sized florets, halving any larger pieces for even sizing.
- Add florets to a large mixing bowl. Pour over the neutral oil and kosher salt. Toss thoroughly until every piece is evenly coated.
- Line a large rimmed baking sheet with parchment paper. Spread the florets in a single, uncrowded layer. Use two pans if needed — crowded florets will steam instead of roast.
- Roast for 20 minutes without opening the oven. After 20 minutes, pull the pan out and flip each floret with tongs. The undersides should be golden-brown.
- Using a pastry brush, generously coat each floret with the miso garlic sauce while the pan is still hot. Work quickly to keep the pan warm.
- Return the pan to the oven and roast for another 10 minutes until the glaze bubbles and deepens in color.
- Switch the oven to broil. Keep the rack in the middle position, about 9 inches (22 cm) from the heat source. Broil for 3 minutes, checking at the 2-minute mark. Pull when edges are deep golden and the glaze looks glossy and slightly tacky. Serve immediately.
Notes
Frozen cauliflower: Thaw completely and pat very dry before roasting or it will steam instead of crisp.
Make ahead: Sauce keeps in the fridge up to 3 days. Raw florets can be prepped 1 day ahead. You can also roast through Step 7 and finish with a broil just before serving.
Storage: Refrigerate leftovers in an airtight container up to 3 days. Reheat in a 400°F oven for 8–10 minutes to restore crispiness.


