Caramelized, Gooey & Absolutely Irresistible
A Delicious Little Bites Recipe

How a Takeout Mix-Up Made Me Obsessed With Fried Plantains
Okay, real talk. I ignored plantains for years.
They just sat there in the produce section. Big, clunky, banana-looking things. I figured they tasted the same as bananas. So I walked right past them. Every. Single. Time.
Then one night, my partner grabbed Caribbean takeout on the way home. Tucked inside the bag? A little container of fried sweet plantains.
I popped one in my mouth and… whoa.
Crispy on the outside. Soft and warm in the middle. This subtle sweetness that almost tasted like dessert. I remember thinking, “Wait, THIS is what I’ve been walking past?” Yeah. I felt a little silly.
That one bite changed everything. Since that night, sticky sweet fried plantains have been on regular rotation in our house. I make them with grilled chicken. I pile them over coconut rice. I’ve even dropped them on vanilla ice cream – and trust me, that combo is something special.
Now, plain fried plantains are great on their own. But I wanted more. More sticky. More sweet. More of that caramel-coated goodness.
So I started adding brown sugar, real maple syrup, and vanilla extract to the mix. The coconut oil throws in a little tropical vibe too. The result? An extra-sticky, extra-sweet version that honestly tastes like it came from a restaurant.
The best part? Five ingredients. About 25 minutes. That’s it.
Whether you serve these as a side dish or a quick dessert, they deliver. Every time.
Picking the Right Plantains (This Part Really Matters)
Here’s the thing about plantains – they look like bananas, but they cook totally differently.
And ripeness is everything with this recipe. Pick the wrong ones and you’ll end up with mush. Or worse, starchy potato-flavored slices. Neither is what we’re going for.
So here’s a quick cheat sheet:
| Ripeness Stage | What It Looks Like | Good for This Recipe? |
| Green | Hard, bright green skin | Nope. Way too starchy. |
| Yellow | Yellow skin, firm flesh | Getting there, but still too firm. |
| Yellow + black spots | Dark yellow, scattered spots | YES. This is the sweet spot. |
| Fully black | Soft, dark all over | Too soft. Falls apart in the pan. |
What you want: Dark yellow skin with black spots scattered around. When you press gently, it gives a little – but still holds its shape. Slice it open and the flesh should look pale golden.
Quick tip: Store only has green plantains? No problem. Toss them in a paper bag and leave them on the counter. They’ll ripen in about five to seven days.

What Makes This Version Different
Most fried plantain recipes you’ll find online? They use two ingredients. Oil and plantains. Done.
That works fine. But you’re relying 100% on the fruit’s own sugar to get any caramelization.
This recipe takes a different approach. It layers in three extra sweeteners that do totally different jobs:
- Brown sugar – melts in the hot oil and forms a crunchy, caramelized shell on the outside
- Maple syrup – brings a warm, amber depth that regular sugar just can’t match
- Vanilla extract – rounds it all out with this fragrant, almost bakery-like aroma
The end result?
Crackling edges. Warm, soft centers. A sticky glaze that practically melts on your tongue.
Plus, they’re naturally gluten-free and done in under 30 minutes. Hard to beat that.
Ingredients You’ll Need
Just five things. You probably have most of them already.
| Ingredient | Quantity | Notes |
| Ripe plantains | 3 whole | Peeled and cut into 1/2-inch pieces |
| Brown sugar | 1/4 cup | Packed; dark or light both work |
| Coconut oil | 1 tablespoon | Unrefined for best tropical flavor |
| Pure maple syrup | 1 tablespoon | Use real maple, not pancake syrup |
| Vanilla extract | 1 teaspoon | Pure extract recommended |
One thing I’ll stress: don’t use imitation maple syrup or fake vanilla. I tried it once early on. The flavor difference was huge. The real stuff is worth every penny here.
Let’s Make Sticky Sweet Fried Plantains
Here’s the good news. Once your prep is done, the actual cooking takes under fifteen minutes.
It’s honestly one of those recipes that’s way easier than it looks. Let me walk you through it step by step.
Step 1: Prep Your Plantains
Grab a sharp knife. Cut the ends off each plantain.
Then run a shallow line along the length of the skin. Be gentle here – you don’t want to cut into the actual fruit. Just score through the peel.
Now peel it back with your fingers and toss the skin.
Slice each plantain into pieces about 1/2-inch thick. You’ve got two options:
- Straight across – gives you round coin shapes
- Slight diagonal – gives wider, oval pieces with more surface area (my preference)
I go diagonal every time. More surface area means more caramelization. And more caramelization means more of that sticky-sweet goodness.
Stubborn peel? Run the plantain under warm water for a few seconds. The moisture loosens things up fast.
Step 2: Make the Sweet Coating
Grab two bowls.
Small bowl: Whisk together the pure maple syrup and vanilla extract. Set it aside. This becomes your glaze for the final step.
Large bowl: Add the sliced plantains and packed brown sugar. Gently toss everything together – hands or spatula work fine – until every piece is coated.
The natural moisture on the plantain surfaces helps the sugar stick. Pretty handy.
Why toss in a bowl instead of sprinkling on top? Think of it like seasoning chicken. Tossing gets into all the nooks and crannies. Sprinkling from above? You get patchy spots and uneven results.
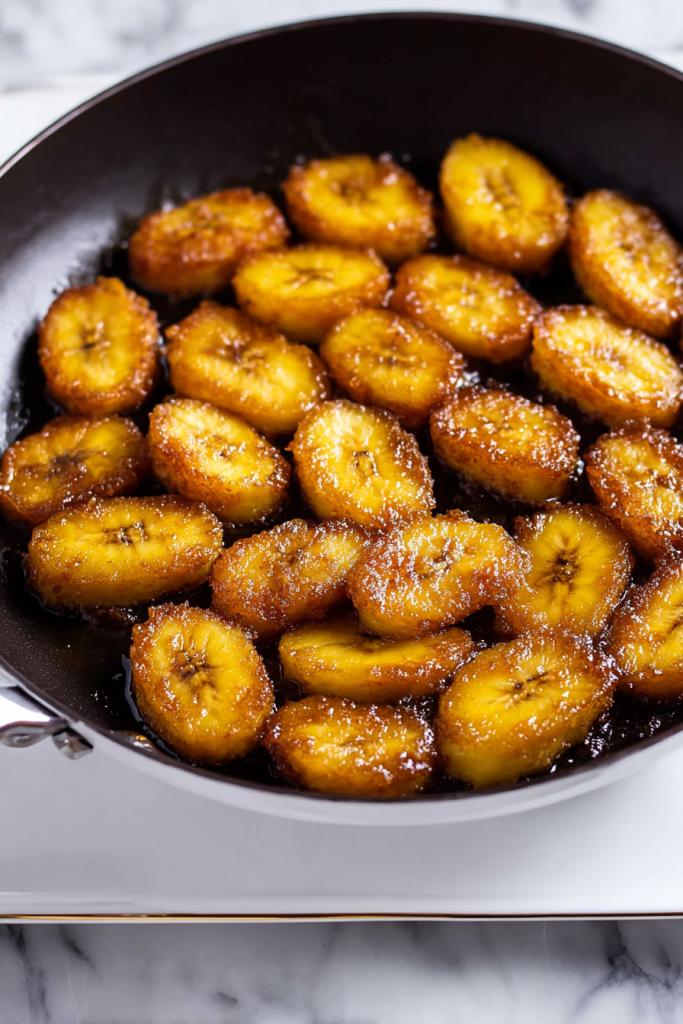
Step 3: Pan-Fry Until Golden
Set a large skillet over medium heat. Add the coconut oil.
Let it melt all the way. Wait until you see that shimmer – that’s how you know the pan is ready.
Lay the sugar-coated plantain slices in a single layer. Don’t let them touch each other. Overcrowding is the enemy here. It traps steam and you end up with soggy plantains instead of crispy ones.
Now here’s the hard part.
Don’t. Touch. Them.
Seriously. Let them sit for 3 to 5 minutes. The sugar needs constant contact with the hot pan to caramelize. Moving them around breaks that crust before it forms.
Once the bottoms are deep golden brown, flip each piece with tongs or a thin spatula.
The second side goes faster. The pan is hotter now, the sugar is already melting. Give it 2 to 4 more minutes and you’re golden. Literally.
Keep your eyes on the pan. Brown sugar goes from “perfectly caramelized” to “burnt” in about ten seconds flat. If things are moving too fast, just nudge the heat down a bit.
Step 4: Hit Them With the Maple-Vanilla Glaze
Both sides done? Beautiful.
Now pour that maple syrup and vanilla mixture right into the skillet. Give the pan a swirl or gently toss the pieces so everything gets coated.
The syrup hits the hot pan and starts bubbling and thickening almost right away. That’s the sticky magic happening.
It takes maybe 30 seconds. And it smells incredible.
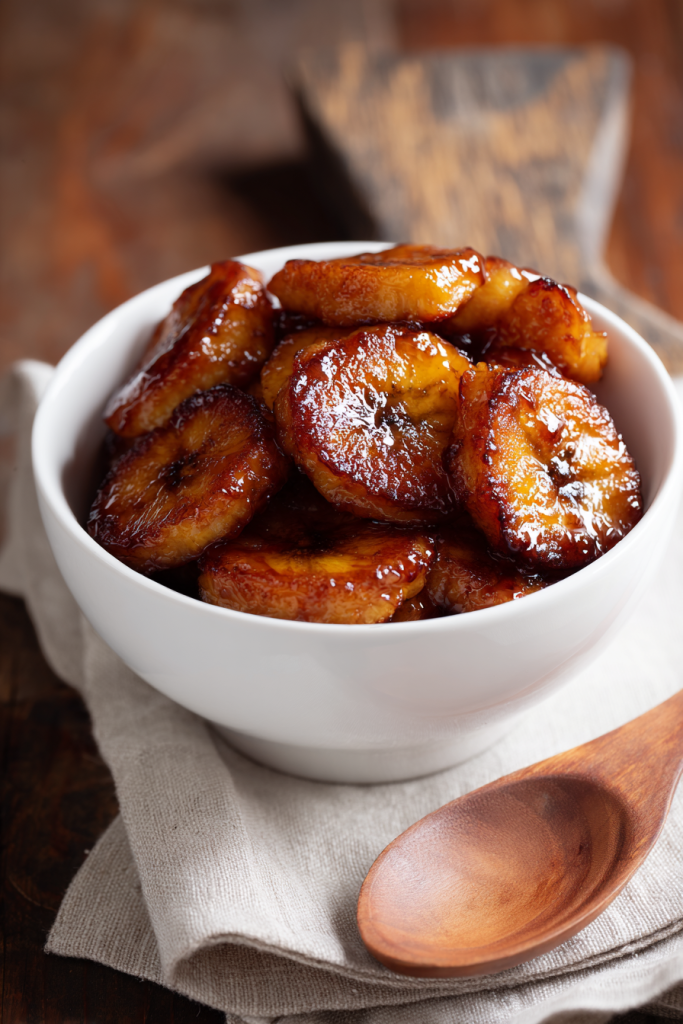
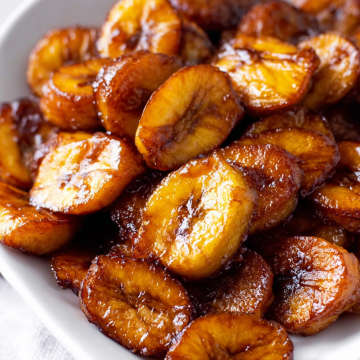
Step 5: Plate and Serve (Right Away!)
Move the glazed plantains straight to a serving plate or shallow bowl.
Important: do not put them on paper towels. I made this mistake once. The caramel glaze bonded to the paper like superglue. I lost half my coating peeling them off. Lesson learned.
These are best warm. The crispy exterior holds up for about ten minutes before it starts softening. So call everyone to the table quick.
Kitchen Tips That’ll Save You
After making these more times than I can count, here’s what I’ve learned:
- Keep it at medium heat. High heat scorches the sugar before the inside cooks. Trust the process.
- Cook in batches if you need to. Can’t fit everything in one layer? Do two rounds. Just know batch two browns faster since the pan is already hot.
- Real ingredients matter. Pure maple syrup and genuine vanilla extract taste wildly different from the fake stuff. This is a five-ingredient recipe – each one counts.
- Toss, don’t sprinkle. Bowl-coating gives you even coverage. Top-sprinkling gives you some spots that are sweet and others that aren’t.
- Ditch the paper towels. Sticky glaze + paper = a mess you don’t want. Use a plate, bowl, or wire rack.
- Watch the second flip. It cooks noticeably faster. Don’t walk away from the stove at this point.
Ways to Serve These (You’ve Got Options)
Honestly? The versatility is what keeps me making these over and over.
They slide right between “dinner side” and “dessert” without any awkwardness. Here are my favorite ways to eat them:
- As a side dish: Next to grilled chicken, jerk-seasoned proteins, or coconut rice. Instant Caribbean plate.
- As dessert: Scoop of vanilla ice cream. Extra drizzle of maple syrup. Done. It’s almost embarrassingly good.
- Straight-up snack: Just eat them out of the bowl. Fair warning – they rarely last long enough to make it to the table.
- Breakfast bowl: Scrambled eggs, black beans, a squeeze of lime, and a few of these on the side. Tropical morning vibes.
- Cheese board addition: Toss a few warm slices alongside soft cheese, crackers, and fresh fruit. People will not expect it. And they’ll love it.
What About Leftovers?
If you somehow have any left (rare in my house), pop them in an airtight container. They’ll keep in the fridge for up to three days.
The texture softens once they’re chilled. But reheating brings back a lot of the original goodness.
Best reheating methods:
- Oven: Spread on a baking sheet, 350°F, 8 to 10 minutes
- Skillet: Medium-low heat, about 3 minutes per side
- Microwave: Works in a pinch, but the crispy edges will go soft
I wouldn’t freeze these though. The sugar glaze gets grainy after thawing and the whole texture changes. Not worth it.
Frequently Asked Questions
Can I swap the coconut oil for something else?
For sure. Coconut oil adds a nice tropical hint, but it’s not a dealbreaker.
You can use avocado oil, vegetable oil, or even butter. All of them fry just fine. You’ll just lose that subtle coconut flavor.
How ripe do the plantains need to be?
Dark yellow with black spots. That’s the target.
They should feel slightly soft when pressed but still firm enough to hold their shape. If they’re completely black and squishy, they’ll fall apart in the pan. If they’re green or bright yellow, they’ll taste like starchy potatoes.
Can I just use regular bananas instead?
You can, but it’s a different experience. Bananas are thinner, softer, and way sweeter. They’ll cook much faster too.
If plantains aren’t available, go with the firmest bananas you can find. And keep a close eye on the pan – they’ll need less time.
My plantains keep sticking to the pan. What’s going on?
Two things to check.
First, make sure the oil is fully melted and hot before any plantains go in. Cold oil = instant sticking.
Second, don’t try to flip them too early. Let the bottom caramelize and form a proper crust first. Once that crust forms, they release on their own. A non-stick skillet helps a lot here too.
Can I prep these ahead for a dinner party?
You can do all the slicing and coating a day ahead. Keep everything in the fridge.
But honestly? They’re so much better fresh out of the skillet. If you’re hosting, my advice: prep everything beforehand, then fry them right before everyone sits down. Takes less than 15 minutes.
Sticky Sweet Fried Plantains
Ingredients
- 3 ripe plantains peeled and cut into 1/2-inch diagonal slices
- 1/4 cup brown sugar packed; dark or light both work
- 1 tbsp coconut oil unrefined for best tropical flavor
- 1 tbsp pure maple syrup use real maple, not pancake syrup
- 1 tsp vanilla extract pure extract recommended
Instructions
- Cut the ends off each plantain. Score a shallow line along the length of the skin, peel it back, and discard the skin. Slice each plantain into 1/2-inch thick diagonal pieces for maximum surface area and caramelization.
- In a small bowl, whisk together the pure maple syrup and vanilla extract. Set aside — this will be your glaze. In a large bowl, add the plantain slices and packed brown sugar. Gently toss until every piece is evenly coated.
- Heat a large skillet over medium heat and add the coconut oil. Let it melt completely until shimmering. Arrange the sugar-coated plantain slices in a single layer — do not overcrowd the pan or they will steam instead of caramelize.
- Cook undisturbed for 3 to 5 minutes until the bottoms are deep golden brown. Flip each piece carefully with tongs or a thin spatula. Cook the second side for 2 to 4 minutes. Watch closely — brown sugar can go from caramelized to burnt very quickly.
- Pour the maple syrup and vanilla mixture into the skillet. Swirl the pan or gently toss the plantains to coat. Let the glaze bubble and thicken for about 30 seconds.
- Transfer the glazed plantains immediately to a serving plate or bowl. Do not place on paper towels — the sticky glaze will bond and you will lose your coating. Serve warm right away for the best crispy texture.