I’ll never forget the first time I made an Apple Mug Cake. It was one of those evenings when I craved something sweet but didn’t want to dirty a dozen dishes. That’s when this little gem of a recipe changed everything for me! This single-serving dessert combines the warm flavors of cinnamon-spiced apples with the convenience of microwave cooking. Within minutes, you’ll have a perfectly portioned treat that tastes like it came from a bakery. The aroma alone will make your mouth water as cinnamon and nutmeg fill your kitchen. Best of all, you don’t need any fancy equipment or advanced baking skills to master this recipe.

Why This Apple Mug Cake Recipe Works
Mug cakes have revolutionized the way we think about desserts. They offer instant gratification without the commitment of baking an entire cake. This Apple Mug Cake recipe works beautifully because it balances moisture, flavor, and texture in one small serving. The melted butter creates richness while keeping the cake tender. Brown sugar adds depth and caramel-like notes that complement the apples perfectly. The combination of cinnamon and nutmeg brings warmth and complexity to every bite. Meanwhile, the chopped apples provide bursts of freshness and natural sweetness throughout the cake. The microwave cooking method ensures even heat distribution in just two minutes. You get a dessert that’s fluffy, moist, and satisfying without overheating your kitchen.
What Makes This Recipe Special
I’ve tried countless mug cake recipes, but this Apple Mug Cake stands above the rest. The texture hits that perfect sweet spot between cake and pudding. It’s soft enough to eat with a spoon yet structured enough to hold toppings. The fresh apple pieces create delightful texture contrast against the tender crumb. Each bite delivers the comforting flavors of apple pie without the fuss of rolling dough. This recipe also adapts beautifully to your preferences and dietary needs. You can adjust the sweetness, add extra spices, or incorporate your favorite mix-ins. It’s genuinely foolproof, making it perfect for beginners and experienced bakers alike. Plus, portion control becomes effortless when you’re making just one serving at a time.
Perfect for Any Occasion
This Apple Mug Cake fits seamlessly into various moments throughout your day. Need a quick breakfast treat to start your morning right? This cake delivers energy and satisfaction. Looking for an afternoon pick-me-up with your coffee or tea? It pairs beautifully with hot beverages. Craving a late-night dessert but don’t want to wake the whole house? The microwave keeps things quiet and quick. It’s also fantastic for satisfying kids’ sweet tooth requests without making a big production. I’ve even served these at casual gatherings by making individual cakes for each guest. The recipe scales easily, and everyone loves having their own personalized dessert. Whether you’re cooking for one or entertaining friends, this versatile recipe has you covered.
The Science Behind the Perfect Mug Cake
Understanding why this recipe works helps you achieve consistent results every time. The baking powder provides lift, creating a light and airy texture. Salt enhances all the other flavors while balancing the sweetness. The small amount of flour ensures the cake cooks quickly without becoming dense. Melted butter distributes fat evenly throughout the batter for tender results. The milk adds moisture and helps create steam during cooking. This steam is crucial for achieving that soft, cake-like consistency. The brown sugar not only sweetens but also adds moisture thanks to its molasses content. When you combine everything in the mug and microwave it, magic happens. The batter transforms from liquid to cake in under two minutes through rapid heat transfer.
Ingredients, Instructions & Recipe Details
Ingredients You’ll Need
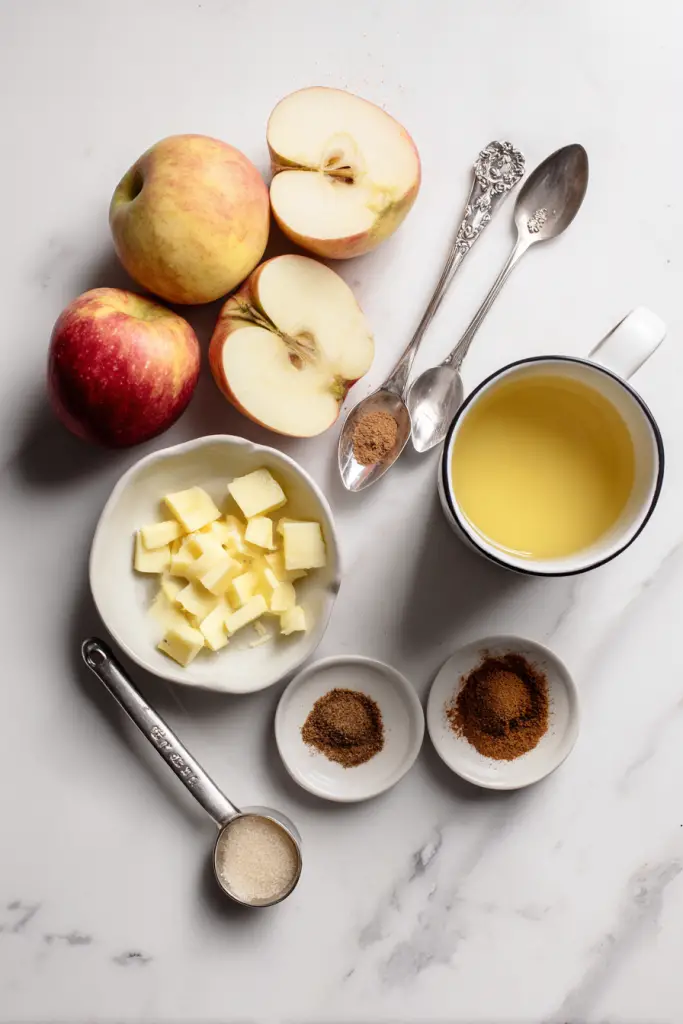
Gathering your ingredients takes just minutes, and most are probably in your pantry already. Here’s everything you need for one perfect Apple Mug Cake:
| Ingredient | Quantity | Notes |
|---|---|---|
| Unsalted butter | 1 tablespoon | Melted; salted butter works but reduce added salt |
| Milk | 2 tablespoons | Any milk variety works; dairy or non-dairy |
| Vanilla extract | 1/4 teaspoon | Pure vanilla preferred for best flavor |
| All-purpose flour | 3 tablespoons | Leveled measurements for accuracy |
| Light brown sugar | 1 and 1/2 tablespoons | Packed when measuring |
| Ground cinnamon | 1/4 teaspoon | Freshly ground offers stronger flavor |
| Nutmeg | Pinch | Freshly grated if possible |
| Baking powder | 1/8 teaspoon | Ensures proper rise |
| Salt | Pinch | Enhances overall flavor |
| Apple | 3 tablespoons | Peeled, finely chopped; Honeycrisp or Granny Smith |
| Walnuts | 1 tablespoon | Optional; chopped for texture |
Recipe Timing:
Prep Time: 5 minutes | Cook Time: 2 minutes | Total Time: 7 minutes
Servings: 1 | Difficulty: Easy
Step-by-Step Instructions
Follow these simple steps to create your perfect Apple Mug Cake:
Step 1: Melt Your Butter
Start by placing the unsalted butter in your microwave-safe mug. Microwave it for 20 to 30 seconds until completely melted. Don’t let it get too hot or start bubbling vigorously. The residual heat will continue warming the mug, which helps everything combine smoothly. Choose a mug that holds at least 12 ounces to prevent overflow during cooking. I prefer using ceramic mugs because they distribute heat evenly and look appealing when serving.
Step 2: Add Wet Ingredients
Pour the milk and vanilla extract into the melted butter. Use a fork or small whisk to mix everything together thoroughly. The mixture should look uniform with no butter pools floating on top. This step creates your liquid base and ensures even distribution of vanilla flavor. Take your time here; proper mixing at this stage prevents lumps later. The milk should be at room temperature for the best blending results.
Step 3: Incorporate Dry Ingredients
Add the flour, brown sugar, cinnamon, nutmeg, baking powder, and salt to your mug. Whisk everything together until you achieve a smooth, lump-free batter. This usually takes about 30 to 45 seconds of steady mixing. Make sure to scrape the bottom of the mug where flour tends to hide. The batter should be thick but pourable, similar to pancake batter. If you see any dry pockets, keep whisking until they disappear completely.
Step 4: Fold in Apples and Walnuts
Gently fold the chopped apples into your batter using a spoon. If you’re using walnuts, add them now too. Distribute the apple pieces evenly throughout the batter for consistent flavor in every bite. Be careful not to overmix at this point, or you’ll deflate the batter. The apples should be visible throughout but covered with batter. Press down any pieces sticking up to prevent burning during cooking.
Step 5: Smooth and Prepare
Use your spoon or a small spatula to smooth the batter surface. This helps ensure even rising during cooking. If any batter has splashed on the mug’s sides, wipe it clean with a damp paper towel. This prevents those spots from burning and creating unwanted flavors. The batter should sit about halfway up your mug to allow room for expansion.
Step 6: Microwave to Perfection
Place your mug in the center of the microwave for optimal heat distribution. Cook on high power for 90 seconds to 2 minutes. The exact time depends on your microwave’s wattage and the mug’s thickness. Start with 90 seconds, then add time in 10-second increments if needed. The cake is done when it rises significantly and the center looks set. A few moist spots on top are fine; the cake continues cooking after removal. Avoid overcooking, as this creates a rubbery texture.
Step 7: Rest Before Serving
Let your mug cake rest for 1 to 2 minutes after microwaving. This resting period allows the cake to firm up and makes it easier to eat. The carryover cooking also completes the process in the center. During this time, you can prepare your toppings and let the mug cool slightly. The cake will pull away from the mug’s sides a bit as it cools.
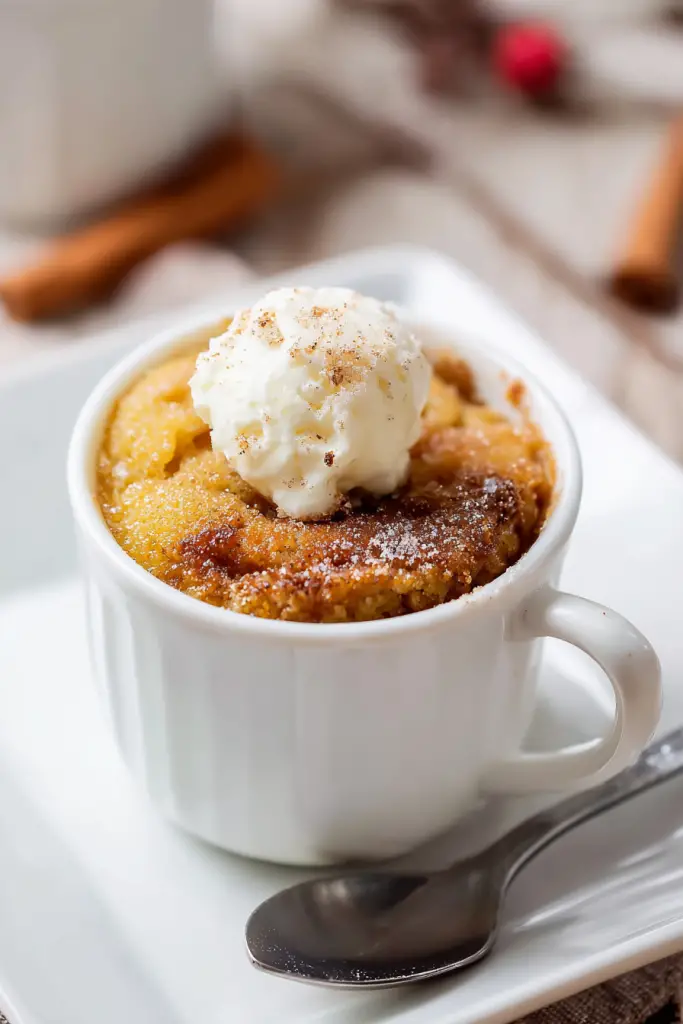
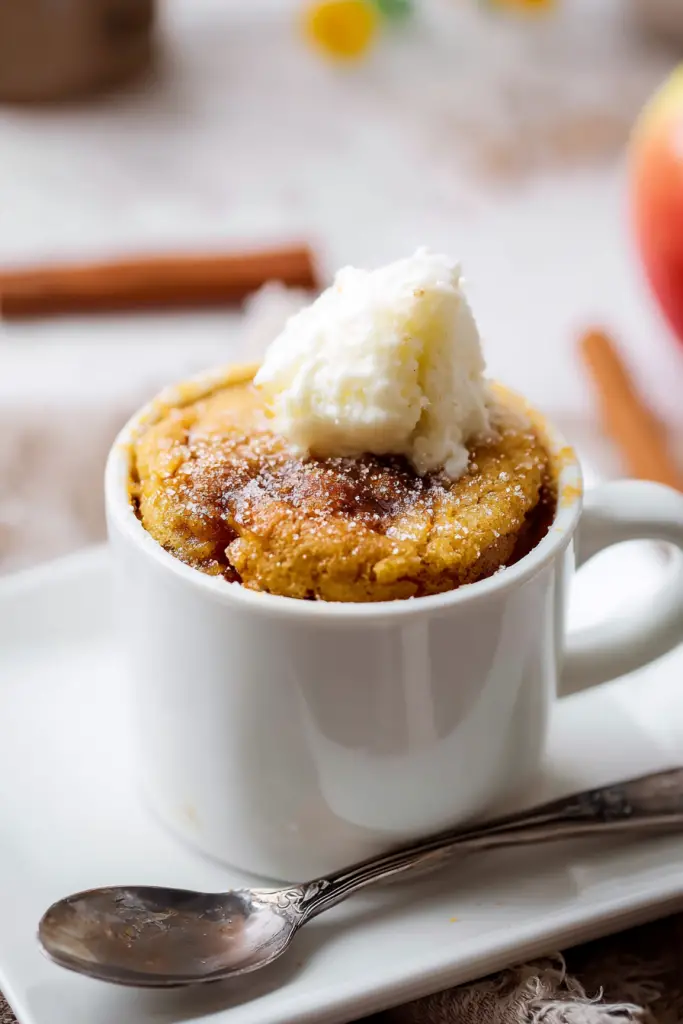
Step 8: Add Toppings and Enjoy
Now comes the fun part – adding your favorite toppings! I love topping mine with vanilla ice cream while the cake is still warm. The contrast between hot cake and cold ice cream is absolutely divine. A drizzle of caramel sauce adds extra sweetness and visual appeal. You can also sprinkle extra chopped walnuts on top for added crunch. Eat directly from the mug with a spoon for the full cozy experience.
Serving Suggestions That Elevate Your Cake
While this Apple Mug Cake is delicious on its own, the right accompaniments take it to another level. Serve it warm for the best texture and flavor experience. The cake pairs wonderfully with vanilla ice cream, which melts into the warm crevices. Greek yogurt offers a tangy alternative that balances the sweetness beautifully. A dollop of whipped cream adds lightness and elegance to your presentation. For beverage pairings, consider hot apple cider or chai tea for amplified autumn flavors. Strong coffee cuts through the sweetness and makes this an excellent afternoon treat. Hot cocoa creates an indulgent dessert experience perfect for chilly evenings.
Tips, Variations & FAQs
Expert Tips for Perfect Results Every Time
After making this recipe countless times, I’ve learned several tricks that guarantee success. Here are my top tips:
Master Your Microwave: Every microwave has its personality, so adjust cooking times accordingly. Higher wattage microwaves (1000W+) may need only 75 to 90 seconds. Lower wattage units might require the full 2 minutes or slightly more. Watch through the window as your cake cooks to prevent overflow or overcooking.
Choose the Right Mug: Size matters when making mug cakes! Use a mug that holds at least 12 ounces to prevent batter overflow. Wide-mouth mugs work better than tall, narrow ones because they promote even cooking. Avoid mugs with metal trim, which can spark in the microwave.
Apple Selection Makes a Difference: Honeycrisp apples provide natural sweetness and maintain texture during cooking. Granny Smith apples offer tartness that balances the brown sugar beautifully. I sometimes mix both varieties for a complex flavor profile. Cut your apple pieces small and uniform for even distribution and cooking.
Don’t Skip the Resting Time: Those 1 to 2 minutes of resting aren’t optional. The cake continues cooking and firming up during this period. Eating immediately results in a too-soft, almost gooey texture. Patience pays off with better consistency and easier eating.
Measure Accurately: With such small quantities, accurate measurements matter significantly. Level off your flour and don’t pack it into the measuring spoon. Pack brown sugar as directed for the right amount of sweetness. Use actual measuring spoons rather than regular spoons for precision.
Creative Variations to Try
Once you’ve mastered the basic recipe, experiment with these delicious variations:
Berry Apple Fusion: Add 1 tablespoon of fresh or frozen blueberries along with the apples. The berries burst during cooking, creating pockets of jammy sweetness. Raspberries work beautifully too, adding tartness and visual appeal.
Caramel Apple Dream: Swirl 1 teaspoon of caramel sauce into the batter before cooking. Top the finished cake with additional caramel and sea salt for a sophisticated twist. This variation tastes like a deconstructed caramel apple.
Chocolate Chip Addition: Fold in 1 tablespoon of mini chocolate chips for a different flavor dimension. The chocolate melts slightly, creating ribbons throughout the cake. Use dark chocolate for a more grown-up taste.
Gluten-Free Adaptation: Replace all-purpose flour with almond flour or a gluten-free flour blend. Almond flour creates a denser, more moist cake with nutty undertones. You may need to increase cooking time by 10 to 15 seconds.
Maple Pecan Version: Substitute maple syrup for brown sugar and use pecans instead of walnuts. This combination evokes fall flavors and pairs wonderfully with breakfast coffee. Add a pinch of cardamom for extra warmth.
Vegan Friendly: Use plant-based butter and your favorite non-dairy milk. Replace the egg (if you added one to your version) with a flax egg. The texture differs slightly but remains delicious and satisfying.
Storage and Make-Ahead Tips
While this cake tastes best fresh, you can prepare components in advance:
Dry Mix Preparation: Combine flour, brown sugar, cinnamon, nutmeg, baking powder, and salt in advance. Store in an airtight container for up to a month. When ready to bake, add wet ingredients and fresh apples.
Short-Term Storage: If you have leftovers, cover the mug with plastic wrap and refrigerate. The cake stays good for up to 24 hours. Reheat in the microwave for 20 to 30 seconds before serving.
Apple Prep: Chop apples and toss with a tiny bit of lemon juice to prevent browning. Store in an airtight container in the refrigerator for up to a day. Drain any liquid before adding to batter.
Troubleshooting Common Issues
Problem: Cake is rubbery or tough
Solution: You’ve likely overcooked it. Reduce microwave time by 10 to 15 seconds next attempt. Remember, slight moisture on top is normal and doesn’t indicate undercooking.
Problem: Cake overflowed during cooking
Solution: Your mug was too small or you filled it too high. Use a larger mug and ensure batter only fills halfway initially.
Problem: Cake is dry
Solution: Add an extra teaspoon of milk to the batter or reduce cooking time. Some microwaves run hot and dry out cakes quickly.
Problem: Uneven cooking
Solution: Your microwave may have hot spots. Rotate the mug halfway through cooking time. Make sure the batter is evenly distributed before cooking.
Problem: Cake didn’t rise
Solution: Check that your baking powder is fresh and active. Old baking powder loses potency and won’t provide adequate lift.
Frequently Asked Questions
Can I make this Apple Mug Cake without a microwave?
Yes, you can! Bake it in a regular oven at 350°F for about 15 to 18 minutes. Use an oven-safe ramekin instead of a mug. The texture will be slightly different but equally delicious. Check doneness by inserting a toothpick; it should come out with just a few moist crumbs.
What’s the best apple variety for this recipe?
I recommend Honeycrisp or Granny Smith apples for their distinct characteristics. Honeycrisp apples are naturally sweet and maintain their shape during cooking. Granny Smith apples provide tartness that balances the sugar perfectly. Fuji and Gala apples work well too. Avoid Red Delicious, which become mushy and lack flavor intensity.
Can I double this recipe to make two servings?
Absolutely! Double all ingredients and divide the batter between two mugs. Cook them separately rather than together to ensure even cooking. Alternatively, use a larger microwave-safe bowl and extend cooking time to 3 to 4 minutes. Check doneness frequently to avoid overcooking.
How do I know when my mug cake is done?
The cake should rise significantly and look set on top. A few moist spots are fine and actually preferred. The center might look slightly underdone, but it will firm up during resting. If you’re unsure, insert a toothpick into the center. It should come out with a few moist crumbs, not wet batter.
Can I prepare the batter ahead of time?
It’s best to cook the batter immediately after mixing for optimal rise and texture. The baking powder activates when combined with wet ingredients and loses potency over time. However, you can measure out dry ingredients in advance. Store them in an airtight container and add wet ingredients when ready to cook.
Final Thoughts on Your Apple Mug Cake Journey
This Apple Mug Cake has become my go-to dessert when I need something quick and comforting. The simplicity of the recipe belies the depth of flavor you’ll achieve. Every element works together to create a perfectly balanced treat in minutes. The warm spices, tender apples, and soft cake combine beautifully in each spoonful. Whether you’re treating yourself after a long day or impressing unexpected guests, this recipe delivers. The best part is how easily you can customize it to your preferences. Once you master the basic recipe, the variations become endless possibilities. I encourage you to experiment with different apples, spices, and toppings until you find your perfect combination. Don’t be afraid to make this recipe your own. Happy baking, and enjoy every delicious bite of your homemade Apple Mug Cake!
Nutritional Information (Approximate per serving):
Calories: 280 | Fat: 12g | Carbohydrates: 40g | Protein: 4g | Fiber: 2g | Sugar: 20g
Note: Nutritional values are estimates and may vary based on specific ingredients used and portion sizes.
Apple Mug Cake
Ingredients
- 1 tablespoon unsalted butter melted
- 2 tablespoons milk
- 1/4 teaspoon vanilla extract
- 3 tablespoons all-purpose flour
- 1 and 1/2 tablespoons light brown sugar packed
- 1/4 teaspoon ground cinnamon
- 1 pinch nutmeg
- 1/8 teaspoon baking powder
- 1 pinch salt
- 3 tablespoons apple peeled and finely chopped (Honeycrisp or Granny Smith)
- 1 tablespoon walnuts chopped (optional)
- For Topping optional:
- Vanilla ice cream
- Caramel sauce
- Extra chopped walnuts
Instructions
- Step 1: Melt the Butter
- Place the unsalted butter in a microwave-safe mug (at least 12 ounces). Microwave for 20-30 seconds until completely melted. Don’t let it bubble vigorously.
- Step 2: Add Wet Ingredients
- Pour the milk and vanilla extract into the melted butter. Use a fork or small whisk to mix everything together thoroughly until uniform with no butter pools floating on top.
- Step 3: Incorporate Dry Ingredients
- Add the flour, brown sugar, cinnamon, nutmeg, baking powder, and salt to your mug. Whisk everything together until you achieve a smooth, lump-free batter (about 30-45 seconds). Make sure to scrape the bottom of the mug where flour tends to hide.
- Step 4: Fold in Apples and Walnuts
- Gently fold the chopped apples into your batter using a spoon. If using walnuts, add them now too. Distribute the apple pieces evenly throughout the batter. Press down any pieces sticking up to prevent burning.
- Step 5: Smooth and Prepare
- Use your spoon or a small spatula to smooth the batter surface. Wipe any batter splashes on the mug’s sides with a damp paper towel. The batter should sit about halfway up your mug to allow room for expansion.
- Step 6: Microwave
- Place your mug in the center of the microwave. Cook on high power for 90 seconds to 2 minutes. Start with 90 seconds, then add time in 10-second increments if needed. The cake is done when it rises significantly and the center looks set. A few moist spots on top are fine.
- Step 7: Rest
- Let your mug cake rest for 1-2 minutes after microwaving. This allows the cake to firm up and complete cooking in the center.
- Step 8: Serve
- Top with vanilla ice cream, caramel sauce, and extra chopped walnuts if desired. Eat directly from the mug with a spoon.