

There’s something magical about the combination of buttery caramelized sugar coating perfectly toasted walnuts. I’ve been making these candied walnuts for years, and they never fail to impress whether I’m serving them at dinner parties or packing them as homemade gifts. What started as a desperate attempt to elevate a simple salad has become one of my most requested recipes.
The beauty of this candied walnuts recipe lies in its simplicity. With just three ingredients and five minutes of your time, you can transform ordinary walnuts into an extraordinary treat that rivals anything you’d find in gourmet stores. I love how versatile these little gems are – they’re equally at home sprinkled over a fresh spinach salad as they are nestled in a gift box for the holidays.
Why You’ll Love This Recipe
Quick & Effortless: I can whip up a batch during commercial breaks. Seriously, it takes just 5 minutes from start to finish, making it perfect for those moments when you need something special without the fuss.
Minimal Ingredients: Using only walnuts, granulated sugar, and unsalted butter, this recipe proves that sometimes the best things come from the simplest combinations. I always have these ingredients on hand, which means I can make candied walnuts whenever the craving strikes.
Incredibly Versatile: These candied walnuts have saved countless meals in my kitchen. They transform ordinary salads into restaurant-quality dishes, turn plain yogurt into a gourmet breakfast, and make any cheese board look professionally curated.
Perfect for Gifting: I’ve packaged these in mason jars for teacher gifts, hostess presents, and holiday treats. They look elegant and taste expensive, but the cost is surprisingly modest.
Customizable Base: While this recipe is perfect as-is, it serves as an excellent foundation for experimentation. I’ve added cinnamon during fall, a pinch of sea salt for sophistication, and even cayenne for guests who enjoy a little heat.
What Makes These Candied Walnuts Special
The secret to my candied walnuts lies in the technique rather than exotic ingredients. By cooking everything in one pan and stirring constantly, I ensure each walnut gets evenly coated with that beautiful caramelized sugar. The butter doesn’t just add richness – it helps the sugar adhere properly and creates that glossy finish that makes these nuts irresistible.
I’ve experimented with different cooking methods over the years, including oven-roasted versions, but nothing beats the control and speed of the stovetop method. You can watch the transformation happen in real-time and achieve that perfect golden color that signals they’re done.
Recipe Timing
Prep Time: 2 minutes | Cook Time: 5 minutes | Total Time: 7 minutes
Servings: 4 | Difficulty: Easy
Ingredients Table
| Ingredient | Quantity | Notes |
|---|---|---|
| Walnut halves or pieces | 1 cup | Choose pieces that are roughly uniform in size |
| Granulated sugar | ¼ cup | Regular white sugar works best for caramelization |
| Unsalted butter | 1 tablespoon | Room temperature butter incorporates more easily |
Ingredient Highlights
Walnuts: I prefer using walnut halves when I can find good quality ones, as they present beautifully and have more surface area for the sugar coating. Pieces work just as well and are often more economical. Look for walnuts that smell fresh and aren’t overly dark, as older nuts can taste bitter.
Granulated Sugar: Regular white sugar is essential here because it caramelizes predictably and creates that classic candy coating. I’ve tried brown sugar, but it doesn’t achieve the same crisp texture and can burn more easily.
Unsalted Butter: Using unsalted butter gives me complete control over the flavor profile. The butter should be at room temperature or slightly softened to incorporate smoothly with the sugar and coat the walnuts evenly.
Pro Tips Before You Start
Choose the Right Pan: I always use a non-stick skillet for this recipe. It prevents sticking and makes cleanup effortless. A heavy-bottomed pan distributes heat evenly, which is crucial for proper caramelization.
Prep Your Cooling Surface: Before I start cooking, I line a baking sheet with parchment paper. Once the nuts are ready, you need to transfer them quickly, so having everything prepared is essential.
Keep Stirring: Constant motion is the key to success. I use a wooden spoon or heat-resistant spatula and never stop stirring once the butter starts melting.
How to Make 5-Minute Candied Walnuts
Step 1: Prepare Your Workspace I start by lining a baking sheet with parchment paper and placing it near the stove. This preparation step is crucial because once the nuts are ready, you need to transfer them immediately to prevent overcooking.
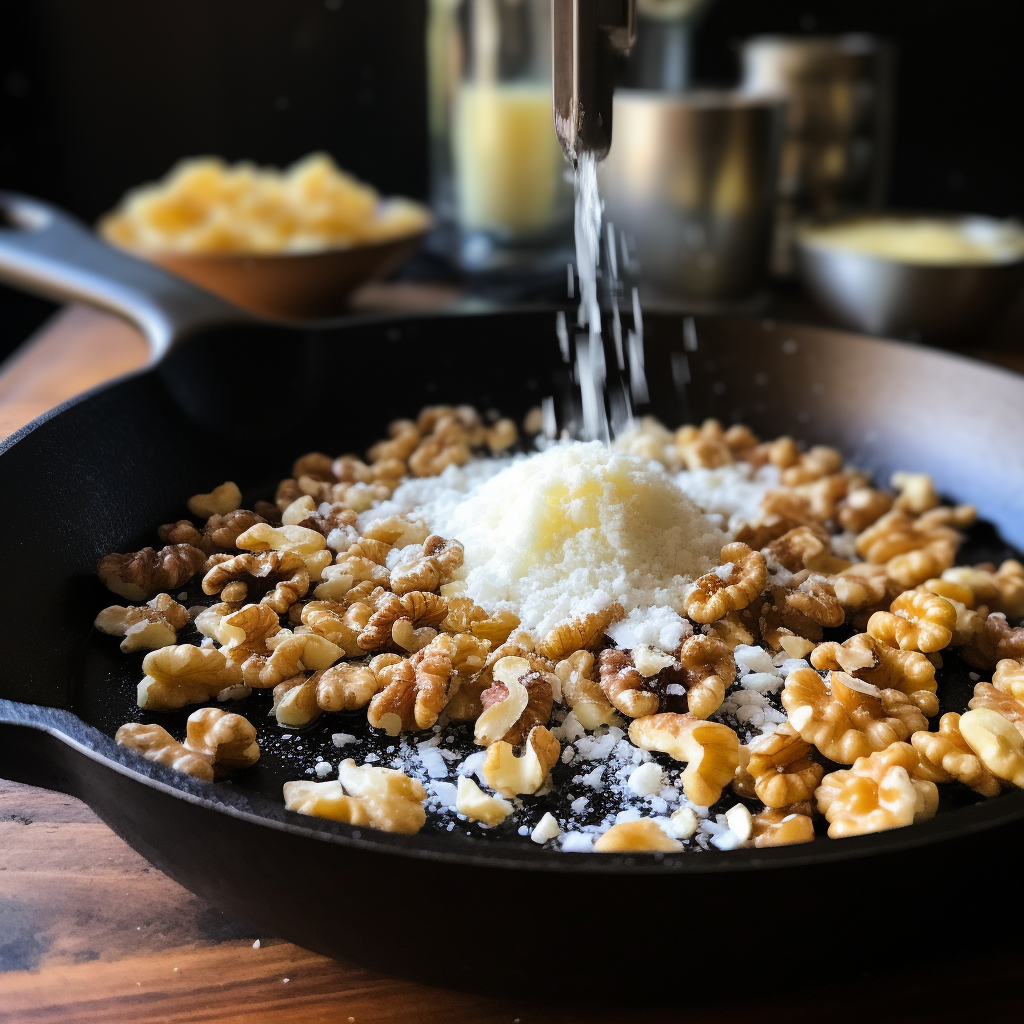
Step 2: Heat and Combine Place your non-stick skillet over medium heat. Add all three ingredients – the cup of walnuts, ¼ cup of granulated sugar, and tablespoon of butter – directly to the cold pan. Starting with a cold pan allows everything to heat together gradually, which prevents the sugar from burning.
Step 3: The Magic Happens As the pan heats up, begin stirring constantly with a wooden spoon. First, you’ll notice the butter melting and coating the walnuts. Then the sugar will start to dissolve and bubble. This is where the magic happens – keep stirring as the mixture transforms from separate ingredients into a glossy, golden coating.
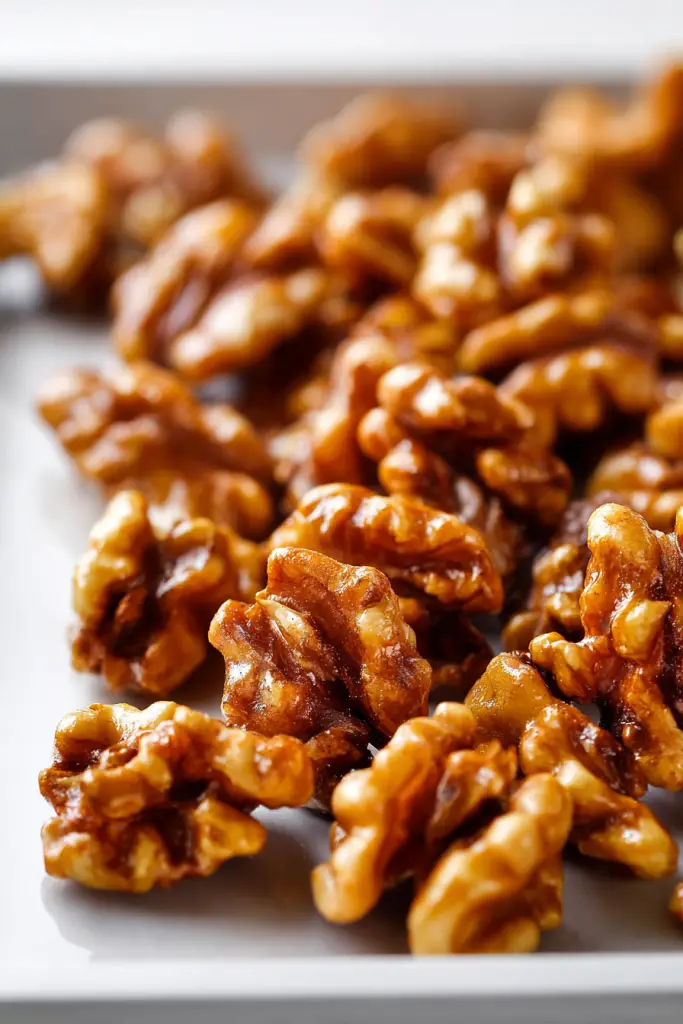
Step 4: Watch for the Perfect Color Continue stirring for about 3-5 minutes total. The mixture is ready when the sugar has completely caramelized to a beautiful amber color and every walnut is evenly coated. The nuts should look glossy and smell incredibly fragrant.
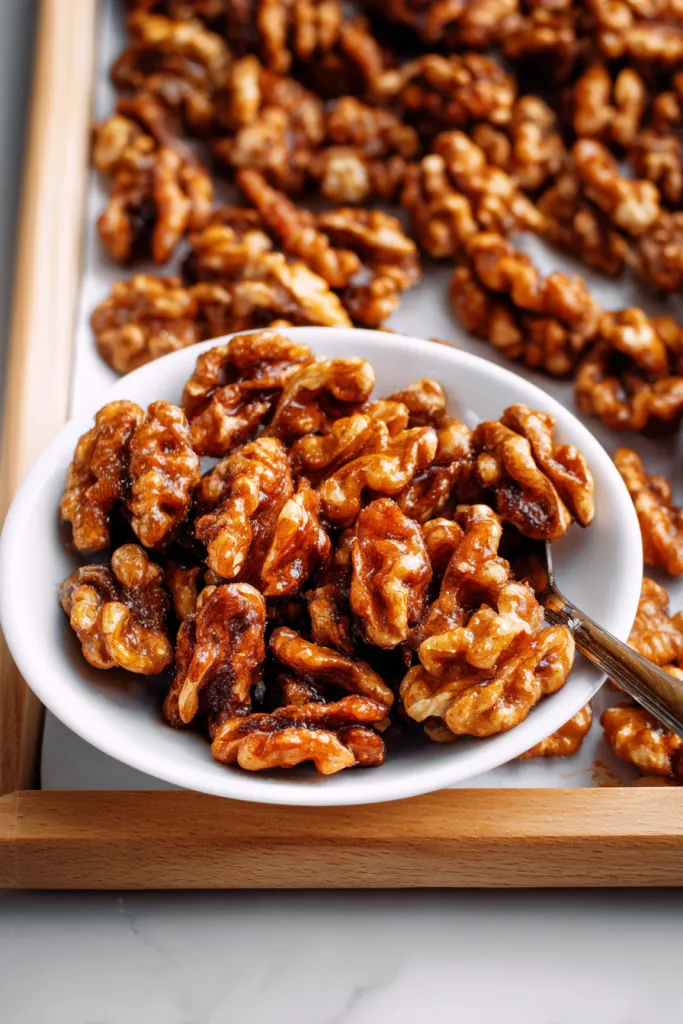
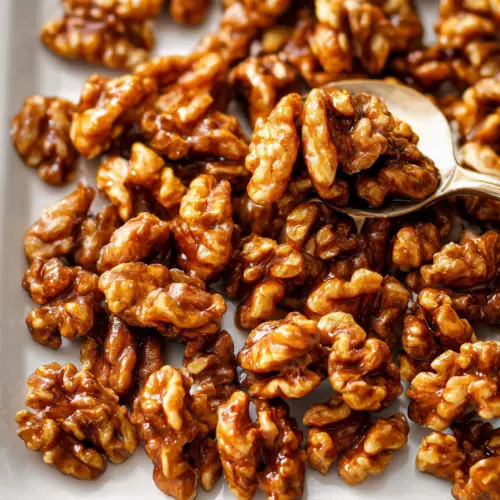
Step 5: Cool to Perfection Immediately transfer the candied walnuts to your prepared parchment-lined baking sheet. Use your spoon to separate any nuts that are sticking together. Spread them in a single layer and resist the urge to taste them immediately – they’re extremely hot and need about 10 minutes to cool and harden properly.
Cooking Tips for Success
The most common mistake I see people make is cooking over too high heat. Medium heat allows the sugar to caramelize gradually without burning. If your stove runs hot, don’t hesitate to reduce to medium-low.
Timing can vary slightly depending on your stove and pan, so watch the color rather than the clock. The nuts are done when they’re evenly golden and the sugar has stopped bubbling actively.
Serving Suggestions
Salad Perfection: These candied walnuts are my secret weapon for transforming simple salads into memorable dishes. I love them over mixed greens with goat cheese and dried cranberries, or scattered across a warm spinach salad with bacon. The sweet crunch provides the perfect contrast to bitter greens and tangy dressings.
Dessert Enhancement: I sprinkle these over vanilla ice cream, fold them into homemade granola, or use them as a topping for cheesecake. They also make an elegant addition to fruit and cheese boards, pairing beautifully with soft cheeses like brie or camembert.
Snacking & Entertaining: These nuts disappear quickly when I put them out during parties. I often make a double batch because guests can’t resist grabbing handful after handful. They’re sophisticated enough for cocktail parties yet familiar enough for casual gatherings.
Gift Giving: I package these in small mason jars with ribbon for teacher gifts, hostess presents, or holiday treats. They stay fresh for a week at room temperature, making them perfect for gift-giving occasions.
Creative Variations & Substitutions
Different Nuts: While I love walnuts, this technique works beautifully with pecans, almonds, or cashews. Pecans create an especially luxurious result, while almonds provide a more subtle flavor that pairs well with savory applications.
Spice It Up: During fall, I add ½ teaspoon of cinnamon to the sugar before cooking. For holiday batches, a pinch of nutmeg creates warmth and complexity. When I’m feeling adventurous, a tiny pinch of cayenne pepper adds an unexpected but delightful heat.
Sweetener Alternatives: While granulated sugar produces the best texture, I’ve successfully used brown sugar for a deeper, molasses-like flavor. Maple sugar creates an interesting variation, though it’s more expensive and can be harder to find.
Flavor Boosters: A splash of vanilla extract added during the last 30 seconds of cooking creates incredible depth. Sea salt sprinkled on the nuts while they’re still warm provides a sophisticated sweet-salty contrast.
Storage & Freshness
Room Temperature Storage: I store completely cooled candied walnuts in an airtight container at room temperature for up to one week. Glass jars work particularly well because they don’t absorb flavors and maintain crispness.
Extended Storage: For longer storage, I keep them in the refrigerator where they maintain quality for up to three weeks. The cold storage actually helps preserve their crunchiness.
Freezer Option: These nuts freeze beautifully for up to two months. I portion them into smaller containers so I can thaw just what I need. They thaw quickly at room temperature and maintain their texture perfectly.
Maintaining Crispness: The key to keeping candied walnuts crisp is ensuring they’re completely cool before storing and using truly airtight containers. Any moisture will make them lose their delightful crunch.

Frequently Asked Questions
Can I use other types of nuts? Absolutely! This recipe works wonderfully with pecans, almonds, cashews, or even mixed nuts. Pecans are my second favorite choice because they have a similar texture to walnuts and caramelize beautifully. Just maintain the same 1-cup measurement regardless of which nuts you choose.
Why do my nuts stick together, and how can I prevent it? Sticking usually happens when the nuts don’t cool properly or are stored while still warm. Always spread them in a single layer on parchment paper immediately after cooking, and separate any that try to clump together while they’re still warm but manageable. Complete cooling is essential for proper texture.
Can I add spices for extra flavor? Yes! Cinnamon is my go-to addition – I use about ½ teaspoon mixed with the sugar before cooking. Nutmeg, ginger, or even a pinch of cayenne pepper create interesting variations. Add spices to the sugar at the beginning so they distribute evenly and don’t burn.
What should I do if my sugar doesn’t caramelize properly? This usually happens due to insufficient heat or not stirring consistently. Make sure you’re using medium heat and stirring constantly once the butter begins to melt. If the mixture seems stuck, increase heat slightly, but watch carefully to prevent burning. Sometimes starting over with a clean pan is the best solution.
How long do candied walnuts actually last? When stored properly in an airtight container, they maintain peak quality for about a week at room temperature. I’ve successfully stored them for up to three weeks in the refrigerator and two months in the freezer. However, they’re usually consumed much faster than that in my household!
Are these candied walnuts gluten-free? Yes, this recipe is naturally gluten-free since it contains only walnuts, sugar, and butter. However, if you have severe gluten sensitivity, always verify that your ingredients haven’t been processed in facilities that also handle wheat products.
Final Thoughts
After making countless batches of these candied walnuts over the years, I can confidently say this recipe has earned its place as one of my most treasured go-to treats. The combination of simplicity, speed, and incredible results makes it perfect for both everyday snacking and special occasions.
What I love most about this recipe is how it transforms three humble ingredients into something that feels genuinely special. Whether I’m using them to elevate a weeknight salad or packaging them as thoughtful gifts, these candied walnuts never fail to impress. The fact that they come together in just five minutes means I can satisfy sudden cravings or last-minute entertaining needs without stress.
I encourage you to make this recipe your own by experimenting with different spices and applications. Once you master the basic technique, you’ll find endless ways to incorporate these sweet, crunchy gems into your cooking repertoire. Trust me – once you start making your own candied walnuts, you’ll never want to buy them from the store again.
Candied Walnuts
Ingredients
- 1 cup walnut halves or pieces
- ¼ cup granulated sugar
- 1 tablespoon unsalted butter room temperature
Instructions
- Prepare your workspace: Line a baking sheet with parchment paper and place it near the stove.
- Heat and combine: Place a non-stick skillet over medium heat. Add walnuts, sugar, and butter to the cold pan. Stir constantly as the ingredients heat together.
- The magic happens: Continue stirring until the butter melts and sugar starts dissolving, bubbling into a glossy caramelized coating.
- Watch for the perfect color: Stir for 3-5 minutes until the mixture reaches a golden amber color and the nuts are evenly coated.
- Cool to perfection: Immediately transfer the candied walnuts to the prepared baking sheet, spreading them in a single layer. Let them cool for about 10 minutes to harden.


