I’ll never forget the night I threw this recipe together.
It was one of those crazy weeknights. You know the type. I got home late, the kids were hungry, and ordering takeout felt like admitting defeat. Plus, my wallet was already crying from last week’s delivery habit.
So I opened my pantry and just… started experimenting.
What happened next? Pure magic.
This dish became our family’s most requested dinner. Not the fancy lasagna I spent hours on. Not grandma’s secret chicken recipe. This simple, throw-it-together noodle dish.
Here’s the thing about this recipe. It tastes like you ordered from that expensive Asian fusion place downtown. But it costs maybe $10 to make. And takes less time than waiting for delivery.
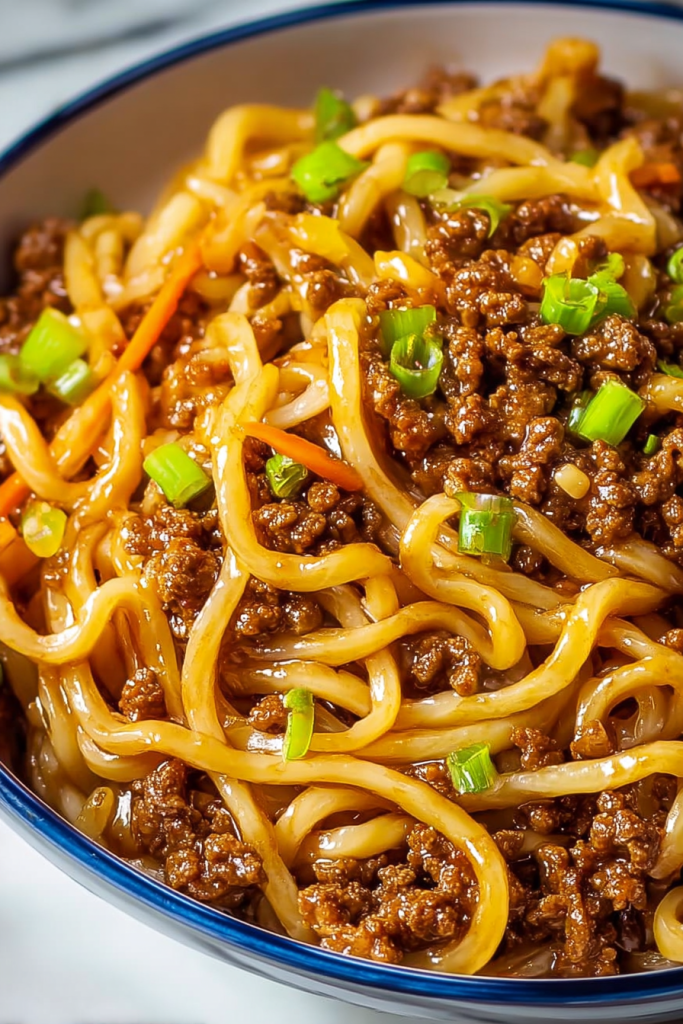
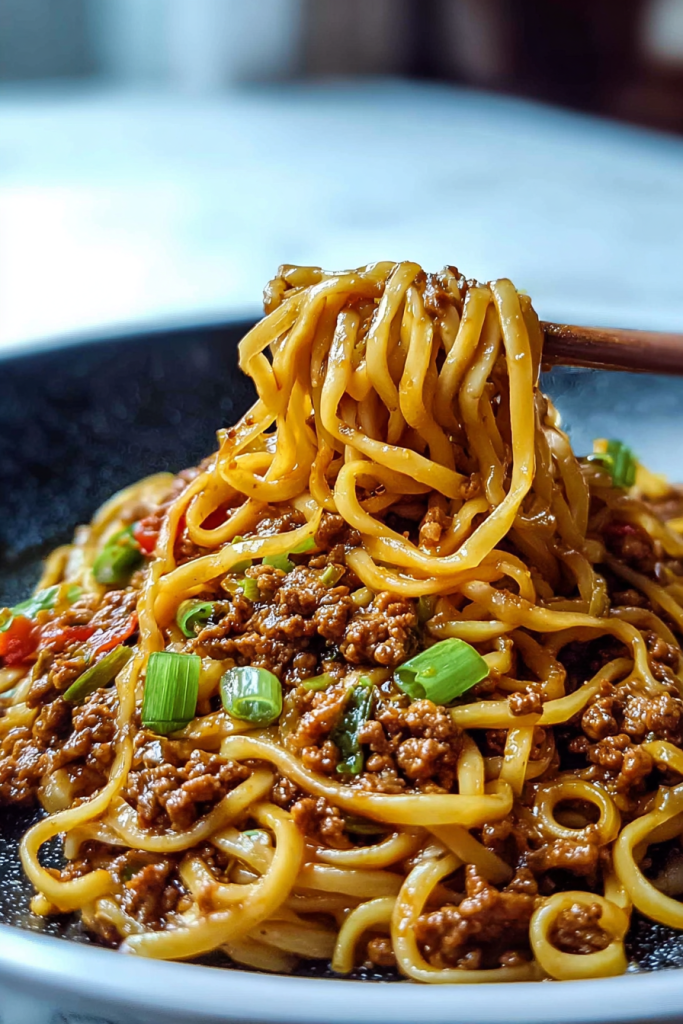
The sauce? It clings to every single noodle strand like it was meant to be there. The ground beef adds this hearty, protein-packed element that makes it feel like a real meal. And that balance of sweet and savory? Chef’s kiss.
Why You’ll Love This
Look, I’m not going to tell you this will change your life.
But it will change your weeknight dinners.
Here’s why this works so well:
- Takes less than 25 minutes start to finish
- Uses ingredients you probably already have
- Tastes better than takeout (seriously)
- Costs a fraction of restaurant prices
- Even cooking beginners nail it every time
The best part? It’s forgiving.
Too much soy sauce? No problem. Forgot the sesame seeds? Still delicious. Your measurements aren’t exact? Neither are mine half the time.
This recipe just works.
What You’ll Need
Okay, the ingredient list looks kinda long. I get it.
But check your pantry first. I bet you already have most of this stuff hiding in there.
| Ingredient | Quantity | Notes |
|---|---|---|
| Ground beef | 1 pound | Choose 85/15 for best flavor balance |
| Linguine pasta | 12 ounces | Any long noodle works well |
| Soy sauce | ⅓ cup | Low-sodium option reduces saltiness |
| Brown sugar | ¼ cup | Packed measurement for sweetness |
| Beef broth | ½ cup | Adds depth and helps create sauce |
| Fresh garlic | 4 cloves | Minced finely for even distribution |
| Ground ginger | ½ teaspoon | Fresh ginger also works beautifully |
| Hoisin sauce | 3 tablespoons | Provides authentic Asian flavor |
| Red pepper flakes | ½ teaspoon | Optional, adjust for heat preference |
| Black pepper | ½ teaspoon | Freshly ground tastes best |
| Cornstarch | 1 tablespoon | Essential for sauce thickening |
| Water | 2 tablespoons | For cornstarch slurry |
| Vegetable oil | 2 tablespoons | For cooking the beef |
| Green onions | 4 stalks | Sliced for fresh garnish |
| Sesame seeds | 1 tablespoon | Optional finishing touch |

Prep Time: 10 minutes | Cook Time: 15 minutes | Total Time: 25 minutes
Servings: 4 | Difficulty: Easy
A Quick Note About Ingredients
Let’s talk about the ground beef for a second.
I always use 85/15. That’s 85% lean, 15% fat. It gives you just enough fat for flavor without turning your skillet into a grease pool. Can you use leaner beef? Sure. But you’ll want to add a little extra oil.
The noodles? Linguine is my favorite here. Those flat strands catch the sauce like nothing else. But honestly? Use what you have. Spaghetti works. Fettuccine works. Even those leftover Asian noodles from last week’s stir-fry.
The key is surface area.
More surface area = more sauce clinging = more flavor in every bite.
Now, about that sauce trio…
Soy sauce brings the salty umami punch. Brown sugar adds this deep caramel sweetness. And hoisin sauce? That’s where the magic happens. It’s got this fermented soybean thing going on that just screams authentic Asian takeout.
One thing I’m not flexible on? Fresh garlic.
Please don’t use the jarred stuff. I know it’s convenient. I know it saves time. But trust me on this. Fresh garlic takes 60 seconds to mince and makes a world of difference. That aromatic punch you get when it hits the hot pan? Can’t replicate it with jar garlic.
Let’s Start Cooking
Alright, here’s where the fun begins.
Everything moves fast once you start. So do yourself a favor and prep everything first. Chop your garlic. Measure your sauces. Have it all lined up.
Ready? Let’s go.
Step 1: Get Your Water Boiling
Grab your biggest pot. Fill it with water. Add salt like you mean it. We’re talking a couple tablespoons here.
Bring it to a rolling boil over high heat.
Toss in your linguine. Cook it according to the package directions until it’s al dente. Usually 8-10 minutes.
Here’s the important part.
Before you drain that pasta, scoop out a cup of the cooking water. I use a coffee mug. Keep it nearby.
That starchy water? It’s liquid gold for adjusting your sauce later.

Step 2: Brown the Beef
While your pasta bubbles away, grab a large skillet or wok. Crank the heat to medium-high.
Add your vegetable oil. Wait until it shimmers. That’s when you know it’s ready.
Crumble in your ground beef. Break it up with a wooden spoon. Get it into small pieces.
Let it cook for 5-6 minutes. Stir occasionally, but not constantly. You want those crispy brown edges.
When there’s no pink left, you’re done. Drain off most of the fat, but leave about a tablespoon behind for flavor.
Step 3: Build the Aromatic Base
Drop in your minced garlic.
Stir it constantly for about 30 seconds. Your kitchen should start smelling incredible right about now.
Watch it carefully though. Garlic goes from perfect to burnt in like… 10 seconds. And burnt garlic tastes bitter. Not good.
Step 4: Create the Sauce
Time to dump everything in.
Pour in the soy sauce, beef broth, and hoisin sauce. Add the brown sugar, ground ginger, black pepper, and red pepper flakes.
Stir it all together. Let it bubble and simmer for 2-3 minutes.
The sauce will start reducing. Getting thicker. The flavors meld together into this beautiful harmony.

Step 5: Thicken to Perfection
Grab a small bowl. Add your cornstarch and cold water. Whisk it until smooth.
No lumps. This is important.
Pour this slurry into your skillet while stirring constantly.
Watch the magic happen. The sauce transforms right before your eyes. It becomes glossy. Thick. Restaurant-quality.
This takes 1-2 minutes max. That cornstarch creates that signature takeout texture we all love.
Step 6: Bring It All Together
Add your drained pasta straight into the skillet.
Grab some tongs or two forks. Toss everything together like you’re mixing a salad. Get aggressive with it.
Every strand of pasta needs to be coated in that sauce.
Too thick? Add splashes of your reserved pasta water. A little at a time.
The pasta should be glossy and well-coated. But not swimming in sauce.
Step 7: Final Touches
Kill the heat.
Let everything sit for 2-3 minutes. This resting time lets the noodles soak up the sauce flavors.
Scatter your sliced green onions over the top. Sprinkle with sesame seeds if you’re using them.
Done.
My Hard-Learned Cooking Tips
I’ve made this recipe probably 50 times now. Here’s what I’ve learned.
Temperature matters. Keep your heat at medium-high when browning the beef. Too low? Your meat steams instead of browns. Too high? You’ll burn the garlic later.
Cold water only for the cornstarch slurry. Hot water causes instant clumping. Nobody wants lumpy sauce.
Don’t overcook your pasta. Aim for al dente. It’ll keep softening when you toss it with the hot sauce. Mushy noodles ruin everything.
Taste before you commit. Before adding the noodles, taste your sauce. This is your last chance to adjust. Need more sweet? Add brown sugar. Want more depth? Splash in more soy sauce. Like it spicier? Red pepper flakes are your friend.
Mistakes I’ve Made (So You Don’t Have To)
The pasta water thing? I used to add it too early.
Big mistake.
Combine the noodles with the sauce first. Then see if you need extra liquid. Adding it too soon makes everything soupy and sad.
Another rookie move? Crowding the pan when browning beef.
If your skillet isn’t big enough, brown the meat in two batches. Overcrowding creates steam instead of that beautiful caramelization we’re after.
And that resting period at the end? Don’t skip it. I know you’re hungry. But those 2-3 minutes make a huge difference in how the flavors come together.
Ways to Mix It Up
This recipe is like a blank canvas.
Want it lighter? Swap ground beef for ground turkey or chicken. Just add an extra tablespoon of oil when cooking. You’ll cut calories but keep the flavor.
Love vegetables? Toss in snap peas, broccoli florets, bell pepper strips, or shredded carrots during the last 3-4 minutes of cooking. They’ll stay crisp-tender and add color.
Watching carbs? Use rice noodles, zucchini noodles, or shirataki noodles instead. Different textures, same great sauce.
Want more heat? Here’s your options:
- Add sriracha sauce at the end
- Drizzle with chili oil
- Double (or triple) the red pepper flakes
- Mix in some fresh minced chili peppers with the garlic
For a milder version? Just skip the pepper flakes entirely.
What to Serve Alongside
This dish stands on its own. It’s a complete meal in a bowl.
But sometimes I like to round things out. Here’s what works:
- Steamed edamame (my kids love these)
- Asian cucumber salad (cool and crunchy)
- Simple stir-fried vegetables
- Egg rolls from the grocery store
- Spring rolls (store-bought is totally fine)
For drinks? Iced green tea is perfect. That slight bitterness balances the sweet sauce beautifully.
Storing and Reheating
Good news. This keeps well.
Store leftovers in an airtight container for up to 4 days in the fridge. The noodles will soak up more sauce as they sit. Which actually makes the flavor more intense.
To reheat, add a few tablespoons of beef broth or water. This loosens the sauce back up.
Microwave option: Heat in 30-second bursts, stirring between each.
Stovetop option: Reheat in a skillet over medium-low heat with a splash of liquid. Stir frequently.
Meal prep tip: Cook the beef mixture and store it separately from fresh noodles. This prevents the pasta from getting too soft. Just combine them when you’re ready to eat.
Your Questions Answered
Can I use different types of noodles for this recipe?
Absolutely. Linguine is my favorite, but use what you have. Spaghetti? Great. Fettuccine? Perfect. Udon noodles? Even better. Rice noodles or authentic lo mein? You’ll feel fancy.
Each type brings a slightly different texture. But they all pair well with this sauce. Just follow the cooking times on your noodle package.
How can I make this dish less salty?
Use low-sodium soy sauce. Cut the amount from ⅓ cup down to ¼ cup. You can bump up the beef broth a little to maintain sauce volume.
Always taste before adding the noodles. That’s your adjustment window.
Remember, the cornstarch slurry dilutes the saltiness a bit when you add it.
What’s the best way to make this spicier?
Beyond just adding more red pepper flakes, try these:
- Fresh minced chili peppers (add them with the garlic)
- Sriracha drizzled on top at the end
- Chili garlic sauce mixed into the sauce
- Gochugaru (Korean red pepper flakes) for a different heat profile
Start small. You can always add more heat. Can’t take it away.
Can I prepare any components ahead of time?
Yes! Brown the beef and make the sauce up to 24 hours ahead. Store them together in the fridge.
When you’re ready to eat, just reheat the beef mixture. Cook fresh pasta. Combine.
You can also pre-chop your garlic and green onions earlier in the day. Saves time during the dinner rush.
My sauce turned out too thick – how do I fix it?
Easy fix. Thin it out with that reserved pasta water. Add a tablespoon at a time while stirring.
Beef broth works too.
The pasta water is actually better though. That starch helps the sauce cling to the noodles while loosening the texture.
My Final Thoughts
This recipe has earned its spot in my weekly rotation.
It’s one of those dishes I make when I’m tired. When money’s tight. When the kids are being picky. When I just need something that works.
The flavor tastes authentic. No specialty ingredients needed. No complicated techniques. Just straightforward cooking that delivers every single time.
The combination of sweet and savory? Perfect. The way the sauce coats every noodle? Satisfying. The fact that it costs maybe $10 and takes 25 minutes? Brilliant.
Whether you’re feeding picky eaters, sticking to a budget, or just need dinner fast… this recipe has your back.
The best part?
It tastes better than takeout. And costs a fraction of the price.
Try it tonight. I’m betting it becomes your new go-to weeknight dinner. Your family will be fighting over seconds before they finish their first bowl.
Trust me on this one.

Easy Ground Beef Noodles
Ingredients
- 1 pound ground beef 85/15 for best flavor balance
- 12 ounces linguine pasta any long noodle works well
- 1/3 cup soy sauce low-sodium option reduces saltiness
- 1/4 cup brown sugar packed measurement
- 1/2 cup beef broth
- 4 cloves fresh garlic minced finely
- 1/2 teaspoon ground ginger fresh ginger also works
- 3 tablespoons hoisin sauce
- 1/2 teaspoon red pepper flakes optional, adjust for heat preference
- 1/2 teaspoon black pepper freshly ground tastes best
- 1 tablespoon cornstarch essential for sauce thickening
- 2 tablespoons water for cornstarch slurry
- 2 tablespoons vegetable oil for cooking the beef
- 4 stalks green onions sliced for garnish
- 1 tablespoon sesame seeds optional finishing touch
Instructions
- Fill a large pot with water and add a couple tablespoons of salt. Bring to a rolling boil over high heat. Add linguine and cook according to package directions until al dente (8-10 minutes). Before draining, reserve 1 cup of pasta cooking water. Drain the pasta and set aside.
- While pasta cooks, heat vegetable oil in a large skillet or wok over medium-high heat until shimmering. Add ground beef and break it up with a wooden spoon into small pieces. Cook for 5-6 minutes, stirring occasionally, until no pink remains and edges are crispy. Drain off most of the fat, leaving about 1 tablespoon behind.
- Add minced garlic to the beef and stir constantly for 30 seconds until fragrant. Watch carefully to prevent burning.
- Pour in soy sauce, beef broth, and hoisin sauce. Add brown sugar, ground ginger, black pepper, and red pepper flakes. Stir everything together and let bubble and simmer for 2-3 minutes until sauce reduces and flavors meld.
- In a small bowl, whisk together cornstarch and cold water until smooth with no lumps. Pour this slurry into the skillet while stirring constantly. Continue stirring for 1-2 minutes until sauce becomes glossy and thick.
- Add drained pasta to the skillet. Using tongs or two forks, toss everything together until every strand is coated with sauce. If sauce is too thick, add reserved pasta water a tablespoon at a time until desired consistency is reached.
- Remove from heat and let rest for 2-3 minutes. Top with sliced green onions and sesame seeds. Serve immediately.