Hey friends. Welcome back to my kitchen. Today we are making a refreshing, vibrant lemon sorbet.
Have you ever bought sorbet from the store? You take a bite. Your heart drops. It tastes like artificial cleaners. That is definitely not what you want for a relaxing dessert.
The good news? You can easily make a beautiful lemon sorbet right at home. The homemade version is incredibly bright. It is perfectly sweet. And it is totally satisfying. You do not even need fancy equipment to get started. Don’t have an automatic churner? Do not worry. I will show you a simple method to get that perfect texture.
Sorbet is naturally dairy-free. It relies completely on fresh fruit. It contains more sugar than regular dairy desserts. But it has absolutely zero fat. The secret to success lies in balancing the sugar and water. Our basic formula is brilliantly simple. Water plus sugar plus flavor.
This ratio creates a magical frozen dessert every single time. Because you do not prepare a complicated custard base, the process is incredibly easy. Once you learn this basic recipe, you can experiment endlessly. You will feel like a professional pastry chef in your own home. Let us dive into this exciting citrus adventure together.
Making this dessert is an absolute joy. The bright aroma of fresh citrus will fill your kitchen. Nothing beats the crisp smell of freshly grated lemon zest. I recently tried a new technique for roasting lemons, and the smell instantly brought back fond memories of sunny summer afternoons. We will extract every ounce of flavor from our beautiful lemons today.
This easy recipe requires just four humble ingredients. You probably already have them sitting in your pantry. Water, white sugar, fresh juice, and fragrant zest make up our base. The sheer simplicity is what makes this recipe shine. Every spoonful bursts with pure, crisp citrus flavor.

I absolutely love serving this icy dessert after a heavy dinner. It acts as a fantastic palate cleanser. Because anytime someone loves your cooking, chances are they will:
- ask for the recipe
- share it with their friends
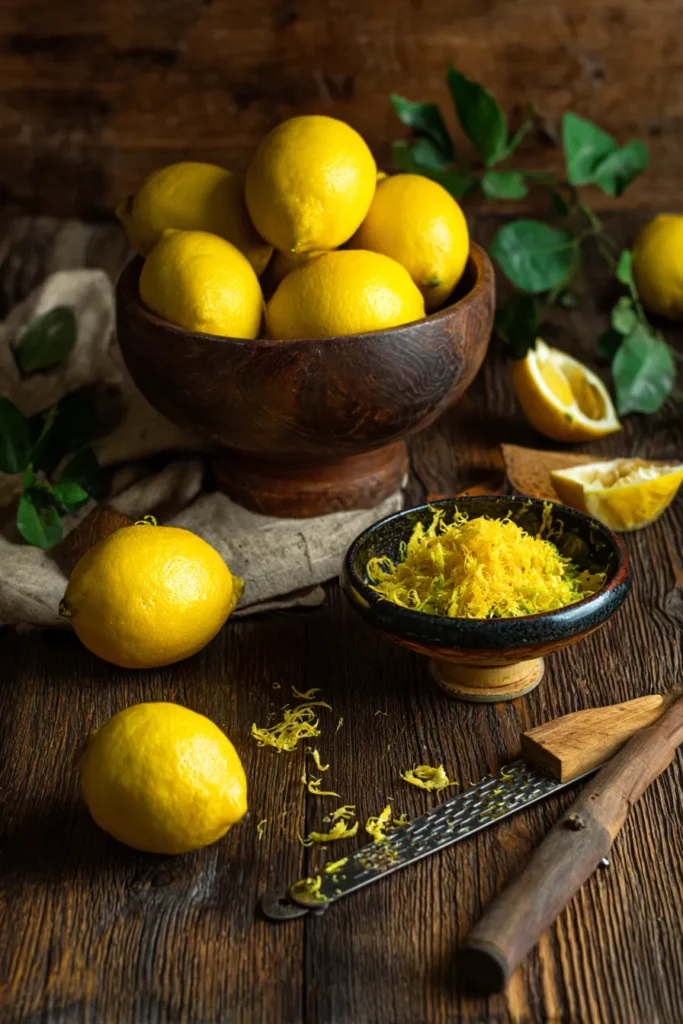
Choosing the right lemons is your first step to culinary success. Look for fruits that feel heavy for their size. Heavy lemons naturally yield the most juice. Their skins should be smooth, thin, and brightly colored. Avoid picking lemons with thick or rough rinds. Those contain far less juice. They also have significantly more bitter pith.
Rolling the lemons firmly on your counter helps immensely. This gentle pressure bursts the internal juice vesicles before you even cut them. You will extract much more liquid using this simple chef trick. Squeezing a cold lemon is harder than stealing candies from a baby. So use room temperature lemons. It increases your overall juice yield significantly.
A good quality handheld juicer saves time. But a simple kitchen fork works wonders if you are in a pinch. Just push the fork into the halved lemon. Twist firmly. This quickly releases the sweet juice into your bowl. Straining the juice removes any stray seeds or pulp. We want a perfectly smooth liquid for our elegant dessert base. Preparing your ingredients properly sets the stage for a great cooking experience.
Now let us gather our supplies. Having everything prepared in advance makes cooking smooth and enjoyable. This practice is called mise en place in the culinary world. It simply translates to putting everything in its right place. Measuring your ingredients accurately is absolutely crucial. Baking and dessert creation rely on exact scientific ratios. Here is exactly what you will need.
Prep Time: 10 minutes | Cook Time: 15 minutes | Total Time: 25 minutes | Servings: 4 | Difficulty: Easy
| Ingredient | Quantity | Notes |
| Water | 1 3/4 cups | Filtered water yields the purest taste |
| Sugar | 2 cups | Standard white granulated sugar works best |
| Lemon juice | 2 cups | Freshly squeezed; avoid bottled juice |
| Lemon zest | 1 to 2 tbsp | Freshly grated; avoid the bitter white pith |

Let us move directly to the actual cooking process. Creating the perfect simple syrup is our crucial first step. This cooked syrup ensures your dessert has a flawlessly smooth texture.
Place a small, heavy-bottomed saucepan over medium heat on your stove. Pour in your precisely measured water and granulated sugar. Stir the mixture gently. You want the sugar crystals to dissolve completely into the warm water. Slowly bring the clear liquid to a gentle, rolling boil. Let the syrup boil vigorously for exactly one minute. This brief boiling time is all you need to dissolve the sugar.
Remove the hot saucepan from the stove heat immediately. Allow this clear simple syrup to cool down completely to room temperature. Cooling the syrup thoroughly prevents the fresh lemon juice from cooking. Cooking the juice would drastically alter its bright, fresh taste. We want to preserve that raw, zesty profile at all costs.
Once the syrup reaches room temperature…
…the real fun finally begins.
Pour your freshly squeezed lemon juice into the cooled sugar syrup. Next, carefully fold in that beautiful, fragrant lemon zest. The zest carries potent essential oils. These oils pack a massive flavor punch. Gently whisk everything together until the liquid is fully combined.
Now it is time to freeze our wonderful citrus mixture. If you own an automatic churner, you are in luck. Pour the mixture directly into the pre-chilled churner bowl. Turn the machine on. Follow the manufacturer’s specific instructions carefully.
Churning introduces tiny air bubbles into the freezing sugar syrup. This continuous motion creates that delightfully light and scoopable texture we crave. When the mixture resembles soft, fluffy ice crystals, stop churning immediately. It will still look quite soft and slushy at this stage. Transfer the cold mixture into an airtight, freezer-safe storage container. Cover it tightly with a lid. Place it in your deep freezer. The dessert will solidify beautifully over the next few hours.

But what if you lack a dedicated churner at home? Do not panic. You can still achieve truly wonderful results. You do not strictly need fancy kitchen gadgets to make this. Simply pour the liquid mixture into a 9×13 metal baking pan. Place the uncovered metal pan directly into your cold freezer. Set a kitchen timer for exactly thirty minutes.
When the timer rings loudly…
…take the pan out carefully.
Use a sturdy silver fork to scrape the freezing edges vigorously. Mix those icy edges thoroughly into the softer liquid center. Return the pan to the freezer. Repeat this entire process. Do this manual scraping every half hour for about two to three hours.
This physical scraping breaks up large, stubborn ice crystals effectively. It cleverly mimics the constant motion of an automatic churning machine. Eventually, the mixture will become entirely firm, smooth, and fully scoopable. You have just successfully made a perfect frozen dessert entirely from scratch.
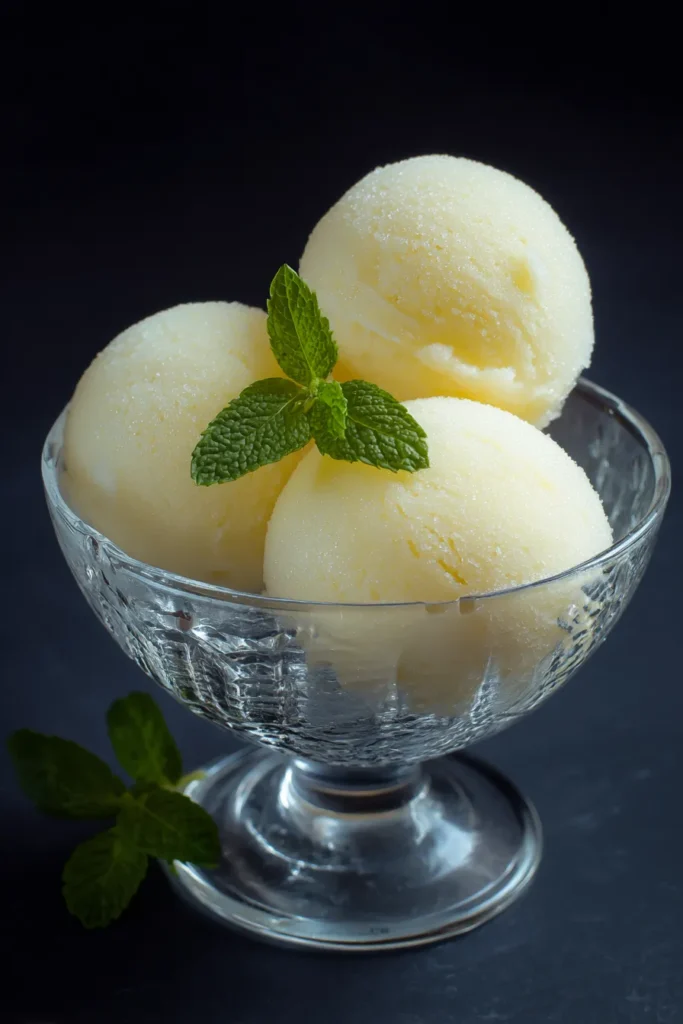
Serving your finished creation is a truly rewarding moment. I highly recommend letting the frozen container sit out for five minutes. This brief resting period allows the hard dessert to soften slightly. It makes scooping perfectly round balls much easier for you.
Use a heavy metal dessert scoop dipped in warm water. The heated metal glides effortlessly through the firm, icy texture. Serve the bright scoops in chilled glass bowls. This elegant presentation looks amazing. Chilling your bowls thoroughly prevents the dessert from melting too quickly.
You can easily garnish each serving with a fresh sprig of mint. A tiny, delicate curl of candied lemon peel also looks stunning. Some people even love serving this inside a hollowed-out lemon shell. That creative presentation always leaves a lasting impression on dinner guests.
Proper storage guarantees your cold dessert stays delicious for much longer. Always use a shallow, airtight container for optimal freezer storage. Press a small piece of parchment paper directly onto the frozen surface. This physical barrier prevents pesky ice crystals from forming on top.
Store the sealed container in the absolute coldest part of your freezer. Avoid keeping your homemade dessert in the freezer door at all costs. The door experiences constant temperature fluctuations when opened and closed repeatedly. These harmful temperature fluctuations can easily ruin that smooth, velvety texture. We worked hard for that texture. Let us protect it carefully.
As a chef, I frequently receive questions about this particular process. Making frozen desserts at home can seem slightly intimidating at first glance. However, understanding the basic science makes it an absolute breeze. I want to ensure you feel entirely confident in your kitchen. Here are some helpful answers to guide your personal culinary journey today. Let us address some common concerns you might have right now.
Frequently Asked Questions
Can I reduce the amount of sugar in this recipe?
Sugar is absolutely vital for both flavor and proper physical texture. It prevents the water content from freezing into a solid block. If you reduce the sugar significantly, the resulting texture becomes unpleasantly icy. It will be incredibly difficult to scoop out and enjoy properly. Following a reliable recipe guarantees the best possible consistency. I highly recommend sticking closely to the stated two cups of sugar. This specific ratio guarantees the absolute best possible mouthfeel and texture.
Can I substitute bottled lemon juice for fresh juice?
I strongly advise against using pre-packaged bottled citrus juice for this recipe. Bottled versions often contain harsh preservatives. These alter the pure, natural taste. They completely lack the vibrant brightness of freshly squeezed fruit. Squeezing fresh lemons admittedly takes a little bit of extra effort. However, the incredible final flavor upgrade is absolutely worth your precious time. Your taste buds will definitely thank you for using fresh fruit.
How long will this homemade dessert last in the freezer?
When stored properly in an airtight container, it lasts beautifully. You can safely keep it frozen for up to one entire month. After a month, the overall flavor quality begins to degrade slowly. It may also develop unwanted freezer burn over an extended time. Honestly, this dessert is so delicious that it rarely lasts that long. My family usually devours the entire batch within just two short days.
Do I really need to use the fresh lemon zest?
The zest is technically optional. But it is incredibly highly recommended by culinary professionals. It contains aromatic essential oils that elevate the entire dish dramatically. Zest adds a deep, complex citrus note. The juice alone simply lacks this depth. Just be extremely careful to only grate the yellow outer layer. The thick white pith underneath will make your entire batch taste horribly bitter. A good microplane grater makes this task incredibly quick and easy.
Can I add other flavorings to this basic base?
Absolutely. This recipe is a wonderful canvas for your culinary creativity. You can steep fresh herbs like basil or thyme in the hot syrup. Just remember to strain the herbs out before freezing the liquid. A tiny splash of pure vanilla extract also adds a lovely background note. Once you learn the base, feel free to experiment with different additions.
Thank you for joining me in the kitchen for this session today. I truly hope you thoroughly enjoy making this fantastic recipe. It is a timeless, refreshing classic that absolutely never fails to impress. This simple dessert proves that minimal ingredients can yield truly spectacular results. Happy cooking, and please enjoy every single sweet, refreshing bite.

Homemade Lemon Sorbet
Ingredients
Sorbet Base
- 1 3/4 cups water Filtered water yields the purest taste
- 2 cups white granulated sugar Standard works best
- 2 cups lemon juice Freshly squeezed; avoid bottled juice
- 1 – 2 tbsp lemon zest Freshly grated; avoid the bitter white pith
Instructions
- Place a small, heavy-bottomed saucepan over medium heat on your stove. Pour in the water and sugar, stirring gently until the sugar crystals dissolve.
- Bring the clear liquid to a gentle, rolling boil. Let it boil vigorously for exactly one minute to create a simple syrup.
- Remove from the heat immediately. Allow the syrup to cool completely to room temperature (this prevents the fresh juice from cooking and losing its bright flavor).
- Pour the freshly squeezed lemon juice into the cooled syrup. Gently whisk in the fragrant lemon zest until fully combined.
- Automatic Churner Method: Pour the mixture into a pre-chilled churner bowl. Follow the manufacturer’s instructions and churn until it resembles soft, fluffy ice crystals. Transfer to an airtight container and freeze until completely solid.
- No-Churn Method: Pour the liquid into a 9×13 metal baking pan and freeze. Set a timer for 30 minutes. Vigorously scrape the freezing edges into the softer center using a sturdy fork. Repeat this scraping process every 30 minutes for 2 to 3 hours until completely firm and scoopable.
- Let the container sit at room temperature for 5 minutes before serving to soften slightly. Scoop with a warm metal dessert spoon and serve in chilled glass bowls.