

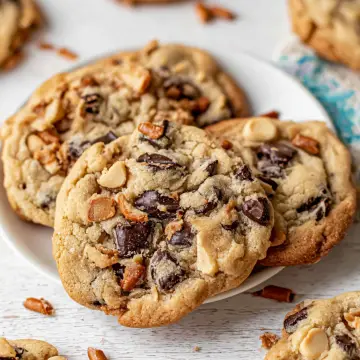
Kitchen Sink Cookies are the ultimate sweet and salty treat that truly lives up to their name. I’ve packed these soft, chewy cookies with chocolate chips, toffee bits, pretzels, and potato chips. Yes, you read that right—potato chips! Every bite delivers an exciting combination of textures and flavors that keeps you reaching for more.
I first discovered this recipe when I was looking for something special to bring to a cookie exchange. I wanted cookies that would stand out from the usual chocolate chip varieties. When I saw a version with potato chips, I was skeptical. But after one bite, I was completely hooked.

These cookies have become my go-to for every occasion. I’ve brought them to potlucks, bake sales, and family gatherings. They always disappear first. The sweet toffee bits balance perfectly with the salty crunch of pretzels and potato chips. The chocolate chips add richness that ties everything together.
What I love most about Kitchen Sink Cookies is their versatility. You can use whatever mix-ins you have on hand. I’ve experimented with different chocolate varieties, various nuts, and even crushed cereal. Each version turns out delicious in its own way.
The texture of these cookies is absolutely perfect. They’re soft and chewy in the center with slightly crisp edges. The crushed potato chips add an unexpected crunch that surprises everyone who tries them. People always ask what makes these cookies so special. When I tell them about the potato chips, they’re amazed.
I make these cookies at least twice a month. My kids request them constantly, and I never get tired of baking them. The dough comes together quickly, which is perfect for busy weeknights. I often double the batch and freeze half the dough for later.

One of my favorite tricks is rolling the dough balls in extra mix-ins before baking. This creates a beautiful presentation that showcases all the delicious ingredients inside. It’s especially nice when you’re giving these cookies as gifts or bringing them to special events.
The combination of sweet and salty is what makes these cookies truly addictive. The brown sugar creates a deep, caramel-like sweetness. The white sugar adds the perfect amount of crispness to the edges. Together, they create a balanced flavor that isn’t too sweet.
I always keep the ingredients for these cookies on hand. They’re incredibly forgiving, which makes them perfect for beginner bakers. Even if you’re new to cookie baking, you’ll have success with this recipe. The simple technique ensures consistent results every time.
Trust me when I say these Kitchen Sink Cookies will become your new favorite. They’re fun to make, exciting to eat, and perfect for sharing. Let’s dive into how to make these amazing cookies!
Recipe Details & Instructions
Ingredients Table
| Ingredient | Quantity | Notes |
|---|---|---|
| All-Purpose Flour | 2 cups (250 grams) | Measured correctly by spooning into cup |
| Baking Soda | 1 teaspoon | Fresh for best rise |
| Kosher Salt | 1/2 teaspoon | Diamond Crystal brand recommended |
| Unsalted Butter | 2 sticks (1 cup) | Softened to room temperature |
| Light Brown Sugar | 3/4 cup (150 grams) | Packed firmly when measuring |
| White Sugar | 1/2 cup (100 grams) | Granulated sugar |
| Large Egg | 1 | Room temperature preferred |
| Pure Vanilla Extract | 2 teaspoons | Use real vanilla, not imitation |
| Semi-Sweet Chocolate Chips | 1 1/2 cups | Can substitute milk chocolate |
| Toffee Bits | 1 cup | Heath Bits o’ Brickle recommended |
| Crushed Potato Chips | 1 cup | Ruffles work perfectly |
| Chopped Pretzels | 1/2 cup | Small pretzel twists, roughly chopped |
| Flaky Sea Salt | 1/2 teaspoon | Optional topping; Maldon brand suggested |
Recipe Timing: Prep Time: 10 minutes | Cook Time: 15 minutes | Total Time: 25 minutes
Servings: 24 cookies | Difficulty: Easy
Step-by-Step Instructions
Prepare Your Workspace
First, preheat your oven to 350°F. Line two baking sheets with parchment paper or silicone baking mats. This prevents sticking and ensures even baking. The toffee bits can melt and create sticky spots without proper lining.
Mix the Dry Ingredients
In a medium bowl, whisk together the flour, baking soda, and salt. Set this aside. Whisking ensures the leavening agents distribute evenly throughout the dough. This step takes just 30 seconds but makes a big difference.
Cream the Butter and Sugars
In a large bowl or stand mixer, beat the softened butter with both sugars. Continue beating for about 3 minutes until the mixture becomes light and fluffy. This process incorporates air, which creates a softer cookie texture. The mixture should look pale and creamy.
Pro tip: Make sure your butter is truly softened. It should leave an indent when pressed but not be melted. Room temperature butter creams better with the sugars.
Add Wet Ingredients
Beat in the egg and vanilla extract until fully combined. The mixture might look slightly separated at first. Keep mixing until it becomes smooth and unified. This usually takes about 1 minute.
Combine Wet and Dry
Add the flour mixture to the butter mixture. Mix on low speed just until the flour disappears. Stop mixing as soon as you don’t see any dry flour streaks. Overmixing develops gluten, which creates tough, cakey cookies instead of soft ones.

Fold in the Mix-Ins
Using a sturdy spoon or spatula, fold in the chocolate chips, toffee bits, crushed potato chips, and chopped pretzels. Make sure everything distributes evenly throughout the dough. I like to reserve a few tablespoons of each mix-in for rolling the dough balls.
Shape the Cookies
Scoop the dough into golf ball-sized portions. These should be generous—about 3 tablespoons of dough each. Roll them between your palms to create smooth balls. For extra visual appeal, roll the outside in reserved mix-ins.
Space the dough balls about 3 inches apart on your prepared baking sheets. They spread during baking, so give them room. I usually fit 6 cookies per standard sheet.
Bake to Perfection
Bake for 10 to 12 minutes. The edges should look set and lightly golden. The centers will still appear soft and slightly underdone. This is exactly what you want! The cookies continue cooking on the hot pan after removal.
Let the cookies cool on the baking sheet for 5 minutes. This cooling time allows them to firm up enough for transfer. Then move them to a wire cooling rack. If desired, sprinkle with flaky sea salt while still warm.
The cookies taste amazing both warm and at room temperature. I can never resist eating one straight from the oven!
Tips, Storage & FAQs
Pro Tips for Perfect Kitchen Sink Cookies
Measure Mix-Ins Carefully
The ratio of mix-ins to dough matters for texture and structure. I use exactly 1 1/2 cups chocolate chips, 1 cup toffee bits, 1 cup crushed potato chips, and 1/2 cup pretzels. Too many mix-ins cause the cookies to fall apart.
Don’t Overbake
These cookies continue baking on the hot pan after you remove them from the oven. Pull them out when centers still look soft. They’ll firm up as they cool. Overbaked cookies become dry and crunchy rather than soft and chewy.
Use Quality Potato Chips
I prefer regular Ruffles potato chips for their sturdy ridges. They maintain some texture even after baking. Avoid kettle-cooked chips—they’re too thick and stay too crunchy. Thin chips integrate better into the dough.

Storage Instructions
Store completely cooled cookies in an airtight container at room temperature. They stay fresh for up to 5 days. Place parchment paper between layers to prevent sticking. The toffee bits can make cookies stick together if stacked directly.
For longer storage, freeze baked cookies for up to 3 months. Wrap individual cookies in plastic wrap, then place in a freezer bag. Thaw at room temperature for about 30 minutes before serving.
Freezing Cookie Dough
I always make a double batch and freeze half the dough. It’s incredibly convenient for last-minute cravings or unexpected guests. Here’s my method:
Roll the dough into balls and place them on a parchment-lined baking sheet. Freeze until solid, about 2 to 3 hours. Transfer frozen dough balls to a freezer-safe bag. Remove as much air as possible before sealing.
Frozen dough lasts up to 6 months. Bake directly from frozen at 325°F for 16 to 18 minutes. The lower temperature prevents burnt edges while ensuring the center cooks through.
Frequently Asked Questions
Can I use salted butter instead of unsalted?
Yes, but skip the added kosher salt in the recipe. Salted butter contains enough salt already. I prefer unsalted butter because it gives me better control over the final saltiness.
What if I don’t have toffee bits?
You can substitute chopped Heath bars, butterscotch chips, or even peanut butter chips. Each option creates a slightly different flavor profile. I’ve also used chopped caramels with great results.
Can I make these gluten-free?
I haven’t tested this recipe with gluten-free flour. However, readers have reported success using 1-to-1 gluten-free baking flour. Make sure it contains xanthan gum for proper structure.
Why are my cookies spreading too much?
This usually happens when the dough is too warm. Chill the dough for 30 minutes before baking. Also, make sure your baking sheets aren’t hot when you place the dough on them.
Can I skip the potato chips?
Absolutely! Replace them with an equal amount of chopped nuts, more pretzels, or additional chocolate chips. The cookies will still taste fantastic. The potato chips add unique texture, but they’re not essential.
Mix-In Variations
Feel free to customize these cookies with your favorite ingredients. I’ve successfully used crushed cornflakes, shredded coconut, chopped pecans, white chocolate chips, and even mini marshmallows. The possibilities are truly endless!
These Kitchen Sink Cookies prove that the best recipes often come from creative experimentation. Enjoy baking and sharing these delicious treats!
Kitchen Sink Cookies
Ingredients
- 2 cups 250 grams All-Purpose Flour (measured correctly by spooning into cup)
- 1 teaspoon Baking Soda fresh for best rise
- 1/2 teaspoon Kosher Salt Diamond Crystal brand recommended
- 2 sticks 1 cup Unsalted Butter (softened to room temperature)
- 3/4 cup 150 grams Light Brown Sugar (packed firmly when measuring)
- 1/2 cup 100 grams White Sugar (granulated sugar)
- 1 Large Egg room temperature preferred
- 2 teaspoons Pure Vanilla Extract use real vanilla, not imitation
- 1 1/2 cups Semi-Sweet Chocolate Chips can substitute milk chocolate
- 1 cup Toffee Bits Heath Bits o’ Brickle recommended
- 1 cup Crushed Potato Chips Ruffles work perfectly
- 1/2 cup Chopped Pretzels small pretzel twists, roughly chopped
- 1/2 teaspoon Flaky Sea Salt optional topping; Maldon brand suggested
Instructions
- Prepare Your Workspace
- Preheat your oven to 350°F. Line two baking sheets with parchment paper or silicone baking mats.
- Mix the Dry Ingredients
- In a medium bowl, whisk together the flour, baking soda, and salt. Set aside.
- Cream the Butter and Sugars
- In a large bowl or stand mixer, beat the softened butter with both sugars for about 3 minutes until the mixture becomes light and fluffy.
- Add Wet Ingredients
- Beat in the egg and vanilla extract until fully combined, about 1 minute.
- Combine Wet and Dry
- Add the flour mixture to the butter mixture. Mix on low speed just until the flour disappears.
- Fold in the Mix-Ins
- Using a sturdy spoon or spatula, fold in the chocolate chips, toffee bits, crushed potato chips, and chopped pretzels until evenly distributed.
- Shape the Cookies
- Scoop the dough into golf ball-sized portions (about 3 tablespoons each). Roll them between your palms to create smooth balls. Space the dough balls about 3 inches apart on prepared baking sheets (6 cookies per sheet).
- Bake to Perfection
- Bake for 10 to 12 minutes until edges are set and lightly golden, with centers still appearing soft.
- Let cookies cool on the baking sheet for 5 minutes, then transfer to a wire cooling rack. Sprinkle with flaky sea salt while still warm if desired.
Notes
Storage: Store in an airtight container at room temperature for up to 5 days. Place parchment paper between layers to prevent sticking.
Freezing Dough: Roll dough into balls, freeze on a baking sheet until solid (2-3 hours), then transfer to freezer bag. Bake from frozen at 325°F for 16-18 minutes. Dough lasts up to 6 months.
Freezing Baked Cookies: Wrap individual cookies in plastic wrap, place in freezer bag. Store up to 3 months. Thaw at room temperature for 30 minutes.
Butter Temperature: Make sure butter is truly softened (leaves an indent when pressed) but not melted for best results.
Mix-In Ratio: Use exact measurements for proper texture and structure. Too many mix-ins cause cookies to fall apart.
Substitutions: Can replace toffee bits with chopped Heath bars, butterscotch chips, or peanut butter chips. Can replace potato chips with chopped nuts or more pretzels.


